Spray cans get upturned noses on the internet. This is probably partly due old style can nozzles, trying to paint large panels, or just basic poor attempts at painting. My recent experience is that at least for something small like a tank or side cover you can get a finish with cans that's potentially better than what you'd get if you took it to a professional. I say better, because you can give as much attention as you want to the gloss and levelness of the paint.
What I know is in large part from this series of videos on youtube. I picked up useful bits of information from lots of other places before I started.
I started with the side covers, on the theory that inexperience would be less obvious than if it was on the tank. Then I proceeded to use the experience while doing the tank.
The side covers were plastic and very rough, maybe 15% dents and chips and loose paint. I used 220 grit wet paper to sand them. All sanding was wet. I didn't pay attention to getting off the old paint unless it was loose. I used a homemade small block to help sand dents out. Without a block there's a tendency to sand inside the dents, defeating the purpose. The next step was was to use Duplicolor high build brown primer. Give it a couple of extra shots where remnants of dents still remain. Sand with about 600 grit, rinse, and let dry. Repeat the priming and sanding until you're satisfied with the surface. Allow .5 to 1 hr between priming and sanding. There's no need for any blending sanding, because of the primer's thickness. New coats of primer will help you see any irregularities.
When you're satisfied, next comes color. I used Duplicolor Perfect Match Dark Cherry Metallic, supposedly a "perfect match" to the GM color of the same name. Start the spray past one end of the work and move it quickly across, and then past the the other end of the work, and go back the other direction. Overlap about 50% as you move up. Maintain a distance of about 9" from the work. The color will look very dull, and maybe mottled as well. That's ok, we're putting on the metallic paint "dry". Give it several coats about 1/2 hr apart, until the color is uniform. The surface reflectivity doesn't have to be uniform, but the density of color should be. Don't sand between coats of color. If the final color coat is very rough, give it a light sanding with about 800 grit, and then follow that with a final coat that you don't sand. You don't want to sand the final coat of metallic color.
Break out the Duplicolor Perfect Match clear. Give it about two or three coats, wait 1/2 hr, and sand with 800 grit then rinse and dry. For this sanding I made pads of corrugated cardboard cut from a box and wrapped the sand paper around it. When it's wet it conforms to the curves while still distributing your finger pressure. Don't sand into the color. Don't sand raised areas or edges or you will go through the clear. Repeat this process until the shiny spots where the sand paper doesn't hit disappear. The objective with the repeated clear and sanding is to eliminate those small spots - build up the finish, sand it down as much as you dare without hitting the color, then repeat, until the spots are gone. When the spots are gone to your satisfaction, give it one final coat of clear. If you sanded through to color, it's not a big deal, just apply more color if needed, followed by clear and sanding to that place.
Let the final clear dry two or three days. Now comes the fun part. The irregularities will all disappear and you will get a uniform mirror shine. This is where shortcomings due to spray cans disappear. Get some 2000 grit paper, it must be 2000 grit, and begin sanding the final coat of clear using the cardboard pad. Rinse occasionally. When it is all sanded and the spots are gone, give a thorough rinse. Break out the Turtle Wax Rubbing Compound. Cut a piece of bath towel and wrap it around a cardboard pad. Use the rubbing compound until the surface won't get any shinier. This will take maybe 20 minutes with a side cover. Rinse it very thoroughly. Now switch to Turtle Wax Polishing Compound. You do not want to get rubbing compound mixed with the polishing compound so use a fresh piece of towel and pad. Polish until it is shiny as it will get with this compound, about another 20 min. If you want you can follow this with Turtle Wax swirl remover, for an ultimate shine.
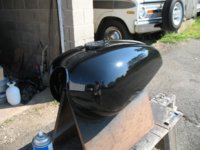
The Tank.
The tank is basically the same but there are a few differences. I didn't go to bare metal because I didn't want to invite adhesion problems. I prepared the existing finish and painted it, the way they would paint your car.
For the chips in the tank paint, I used a putty knife and enlarged them until the paint became hard to remove. Some tiny chips turned into some quarter size ones that way as I got the loose paint off. But it was the paint separating from the primer, with most of the primer remaining on the tank still. I followed up with high build primer on the chips. I used a rigid block to sand those areas made from a little slat of wood like you could break off of a ruler. Prime, sand, repeat until the chips are filled. Then give the whole thing a good coat of primer, and begin with color as before.
Ah - taping off the tank. Put masking tape where the petcock goes, extending outside of where the o-ring goes, to keep gas away from the paint. Tape the filler opening about 1/8" down from the top of the opening.
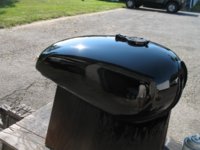
Continue with the clear as on the side covers. For the final clear you will probably want to use fuel proof clear. I used Spraymax 2k, which was interesting stuff. I used Duplicolor clear for the first clear layers on the tank to build it up at less expense. When you get ready for fuel proof clear, remove the tape from the filler and re-tape it with the tape straight across the opening. This will help prevent fuel from getting under the clear.
With the Spraymax, I put the tank upside down and sprayed several coats a few minutes apart on the bottom. I let it dry a couple of hours and then forgot about the bottom and put it on a box on my stand, so that it was only in contact with four points. I used a whole can on the tank with about maybe 15 minutes between coats. There was enough for five or six coats. There was a lot of orange peel, not overspray but uniform orange peel which I wasn't expecting. Not chemical reaction, just something to do with application.
The next day, the Spraymax was about as hard as the lacquer had been, so I did final sanding and polishing on it, exactly the same as with the side covers. The Spraymax is so hard now a couple of weeks later, that it might be hard to sand and polish.
The Turtle Wax products work with hand polishing. Some other brands are only good for machine.
When ready to remove the tape from where the petcock was, cut it around the periphery first, so it won't tear the clear.
So, nothing wrong with cans if you do it right. No reason to feel like second class citizens. Smooth and shiny is smooth and shiny, no way to tell whether it came from a can or a gun. I think it was probably under $75.
What I know is in large part from this series of videos on youtube. I picked up useful bits of information from lots of other places before I started.
I started with the side covers, on the theory that inexperience would be less obvious than if it was on the tank. Then I proceeded to use the experience while doing the tank.
The side covers were plastic and very rough, maybe 15% dents and chips and loose paint. I used 220 grit wet paper to sand them. All sanding was wet. I didn't pay attention to getting off the old paint unless it was loose. I used a homemade small block to help sand dents out. Without a block there's a tendency to sand inside the dents, defeating the purpose. The next step was was to use Duplicolor high build brown primer. Give it a couple of extra shots where remnants of dents still remain. Sand with about 600 grit, rinse, and let dry. Repeat the priming and sanding until you're satisfied with the surface. Allow .5 to 1 hr between priming and sanding. There's no need for any blending sanding, because of the primer's thickness. New coats of primer will help you see any irregularities.
When you're satisfied, next comes color. I used Duplicolor Perfect Match Dark Cherry Metallic, supposedly a "perfect match" to the GM color of the same name. Start the spray past one end of the work and move it quickly across, and then past the the other end of the work, and go back the other direction. Overlap about 50% as you move up. Maintain a distance of about 9" from the work. The color will look very dull, and maybe mottled as well. That's ok, we're putting on the metallic paint "dry". Give it several coats about 1/2 hr apart, until the color is uniform. The surface reflectivity doesn't have to be uniform, but the density of color should be. Don't sand between coats of color. If the final color coat is very rough, give it a light sanding with about 800 grit, and then follow that with a final coat that you don't sand. You don't want to sand the final coat of metallic color.
Break out the Duplicolor Perfect Match clear. Give it about two or three coats, wait 1/2 hr, and sand with 800 grit then rinse and dry. For this sanding I made pads of corrugated cardboard cut from a box and wrapped the sand paper around it. When it's wet it conforms to the curves while still distributing your finger pressure. Don't sand into the color. Don't sand raised areas or edges or you will go through the clear. Repeat this process until the shiny spots where the sand paper doesn't hit disappear. The objective with the repeated clear and sanding is to eliminate those small spots - build up the finish, sand it down as much as you dare without hitting the color, then repeat, until the spots are gone. When the spots are gone to your satisfaction, give it one final coat of clear. If you sanded through to color, it's not a big deal, just apply more color if needed, followed by clear and sanding to that place.
Let the final clear dry two or three days. Now comes the fun part. The irregularities will all disappear and you will get a uniform mirror shine. This is where shortcomings due to spray cans disappear. Get some 2000 grit paper, it must be 2000 grit, and begin sanding the final coat of clear using the cardboard pad. Rinse occasionally. When it is all sanded and the spots are gone, give a thorough rinse. Break out the Turtle Wax Rubbing Compound. Cut a piece of bath towel and wrap it around a cardboard pad. Use the rubbing compound until the surface won't get any shinier. This will take maybe 20 minutes with a side cover. Rinse it very thoroughly. Now switch to Turtle Wax Polishing Compound. You do not want to get rubbing compound mixed with the polishing compound so use a fresh piece of towel and pad. Polish until it is shiny as it will get with this compound, about another 20 min. If you want you can follow this with Turtle Wax swirl remover, for an ultimate shine.
The Tank.
The tank is basically the same but there are a few differences. I didn't go to bare metal because I didn't want to invite adhesion problems. I prepared the existing finish and painted it, the way they would paint your car.
For the chips in the tank paint, I used a putty knife and enlarged them until the paint became hard to remove. Some tiny chips turned into some quarter size ones that way as I got the loose paint off. But it was the paint separating from the primer, with most of the primer remaining on the tank still. I followed up with high build primer on the chips. I used a rigid block to sand those areas made from a little slat of wood like you could break off of a ruler. Prime, sand, repeat until the chips are filled. Then give the whole thing a good coat of primer, and begin with color as before.
Ah - taping off the tank. Put masking tape where the petcock goes, extending outside of where the o-ring goes, to keep gas away from the paint. Tape the filler opening about 1/8" down from the top of the opening.
Continue with the clear as on the side covers. For the final clear you will probably want to use fuel proof clear. I used Spraymax 2k, which was interesting stuff. I used Duplicolor clear for the first clear layers on the tank to build it up at less expense. When you get ready for fuel proof clear, remove the tape from the filler and re-tape it with the tape straight across the opening. This will help prevent fuel from getting under the clear.
With the Spraymax, I put the tank upside down and sprayed several coats a few minutes apart on the bottom. I let it dry a couple of hours and then forgot about the bottom and put it on a box on my stand, so that it was only in contact with four points. I used a whole can on the tank with about maybe 15 minutes between coats. There was enough for five or six coats. There was a lot of orange peel, not overspray but uniform orange peel which I wasn't expecting. Not chemical reaction, just something to do with application.
The next day, the Spraymax was about as hard as the lacquer had been, so I did final sanding and polishing on it, exactly the same as with the side covers. The Spraymax is so hard now a couple of weeks later, that it might be hard to sand and polish.
The Turtle Wax products work with hand polishing. Some other brands are only good for machine.
When ready to remove the tape from where the petcock was, cut it around the periphery first, so it won't tear the clear.
So, nothing wrong with cans if you do it right. No reason to feel like second class citizens. Smooth and shiny is smooth and shiny, no way to tell whether it came from a can or a gun. I think it was probably under $75.
") In my case it wasn't necessary to strip it at all, but at first I thought it would make it easier. It was easy enough without it.
In my case it wasn't necessary to strip it at all, but at first I thought it would make it easier. It was easy enough without it.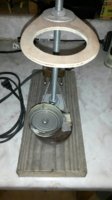
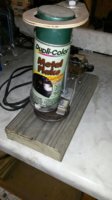
 . defiantly should go in the unique tool thread