Reseal, Rebuild or Resize?

reseal, rebuild or big bore?

  • reseal

    Votes: 0 0.0%
  • rebuild

    Votes: 0 0.0%
  • big bore

    Votes: 0 0.0%

  • Total voters
    0
And are these bikes sensitive to the weather more than most? Especially heat(100 plus degrees)?
Not really... at least mine isn't. Idle might get a little finicky when it's real hot out, but other than that, no.
Do you think putting the front fender back on would help in the twisties? This bike definiteately doesn't inspire confidence on more challenging turns/uneven pavement. If not, any recommendations on braces(or other solutions?)
No recommendations, but yeah, fender or brace is absolutely necessary if you're gonna be crankin' it 'round the twisties.
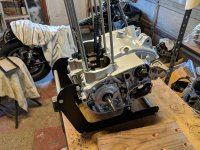
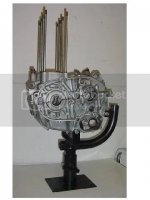
Also, what's your favorite engine stand(s) for this? That is something I will definitely need.
I use a wood block for upside down work and made my own for head work. MikesXS sells one like mine but I've read that they don't fit real good.... dunno... never used theirs. Have a read here.
8.jpg 9.jpg 10.jpg

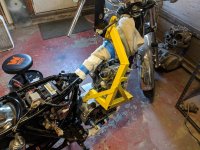
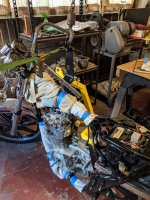
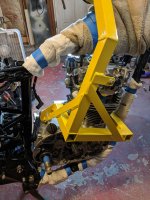
And I do have a cherry picker but not sure how/if I could postion that to pull the bike engine?

There's lots of variations out there for a cherry picker. Here's mine.

1.jpg 2.jpg 3.jpg
 
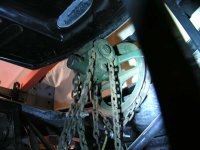
For lifting the engine in & out, I use a chain and pulley from the roof timbers, and pass a judo belt under the engine, front to back and tied above the cylinder head, as a sling to lift with. This has worked well enough. But I don't have welding facilities or skills like Jim.
 
Yes, you will want to pull the jugs off. You have to when installing a new front guide to insure it is mounted straight. There is some play in the mounting bolt holes and the guide can be installed crooked. Then the chain won't run straight on it and it will cut into one of the lips on the sides. To insure it's straight up and down, and centered, you need to measure over to it from both sides of the tunnel, and you must do this where it sticks out at the top and at the bottom .....

o0c8evP.jpg


Here's a link to an engine stand thread. It has mostly bench top versions, but there are a couple like you're looking for .....

http://www.xs650.com/threads/cleaner-engine-stand-plans.703/

To split the motor cases on one of these, the engine needs to be flipped upside down. That's how it's done. The bottom case half is lifted off and all the gears and the crank remain sitting in the upper case half. But, if your mileage is as low as indicated, you shouldn't need to go into the bottom end, just do the top end.
 
I'm surprised 5T didn't post his pride and joy flip stand...post #244 and #246.........
http://www.xs650.com/threads/homemade-and-unique-tools.37/page-13#post-426061

Already posted a link to porting.......here is another..... Make sure to read the do and don't s. It's not really a porting job as in the true sense of Car porting and polishing. The ports are already large so its a matter of cleaning up the casting marks and maybe some work around the valve stem guide to smooth out the flow. Taking out more of the port is usually detrimental to performance..........jack has done a lot of work in this area

http://www.xs650.com/threads/anyone-here-ever-done-a-port-and- polish.5833


yes i do have a lot of bookmarks....... There is a Tech menu that has a lot of good information all though there is a lot more that hasn't been added, using the search feature will also bring up a lot of those tip bits that aren't in the tech menu.
 
Last edited:
Jim - I like your engine stand. Clean, simple, effective. Just my style. Nice write up as well (all your stuff is. Very well documented and photographed.) How heavy is the engine though if you have to be flipping it all the time? Actually, 5t said I shouldn't have to be flipping it upside down so...
Read through some of your linked post. (Ooh ahh, you have a plasma cutter. Someday I'll break down and get one.) That rotisserie ROCKS! I'll have to go back and do some more reading there. I'm sure I'll find LOTS more well photgraphed /well documented stuff useful information there. I was going to ask how you got your engine case so clean but found that in the post as well.
And I like your solution for the cherry picker adapter. What I think is BRILLIANT is the threaded rod to balance/shift the weight. Very NICE.

Raymond - Hey, Don't sell yourself short. We work with what we have and find solutions. You got the job done. That's what matters. I remember pulling many an engine(car) with the method you described. Minus the Judo belt of course. I didn't know the belts to gi's were that strong. As a matter of fact, still have and use that old chain and pulley.(The belts, not so much.lol)
DSCN5353.JPG

5T - Thanks for the tip on installing the guide. And your flip stand is INGENIUS. That took a LOT of thought. And that other thing to access/pull the engine from the side is also very well thought out. Your engine stand? You could rebuild a Mack truck diesel engine on that. Nicely gussetted, etc. SOLID.
So, if I don't have to be flipping this thing every way till Sunday, a simple stand may suffice. Good to know. Very. THANKS.

650skull - Thanks for the link to 5t's stuff. Nice.
That first link to porting had a lot of pics missing. Just showed where the pics used to be. Don't know if they were hosted elsewhere and they reached the limit on hits or were removed from the site or....thats why asked. Just hoping to see the pics. Like on this new one you sent ;)
I didn't realize you had done the ID chart/manual. REALLY nice and thorough job 650skull!
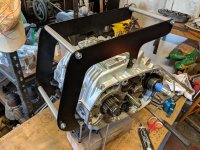
 
Yes, this engine is quite the lump, weighing about 150 lbs. The problem is, there's nothing to grab onto. Even though I do now have the means to pull one by myself, I still find it easier to enlist the aid of a helper and use my original lifting "handles". These allow us to lift the motor like a stretcher and wiggle it in and out of the frame .....

urN4sFu.jpg


fPVHbkZ.jpg


Even once out, it can still be difficult to move this thing around. If you don't already have one, pick up one of those $7.99 movers dollies from HF. The motor w/ stand sits nicely on it .....

6Hz2L2R.jpg


But, still difficult to grab onto, I made up some quick detach grab handles .....

7KPpfIF.jpg


5NuwcZ9.jpg


Rb7XZck.jpg
 
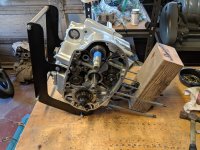
When choosing an engine stand design to use, keep in mind that some of the motor mount holes are in the bottom case half and some are in the top one. If you want to split the cases some day, you'll want a stand that attaches to holes in the bottom case only. A stand like Jim's won't allow the case to be split unless you remove it because it attaches to holes in both the upper and lower cases.
 
When first thinking about this, that was my first thought, "The problem is, there's nothing to grab onto" to get this out. Funny, I was thinking steel tubing like you show just hadn't given much thought to how/where to attacch to the engine. I LOVE your green "quick detach grab handles"! Are those just stanard hitch pins that go through the block/case? I can see those being VERY useful. Lol, I think I have about 4 or 5 of those HF dollies around the house plus keep one in my truck. Best $8 I ever spent.
So, Ideally I would like an engine stand that would allow me to access the bottom/split the case if I ever need to in the future. Can you please identify the bolts/holes/mounting points I would have to use to make that happen? I know you said to use the holes in the bottom case only but which ones are those? And can I see them with the engine and side covers still on the bike? And I'm assuming they would be able to support the weight of the entire engine without stressing, cracking or breaking off. That's a BIG question for me. I don't want to crack or break off an engine tab while supporting the weight of the motor on this job. Speaking of side covers, what did you use to polish/clean the nice ones in your pics? I like they aren't too shiny or flat.
Thanks
 
650skull - Thanks for the link to 5t's stuff. Nice.
That first link to porting had a lot of pics missing. Just showed where the pics used to be. Don't know if they were hosted elsewhere and they reached the limit on hits or were removed from the site or....thats why asked. Just hoping to see the pics. Like on this new one you sent ;)
I didn't realize you had done the ID chart/manual. REALLY nice and thorough job 650skull!

That link is 6 pages long..........There is good information on page one through to page 6about the XS650 head and porting do and don't s..........i suggest reading the whole thread, you might find what your complaint is about is in the thread..........
 
The rear handle uses a common hitch pin but for the front I couldn't find one long enough. I had to go with a length of 3/8" steel rod. Or, you could use a long bolt or some all-thread.

The 3rd pic in the post above shows the bolt holes used for the stand nicely. One is the long bottom center bolt, the other is the bottom rear bolt. The long center one is easy enough to see but you will need to remove the left cover to see the lower rear one. Yes, these two mounting points are plenty strong enough to support the motor.

I've changed my polishing techniques some over the years. Those covers pictured were some of my first and were done with lots of hand sanding then buffing. Today, I don't sand nearly as much, using Roloc discs in a die grinder instead to get the parts to the point I can buff them. It saves lots of sanding work.
 
5t - I was looking through my scrap heap yesterday, taking some measurements and looking throughout this site. Do you happen to have or know where I can get the dimensions for your little red stand? The one that attaches to the bottom 2 bolts? Thanks in advance.
 
650skull - It was not my intent to "complain". Far from it. I am extremely grateful for ALL the help and support I have received here from everyone. So if I offended you (or anyone else on here) I apologize. Maybe what I said was because of my years in I.T. I don't know. But it was in no way meant to come off as complaining. So again, if I offended you or anyone else, I apologize.
 
Last edited:
Don't apologize. go back and reread the thread and then get back and make a comment..........maybe i posted the wrong link........

making a point with highlighted words when it was yourself who didn't read the thread before making a comment.........never mind
 
650skull - It was not my intent to "complain". Far from it. I am extremely grateful for ALL the help and support I have received here from everyone. So if I offended you (or anyone else on here) I apologize. Maybe what I said was because of my years in I.T. I don't know. But it was in no way meant to come off as complaining. So again, if I offended you or anyone else, I apologize.


Don't worry about skull, we all learn to put up with his acerbic way. Cuz, well damn it, he often has important info.
 
Don't worry about skull, we all learn to put up with his acerbic way. Cuz, well damn it, he often has important info.

lol, I post a link to information.............the guy doesn't read it and complains the pics are missing.............he gets offended because i mention the word complaint,............... Quote]might find what your complaint is about is in the thread[ Quote ...............now i'm the bad one..............fffffffffffffffff
 
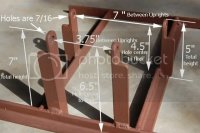
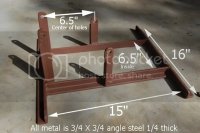
Here you go. The drawing that the stand is based on is in some of those threads I linked to, but the quality is so poor, you can't read all the dimensions. Also, it came from a very early Yamaha tech bulletin, for the XS1's which had no starter. That makes the uprights too short for later motors with starters. So, I've been meaning to re-do the drawing with updated measurements (uprights 1" longer for starter clearance) but just never got around to it ..... until now .....

laplXix.png
 
gggGary - Thank you. I needed that. You sound like the voice of wisdom. :) And I learned a new word today ;) I agree, skull has a LOT to offer. Read several of his posts and they're all really good and have very pertinent information. Thanks again sir.

Jim - I think JPcycles/TCbros stole your design. Just added angle on the bottom -
http://www.tcbroschoppers.com/yamaha-xs650-engine-stand.html

5T - Big THANK YOU. I did run across a few designs/illustrations on the thread you mentiioned and was actually going to use one as a basis for my stand -

XSStand1.jpg

XSStand2_dimensions.jpg
GLAD I didn't. One person even commented that the dimensions were wrong (may even have been you?) The most critcal dimensions (to me) are the spacing (front to back, side to side) and the height of the uprights. As you can see, his is 1/2' difference front to back which would be critical (sure, I could break out a grinder with cutoff wheel or something and reposition and weld back up but would rather not be doing that last minute with an engine hanging). And his spacing between the 2 center ones is 1/8" difference. May be able to spread those apart at last minute but would rather not. Not that I don't appreciate that he took the time and effort to share his creation. It may have been perfect for his bike/needs. As you guys have pointed out, there are differences year to year and even in the same year. I'm not complaining. Just pointing out some critical differences(for me and my needs). Hmmm, scratch all that. I'm not going to go there.

And would something like this (center spine) interfere with something on the bottom I may need to access in the future?
4b02_12-1.jpg

BIG thank you 5T for taking the time to measure and draw up a new one and sharing it with us/me. Invaluable.
p.s. - VERY nice illustration skills by the way.
 
My big beef with that brown stand is the upright lengths. Use those and the motor won't sit level. But, maybe that explains his different front to back spacing. I do make stands like that, with the base angles extending out the sides more, but combine that with the uprights and front to rear spacing from the diagram I posted. This style is good for transporting a motor. It's less likely to tip over with those extended sides.
 
Back
Top