Restoring 1981 XS650 as my first bike!

Thanks Vlad! Go Eastern Europe!

This is a very helpful diagram! Going to try to figure it out this weekend!

I also just got a torque wrench, I knew they were gentle. There was no resistance at all and the next thing I found head popped off. I was also, making sure I screw them equally as well.

Thanks 650Skull, I will definitely check if I have bent it. It's aluminum, so I assume it's easy to do.

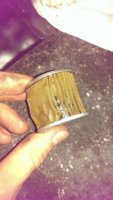
Here are pictures of oil filters that I took out. My mechanic friend says they scream trouble because these metal chunks came from a piston and I need to check the pressure in the chamber. is that true?
 

Attachments

  • IMAG1909.jpg
    IMAG1909.jpg
    186.9 KB · Views: 217
  • IMAG1910.jpg
    IMAG1910.jpg
    215.1 KB · Views: 204
  • IMAG1911.jpg
    IMAG1911.jpg
    300.6 KB · Views: 242
Those tears aren't bad at all, mine were far worse. I also had metal shavings in both my filters. When I did a compression test, both cylinders were perfect. You should do a compression test just to be sure. Chances are that that stuff is probably from the break in period and the previous owners never cleaned it up.

Also wanted to comment on turn signals - if you're going to use LED types, you'll need to change the flasher unit too. This is because the flasher depends on the signal bulbs to consume a certain amount of power to function correctly and LED types use much less power than the bulbs do. If you're going with OEM or similar, it'll be fine. Just connect the signals to the appropriate wires (colored in that diagram).
 
Hey guys,

I have a question. I have fixed the oil leak from a sump plate with new bolts and careful wrenching with a torque wrench. So my next job is to adjust the cam chain tension-er, then check the valve gaps and adjust the timing.

I have a problem though. I found on the forum the gaps for the valves and I can't figure out what kind of model do I have.

Tappets - model...inlet...exhaust
...XS1-B.....0.003"(0.076mm)...0.006"(0.15mm)
...XS2-650..0.006"(0.15mm)....0.012"(0.30mm)
...XSB........0.0024"(0.06mm)...0.004"(0.10mm)
...XSC-on...0.0024"(0.06mm)...0.006"(0.15mm)

So I think I have a 1981 xs650H, so which gap size should I use?

Thanks,

Gunnar
 
No worries, figured it out. I guess XS650H falls in a category of XSC-on, since letter "H" goes after letter "C". Just for anyone who will be wondering the same thing.
 
On the threads being pulled out a bit from over tightening, This can leave a ridge around the hole. I remove this ridge with a large drill bit. Turn it by hand NO power. I do this instead of using a file. The drill bit removes the ridge with out any possible damage to the sealing surface.
On the vale adjustments, Yamaha tried several different gaps over the years, mostly to quiet them. A lot of us use .003 intake, .006 exhaust. Too tight they are quite but the valves might not seal as well, this can lead to a loss of power and might even burn valves. A bit of noise is ok.
On the oil filters they clean up well, so just doo that. No need to replace. On the sump filter if there are tears in the screening, just patch them. Clean really well, use what ever epoxy you like. I like JB Weld. If the tears are very big cut a patch out of a can, soda beer , whatever, "glue" the patch in place with epoxy over the tears. Once set add a bit more epoxy around the edges to ensure a good seal.
You can find pics of how it's done with a bit of searching.
Leo
 
Another update with some good and some bad news.

Good news first!

So I adjusted the cam chain tension-er and then the valves. The clicking noise went away. All the leaks stopped and I decided to take the bike for a spin.

Here's the result of that:

http://imgur.com/YyxSnnl

Several things that I realized - I like riding a lot. Especially on the bike that I restored. But also I realized that this bike still needs a lot of work.

During the drive - several things broke/fell off.

First one the I noticed that I got a set of mirrors which can not withstand 60 mph winds and move under pressure. So I have to get a new solid pair of mirrors which will let me actually see things that approach me from behind.

Secondary, this thing fell off. Anyone knows what this is? It is in the clutch handle assembly? It did not affect the handling though.

http://imgur.com/PKexD2bl

Last, by the end I started feeling a lot of vibration and later on found that this is the source of it. Seems like exhaust was loose and I tried tightening the bolt. It was pretty hard to put lock-nut on in the first place - because it had very badly damaged thread on the bolt. When I tried tightening it further - it broke off.

http://imgur.com/PKexD2b

I hope these are removable double sided bolts and that I can find them on mikes XS. But after search I am not sure which one's they are? What are my options now?


Lastly - It seems that the bridge between two exhaust pipes is leaking. I have been thinking about getting a gasket which goes in between them. Do you think it will fix the issue? It seems that pipes go over each other and still leak after tightening.

Still have to finish up turn signals and the rest of the electric. But when I am done I will enjoy it a lot!

P.S. also I will have to deal something with those vibrations in the steering bar. It's so strong that I can't see anything in the mirrors (when they are straight) but dancing lights.

Thanks for all your help and advice!

Cheers!
 
Last edited:
The vibes are just part of the allure of this old bike.
Proper tuning helps remove most of it. Carb balance is a very important part of tuning.
You might try searching this site for bar vibrations or stopping bar vibrations. Lots of ways to do it.
On the exhaust mount stud. If it's the one that supports the rear foot peg, it's a stud welded into the support bracket. Only option is to drill out, weld in a new bolt.
I had one that was stripped when I got my 75. I have a metric tap and die set. The 12x1.5 die fit well enough to cut new threads on the stud. The 12x1.5 is the same thread as a lot of car lug nuts. To replace that stud getting a lug nut stud that size. Drilling the old stud out so the lug stud fits in where the old stud was should work fine.
You might have a hard time finding some one behind the counter to understand what you are doing , most will want to know what car it goes to.
In the pic you linked that thing in the clutch lever perch is a switch. This switch is used with a relay linked through the neutral switch. It's purpose is so you either have to have the transmission in neutral or the clutch pulled in before the e-start works.
Both your pics seem to be the same thing.
Leo
 
Hey XSLeo,

Thanks for such a thorough response. Yes, I indeed linked a wrong picture. I am attaching the right one. It's the bolt which is right before the back peg one. (The one on the right in the picture) Is this one also welded into the frame?

Thanks for the information about the clutch perch switch. I am in the process of ordering new clutch perch anyway because my left mirror mount is stripped. Do you think it will fit back into the new clutch perch?

Where can I find information about balancing carbs? I have cleaned them and used a mike's XS rebuild kits, but I haven't adjusted anything but the idle screw. I also have a feeling that I run a too rich of a mixture, because if I push in a choke half way my bike is gasping for air and actually decreases it's RPM.

Lastly, I also noticed that if I give it more than a half of throttle in gear my revs go up and then go down and I gain no power. I have a feeling that it is because of worn out friction disks. Do you think it is true?

Thanks for all the help guys, without this forum I would have much more trouble! You are a great help!
 

Attachments

  • IMAG1923.jpg
    IMAG1923.jpg
    143.8 KB · Views: 187
I thought the BS34 carbs had a pull choke? And when you push it all the way in, it's no choke.

As for the carb synchronization, you'll find that people either make their own "homemade manometer" or they go with a set of vacuum gauges like this:

ZZ40034_A.jpg


If you're cheap, resourceful, and have some free time, I'd suggest the home-made route. But if you are extremely busy, then get the vacuum gauges.

As for the clutch, make sure that you have it adjusted properly first. What kind of oil are you running? That sounds like the clutch is slipping, but the clutch plates might not be at fault.
 
Yeah, it is pull choke on my carbs. I meant as when I pull the choke out all the way out it it feels that my engine is suffocating or running too rich. Sorry for the confusion.

I will look into making my own manometers and look up the procedure for the synchronization of my carbs. I have a feeling that they never been adjusted in their entire life.

Lastly, I am running 20W50 Mobil 1 motorcycle oil. I flushed the system with some cheap 20W50 walmart brand before I put Mobil 1. I checked the oil yesterday there is enough.

I need to read up on how to adjust the the clutch. I only adjusted it on the handle with the adjusting knob and that's it. Are there more ways to adjust it?

On a bright side - I rode my bike to work today! Wohoo!
 
Hey guys!

It has been a while since I have posted an update, but a lot of work has been done on the bike.

Now I am thinking about replacing clutch friction discs and I have a question for you.

Do I have to replace steel pressure plates as well or can I just replace springs and friction discs alone. The reason why I want to replace the clutch is because it is slipping in 3+gear when I give it enough gas.

Any advice?
 
You need to adjust the worm mechanism at the left side cover before you adjust the cable at the lever. Your repair manual has a good "How To"
On the steel plates, if they are not warped they are good to go. The repair manual should tell you how.
When I work on clutches I a medium to coarse sand paper the clean off any discoloration and to rough up the surface a bit. If you look close at the steels you will see one side is slightly rounded, the other slightly sharp. This is because they are punched out. I use the sand paper to break the sharp edge. Just make it kinda match the rounded edge.
You can break the edge of the fibers too.
I would try just new springs first. This may be enough to prevent slippage. I would rough up the fibers a bit to. This will break up any glazing they might have.
Doing the drill the stock clutch spring bolts for Allen bolts mod is a good thing. Easy to do and makes working on the clutch much easier.
Leo
 
Hint; you have to use a hand impact and a #3 Philips bit to remove the clutch screws. if you do that, they will be quite reusable. If they weren't preboogered by a ham handed PO.
 
Thank you for the input!

I am going to modify my pushrod to a solid one and replace the bearing and the seal as well because they are leaking. I will adjust the clutch on the left side then and see if it still slips. If it does I'm going to get new springs and see if that will fix the issue on my next oil change!

Good thing I have an impact driver.

Do you know if these springs are good? I read on this forum that they might not be very good.
 
I would recommend going with a brand name spring. Those springs from Mike's are some no-name type. They may not last more than a few years. I started out using them and they were OK but when I checked them in a few thousand miles, they had already sacked out a few MM. They hadn't failed yet but I figured it was only a matter of time. I replaced them with something better.
 
650Central offers several different sets from slightly stronger to really stiff. You probably don't need or want the stiffest .....

http://www.650central.com/

You can probably shop around and find them cheaper. The Vesrah springs are part #SK-201. EBC also has springs for the 650, part #CSK 14.
 
Back
Top