
Valve Lapping: Did I do it right? [video]

You got it exactly. The video nicely illustrates the change in sound as the grit gets used up and you need to lift the valve to suck more fresh compound in. I couldn't really tell from watching but when I lift the valve I also rotate it 1/4 turn or so before lowering so that different areas of the valve and seat come into contact and get ground together.
 
Thanks 5twins, that's good news. When I picked it up to do the tapping I did try to remember to turn it a bit too.

I brought my head into a shop in town and the guy wanted $80 to lap the new valves. Which seemed reasonable, I was assuming was some expensive laser guided machinery involved...

Lapping compound: $2.99
Wooden suction stick: $3.99
Knowing how to lap my own valves: Priceless
 
A couple more tips. I do mostly originals to renovate them and the seat. They get pitted over time and use. You MUST use coarse, then fine compound. If you just use fine, you'd still be lapping them tomorrow and maybe the next day. The fine just gives the nice final finish and doesn't get the pits out. When you start lapping, the pits will appear as black specs on the seat and valve. Keep lapping with the coarse until the black specs are gone. After 10 or 15 minutes, the compound may get all used up. You may need to wipe it off and apply fresh compound.

It is nice to be able to do this and really is very simple once you see how.
 
You MUST use coarse, then fine compound? WOW i di not know there was the 2
i used some suff from napa they had 2 kinds some white and some that looked like sewer water. i have only tested the bike ran it for 2 miles. but yeah i caught a video on you tube to get the idea, my valve guys did not say anything about fine and course, good to know
 
Yes, if you want to get the pits out and do some cutting, you must use the coarse 1st or you'll be there all day, lol (DAMHIK).
 
Thank you for the video. I just lapped valves for the first time. Very simple and straight forward, just like the video shows.

avenue.
 
you can check you valve lapping job .. by sticking them back in with the spings and retainers .. take some soapy water and stick it in the combustion chamber (obviously it has to be upside down) .. take a air hose blow nozzle and a wet rag, wrap your rag around the nozzle and shove it into the intake port(as tight as you can get it ) (or whatever one applies) .. let the air rip .. if you get alot of bubbles keep lapping ... if you get very few to no bubbles your good to go
 
I've wasted all day trying to lap my valves for the first time and ended up with concave shape due apparently to using coarse paste - I'm only posting the following because it makes sense to me after what's happened today. In fairness, I am a total novice first time builder attempting my first engine build! Will be interested to see what others make of he following I found online.
From another site: Valve lapping is quite a curious engineering process which of necessity I've studied in detail over the years. Prolonged lapping, especially with coarse paste, actually makes the seating surfaces of the valve and head insert concave so the two only make contact on their inner and outer edges. This is obviously very bad for heat dissipation as well as airflow. I can see the effects of heavy lapping very clearly on my valve refacing machine or head seat cutting machine as the grinding wheel or cutter makes initial contact with the concave faces and only touches them along the edges.

You can also easily see the concavity on a valve after prolonged lapping by putting a high quality straight edge across the seat and holding it up to the light. Try it on an old head some time. The mechanism at work here is that the paste on the inner and outer edges of the contact area quickly squeezes out as you start lapping leaving most of the abrasive action taking place along only the centre line of the seat. So lapping can't restore a badly cut or badly worn seat properly as they used to think in't olden days. It might have sufficed for a 30 bhp per litre truck engine from the 1940s but is not what you want for today's high performance machines generating much more heat which needs dissipating properly through surfaces in perfect contact with each other.

However a very light lap with fine paste for just 10 seconds or so to check that the valve and seat are truly concentric and with no high or low spots is a good idea and not a problem. If there isn't an even grey contact area all round both valve and head seat after that then it's probably time for remedial machining rather than further lapping.

For many years now I've used special diamond grit based paste rather than the normal carborundum grit paste you get in little tins with two lids for coarse and fine at each end from car accessory shops. It's horribly expensive but it has a completely different abrasive action which I can't really describe but it's much nicer. Being so hard and sharp, diamond grit abrades the surfaces really fast before the paste has had time to squeeze out and the grit particles don't break down into powder immediately like carborundum does so you don't get the concavity and it takes less time to check that the surfaces are making good contact. However the fine paste from those little tins is perfectly ok for general use. The coarse paste is a definite no no.

I used to have a customer in the early 90s for whom I did the CVH heads for his race car along with many other people's. They generally got a quick refurbish mid season and it took me a while to work out why every time I recut the seat on one of his valves (but no one else's) they were badly concave and only touching the grinding wheel on the inner and outer edges. After speaking to him it turned out that every time I sent a finished head back, despite my own quick lapping to check the seats were perfect he'd stand there for half an hour grinding them in further before assembling everything thinking he was contributing to the general cause and doing some good when in fact he was just buggering up my delicate machining work. After actually showing him what his tinkering had been doing to the concavity of the seats there was one of those "oh _____ what have I done?" expressions on his face and he left things well alone after that.

In OE engine production valve seats are never lapped which would be horribly time consuming to do on every engine but of course there are constant quality control checks being carried out to make sure the valve and head seat surfaces are being machined to a perfect specification. They also sometimes use a very slightly different angle on the seat in the head and the seat on the valve, maybe half a degree or so, to make the two components "hammer" into full contact after the engine is first started. Not my idea of perfection engineering really. Unfortunately you can't just assume that Joe Bloggs your general engine reconditioner is even capable of cutting proper valve seats which most aren't in my experience so checking them with a quick lap is essential. The much vaunted Serdi machine which is the popular choice these days is a bugger for cutting non concentric seats in the head if there's even a fraction of a thou of valve guide wear. I prefer seat cutting systems with fixed rather than rotating pilots like the Sunnen system.
 
image.jpeg image.jpeg image.jpeg image.jpeg Yes, great video and for you new comers, you can definitely hear the difference in sound as the grit wears down.

2 things: One of my Dad's old tricks was to put a soft spring under the valve that will lift it about an inch. This makes it easier to pull off the seat with the lapping tool as the compound can have an adhesive effect as the seats grind in tighter and smoother together.

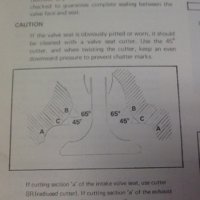
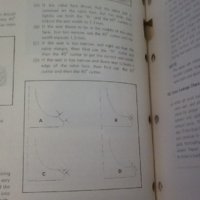
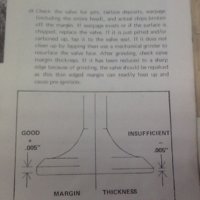
Two: Attached are a few Picts from the xs1-B book that came with my 72. It shows the seat widths and angles that can easily change with mileage and excessive lapping. These figures and angles may have changed thru the years, but they seem pretty basic and straight forward.

I bought a head on eBay, dismantled and lapped the valves and found the contact area was much greater than 2mm. If the contact area is too large, it reduces the seat pressure per square inch. This will lead to burnt valves.

Three: Sorry, sounds like the Spanish Inquisition, anyway, I'm gonna wait to see how my original head and valves look in a week or two and choose the best one.

Lastly, "No one expects the Spanish Inquisition!", my local Japanese bike shop, (and there are several where I live), said that they send their heads to a shop nearby. I spoke to the shop and they said they don't lap, they cut. I'm thinking I'll let them do my head because they'll cut the valves and seats to spec. I will give them my specs. I'm living on a budget also, but for a $100, I know it will be correct and have some confidence that I can maybe get another 60K miles before my next top-end tear down.

That's all I got for now. If anyone has any other specs from newer shop manuals, I'd love to see them.
 
Back
Top