Waking up my nicely rested engine. What would you do?

XStretchified650

Back in the 650 Saddle
Messages
158
Reaction score
12
Points
18
Location
Illinois
Hi Forum Members,

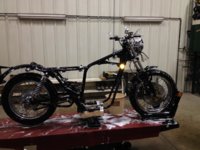
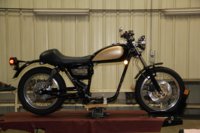
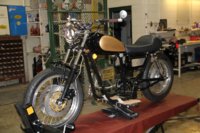
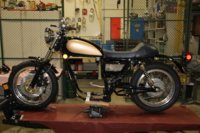
I am looking for suggestions and advice on maintenance or smart upgrades I should do with the engine of my XS650D. I am in the 'home stretch' of a thorough restoration that I started about three years ago. Yea, three years is a long time but I only get to work on it for a month or two during the winters. I've done a lot of custom work on the rest of the bike and I don't want to screw up my new motorcycle by neglecting the motor.

A little engine history:

It has 18,700 miles on it now and I've owned it since it had 1500.

When I parked it 24 years ago it ran just fine.

I would regularly adjust the valves and cam chain tension. About every 1000 miles.

It did not noticably consume oil.

I always used Castrol 20/50 (back then it was considered the good stuff). I will be reading past threads on recommended oil.

It has always been inside a building and out of the weather.

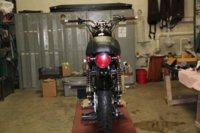
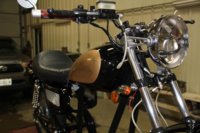
It is bone stock and on a stand on the bench.

I have a new sump filter and cam chain tensioner to install. And a gasket set on hand.

The motor had a really small oil leak at the base gasket. Small... but it was always there.

The clutch is all original.

It has stock points type ignition.

The carburator set is 100% refreshed and ready to go back on.

Please speak up and help me bring this sleeping beast back to life.

I'll post pictures of the rest of the build in a few days. Thanks in advance for your suggestions and advice.

John (Xstretchified650)
 
If you don't plan to pull the head, I would:

1. New plugs and leads and set the timing / points correctly
2. When they are out, get a torch or better still a fibre optic into the bores to check for corrosion. If its light / OK squirt some light oil down just to help - it'll burn off
3. Pop the oil feed pipes off the top and prime the feed to the cam rockers
4. Change the oil and both the filters
5. Check the head torque, back them off first so no false readings
6. On the kick, gently turn over listening and feeling for any binding / noises
7. Fuel and start :)

Bearing in mind the time standing, things like seals, gaskets, cam chain guides will probably be brittle / shot. However, you will soon find out.

Personally, I would pull the head and do a check over replacing the above.
 
Thanks..these suggestions are what I am looking for. I would rather put my time in up front to know that it is ready to run for the long term.

It is out of the frame and I am looking forward to getting dirty.

....More please...keep em coming.
 
Absolutely. Every build I have done the engine gets a rebuild, even the one I have now with 8k on the clock, will get the cases split and each part inspected.

With yours, due to the time spent standing, the oil seal on the crank, cam gearbox etc will no doubt be past there best. whilst they may not fail immediately, they will go in the short term. Some of these can be replaced with the engine in situ, however, if I was you I would replace them all with the engine out and split the cases. Once you have them split you can also get the casings refurb'd painted etc which will bring them back to new. For the little extra effort, it will be worth it in the long run.

What else would you be doing over the winter ;)
 
+2 head stud re-torque, most tear downs for oil leaks are unnecessary.
Pull the plugs, squirt in a bit of rust buster, hit valve stems too, at least one valve has been open all those years. Plugs out, turn the engine over with foot or starter a lot, then squirt oil, repeat the plugs out spinning, before attempting a start.
Change to an electronic ignition. Points, old coils, condensers etc. are feeble, RIP. I think a high percentage of the bikes I rescue from sheds died of electrical issues.
Use ethanol gas to rinse your tank, pour in slosh sit drain repeat. Rebuild or replace petcocks, replace ALL fuel lines, clamps with new. Read, follow the carb guide, most? "carb overhauls" are done wrong, or neglect needed maintenance items.
Do the head stud retorque again after a few hundred miles.
Use use only modern air cleaners IE paper filters or UNI foam elements.
 
I would loosen the banjo bolts on the top of the head, kill the iginiton spark and crank the motor until you get oil leaking out of the banjo bolts then tighten them. As mentioned, wash the fuel system good then give it a try. If you have time and money and want to get in deeper that is always an option too but these motors work well a long time with basic service.
 
You mention the cam chain tensioner. This item seldom goes bad. Do you mean the front cam chain guide? This is an item that goes bad. After many years they get brittle and bits of it break off. The black plastic part comes unglued from the aluminum backing/mounting part.
If you pull the head and cylinders I would replace the cam chain while in there.
On the points I would put in a new set. The old ones may be ok but they don't cost much. The stock points coils were not all that strong new. All these years didn't improve them. I would replace with new more powerful coils. Or replace with a Pamco, I have used both the original and the new E-advancer units. I like the e-advancer.
Mike's has kits of both types.
I might as others have mentioned do a retorque of the head bolts, upping the 8 big nuts to 30 ft./lbs. Turn it over with the e-start, easy to do on the engine stand. I have a spare car battery I use for things like this. Use jumper cables, battery negative to anywhere on the engine, positive to the starter. Fresh oil and loosen the banjo bolts of the oil feed to the head at the head. Valve adjustment covers off. Now as you crank the engine watch the valves, doo all move a full stroke, or do some seem sticky?
If sticky spray liberally with a good penetrating fluid, a 50/50 mix of acetone and ATF is the best. In around the valve spring and in the intake and exhaust with the valves open, to get that end of the valves.
Once you are sure no valves are sticking continue cranking as you watch the banjo bolts. Oil should come out both bolts.
This means oil is getting to the top of the engine. Oil may also spray out the open valve adjuster covers once you get oil to the banjo bolts.
Once you are sure of the oil flow I might put on the carbs and exhaust, build a place to mount the coils, wire up the ignition to a battery. A fuel tank of some sort, the stock tank on a chair on the bench so it's high enough to feed the carbs.
With power to the points and fuel to the carbs run it on the stand. If it runs ok and doesn't leak oil, then install it in the bike and enjoy.
If you find anything that isn't quite right, fix it now. After any fixes run it on the stand to check things out. Once satisfied it's ok install it and enjoy.
Leo
 
Getting back to this discussion....

I will be pulling the head. It sounds like opinions vary on whether to pull the cylinders to replace the base gasket or whether improper torque of the head bolts is the likely cause of the base gasket oil leak.

I am fine with pulling the cylinders to replace the base gasket (full well knowing that the base gasket may be just fine until I pull it apart). Maybe I'll get some clues on how well the head is torqued right now when I break the nuts free. Any pitfalls or challenges when reassembling the cylinders?

I am a bit leery of splitting the cases...the motor has 18,700 miles on it...what would I be looking for? When I parked it all was good. I need more info on the benefits of splitting the cases. Tell me more about the oil seal on the crank. I wasn't planning on painting the cases but I will be going over the engine with a soda blaster.

Earlier I did mean to say Cam Chain Guide (not Tensioner). I've got a new one.

As far as the cam chain goes would I see indications of wear that signal that it is time to replace it or irregardless of what it looks like just change it because of motor mileage and it being readily accessible?

A few other engine related tidbits:

The tank has been de-rusted and then coated with the Caswell kit. Repainted it along with the tins.

The carbs were done by OldskoolCarbs.

I rebuilt the petcocks.

I de-rusted and powder coated the air boxes and have a set of the KN high performance Yamaha cartridges ready to go.

I've got a set of JBM carb holders on hand.

I've got a new clutch pushrod oil seal on hand.

I'll have a Heiden oil filter/cooler kit to use.

I am leaning toward a Pamco and the old coils went into the junk box at tear down. I'll read up on electronic ignition systems. And probably have questions.

Yet to do beside the engine:

The exhaust system and wiring. I have my old set of BUB head pipes but I don't think I will reuse them.

I've finished restoring everything on the chassis. It's non stock restoration.

Have any other suggestions while I have sleeping beauty (engine) on the bench?

What about the clutch?
 
The main benefit would be that you will get to know the engine inside and out. Also it will be like new if you do it all right. Cam chain tensioner and guide wear will show up in the oil, just strain it in a coffee filter and check for ally and black plastic bits, that is the sign they probably need doing. Also a bike as old as these you will probably find the plastic delaminating off the ally guide, mine was.

If you go in to replace the guide, you may as well go all out and remove the top, get new rings in the pistons, maybe check for wear on the sleeves as well. Lap your valves and clean inlet and outlet ports, replace valve stem seals.

I would not split the cases unless you have troubles with the gears, they are pretty solid down there. Although I think personally tearing the engine down for a good clean is a lot easier to maneuver than a fully assembled lump of metal.

This engine is VERY easy to build, I have done it, and I have NEVER done anything mechanical until I got my bike. Check out my thread, it is a LOT easier if you know how, and these guys were here to help! I did a lot of reading and searching, and combining threads to rebuild my engine. As I started, I decided to do a step by step as there aren't many complete build threads. http://www.xs650.com/forum/showthread.php?t=30786

The clutch should be fine at that low mileage I would imagine. It's pretty easy to get to if you need to sort it out.

Stick some pictures up, we love pictures!!!:D:thumbsup:
 
Hmmm, 24 years. Worst case scenario, weather changes, hot/cold, moist/dry, high/low pressure, moisture mixing with oil contaminated with combustion byproducts produces acids. Check inside aluminum surfaces for thin layer of grey slime, rust dots on cam and followers. If found, then consider complete teardown to check for more corrosion...
 
It depends on how deep you want to get, in time, money both. If it was properly maintained, 18K is nothing. Stored indoors a huge plus. I recently fired up a 750 Virago that sat indoors, 11K on the engine, for near 12 years I changed the oil and filters, pulled the cam covers and plugs, and the carbs. Shot a lot of WD40 in every hole I could find and left it set for a week waiting for new jets for the carbs. I never heard a mechanical tick and no smoke or nothing. 30 minutes on the motor followed by another oil change. I do not find this abnormal on stuff that was OK to begin with when parked. I would break the headbolts loose on a xs650 and retorque them tho.
 
On the clutch you can pull it apart and inspect the parts. I can recommend a bit of clean up on the steel plates. They often get a bit of discoloration. These plates are just stamped out of sheet steel. This leaves one edge slightly rounded and the other edge slightly sharp.
I think this sharp edge causes excess drag as the plates slide in the hub and basket. It also promotes extra wear in the basket and on the hub. I think it cuts into the aluminum and this makes grooves on the basket and hub. This can lead to excessive play in the clutch.
When assembling you can face this edge in or out. One way the excess drag effects how easy the lever pulls, the other how well the clutch engages.
I use a coarse, 150 grit, sand paper to remove the color and rough up the surfaces, this promotes grip. As I'm doing this a break the sharp edge of the plates to match the slightly rounded edge.
With both edges slightly rounded the plates can more easily slide both in and out. Decreasing lever pull as well as increasing grip.
You can measure the thickness of the fiber plates, your D model uses 3 mm thick, the earlier used 3.5 mm. Seldom wear much if any.
I do recommend replacing the 6 clutch spring, after all this time they are getting weak. The no name ones Mike's sells don't hold up well. Get a brand name set from 650central.
Inspect the actuating worm in the side cover, the plastic part often cracks. Clean and a generous coat of grease will improve things. Lubing the cable with engine oil as described in the book takes a bit of time but works so much better than a spray lube and the clamp on gizmo.
A new cable, either from Yamaha, Motion Pro or 650 central is a good idea.
On the cam chain, wear lengthens the chain, this lets the cam go retarded, not enough to effect cam timing much but it can effect ignition timing. As it wears and you adjust the points backing plate you get closer to one end of the adjustment slot. The closer to the end of the slot the more worn the chain.
It's not an expensive part so most change it and the guide while the engines apart. Easier than not replacing then having to in a year or so.
On the Pamco, I think that's a good upgrade. With your bike one of the basic kits that still use the stock advancer will run just great. One of the E-advancers run just a bit better.
Your choice on that.
Leo
 
I read through the Haynes manual on the engine work and I've got my old and greasy Clymers copy thats in the shop with the bike to read though also. I read Airwolfie's build thread which was enlightening to say the least.

I should have time to open up the engine on Sunday. I will post photos then. First off is the head cover and cylinder head.

I will decide as I go just how much to open up on the engine and then order the parts once I know what I need.

XSLeo suggests I should replace the camchain while I am in there.

Airwolfie suggests that I replace the rings and check the sleeves if I pull the cylinder block.

Do others agree and might I be able to know for sure once I get a look inside?

I know parts wear out and replacing those worn parts makes for a good feeling. Replacing parts that are soon to wear out falls into the same category. But replacing parts that may be perfectly fine messes with my head.

Thanks for the help to all of you.
 
Hey Leo, We must have been typing at the same time.... Thanks for the clutch suggestions and your cam chain reasoning is great. ...I sure don't want to be retarded. Not me...I mean the ignition.
 
I got back to working on the project on Sunday. Everything was either under a tarp or crated. Since I had not worked on the restoration since last spring I started with a bath. Then set on the tank and tins to take these photos to post.


As far as the engine work goes I closed up open ports and started pre-cleaning to get it ready for soda blasting. I'll remove the head after the engine is fully clean.

Correction: Upon closer inspection the slight oil leak I was talking about was at the head gasket not the cylinder base gasket.

Happy Holidays to All.
 

Attachments

  • IMG_1732.jpg
    IMG_1732.jpg
    208.1 KB · Views: 277
  • IMG_4271.jpg
    IMG_4271.jpg
    175.9 KB · Views: 237
  • IMG_4275.jpg
    IMG_4275.jpg
    206.7 KB · Views: 280
  • IMG_4276.jpg
    IMG_4276.jpg
    209.2 KB · Views: 269
  • IMG_4277.jpg
    IMG_4277.jpg
    148.6 KB · Views: 258
  • IMG_4278.jpg
    IMG_4278.jpg
    169.8 KB · Views: 254
Back
Top