What Diameter Degree Wheel is Best for Determining TDC?

smg65

XS650 Addict
Messages
160
Reaction score
3
Points
16
Location
Lancaster, Ohio
This question is related to a thread I previously started regarding locating TDC on a PMA equipped bike. I finally had a chance to play around with it this weekend, and I found that my old Yamaha dial indicator that I was going to use is behaving in a "sticky"manner. Perhaps it's because I don't have a wheel on the tip to ease the movement. I've been reading about all the different methods, and I thought I would try the piston stop method. And although it appears that a degree wheel is not necessary for simply finding TDC, I thought it would be a nice tool to have and I could also use it in conjunction with the piston stop.

I know... this is probably a stupid question! :doh: But not owning a degree wheel and wanting to use one, I found that the printable ones seem like they would be too large to be conveniently and efficiently used for this purpose. Backing up... I want to use one with just the inspection cover off... nothing else disassembled or removed. I've searched this question, and I haven't found it answered. Perhaps the answer is just too simple and obvious for me! :shrug:

I printed one out, and it was huge. The gear shift would need to be removed (not a problem at all... but why??). I know I can easily resize the degree wheel image. But... before I waste a bunch of paper... what diameter degree wheel would you guys find most convenient to use for this purpose? Also... any tips on a pointer? Or... quite possibly... am I totally off base with these questions??

Thanks!! And thanks for putting up with my questions!

My original thread regarding tools for determining TDC: http://www.xs650.com/forum/showthread.php?t=36321
 
Like the dial indicator, a degree wheel is a handy tool to have for finding crank positions away from TDC. If you're only concerned with TDC then it will do nothing but add steps to the process.

The procedure for finding TDC on a degree wheel is basically the same as finding TDC directly on your rotor.

With the degree wheel you will mount the wheel to the crank and fashioning a pointer. Find TDC by turning back and forth against the stop, adjusting the degree wheel and/or pointer until it reads the same BTDC and ATDC. Turn crank to the indicated TDC. Remove the degree wheel and pointer, hope the crank didn't turn at all, then mark your rotor.

Without the degree wheel you will turn back and forth against the stop, making a mark at each end point. Measure between the marks, divide by two, then mark TDC.
 
mrriggs... why must you keep on trying to simplify things for me while I try my best to make things more difficult for myself?? (please note.... sarcasm!!) OK.... I'll forget the degree wheel for this job! :D

I do have another question though. In my researching of "how to create timing marks", I have seen that to add the 15 degree mark, one only has to measure exactly .5 inch to the left of the TDC mark. I have seen this in a few places, including MikesXS PMA instructions. Sounds very simple, almost too much so. Is this method close enough... or is this where the degree wheel and/or dial indicator best come into play?

Thanks!!
 
I determined that by measuring the opening of the timing plate hole, multiplying by pi to find the circumference, dividing that by 360 to find length per degree. Multiplying that by 15 and 40 told me how far around the hole each mark should be.

The 40° mark came out close to the edge of the flange so I measure back from there to determine where to make the TDC mark. It just happened to line up with the right edge of the notch. From there I measured for the 15° mark then, with a straight edge between the mark and center of crank, determined where on the flange to make the 15° mark. It ended up being a nice even 0.5 inches.
 
Thanks for doing the math for me.... one of my (far) weaker skill sets! I appreciate the help. It'll be nice to get this done and move onto the other things I have to do or have planned for this bike.

Thanks!
 
I use one of these little plunger style tools. really nice and simple to use. You just have to take care not to allow it to stop the piston

That's an interesting piston stop. Kind of expensive, but looks pretty cool. I bought a new Jeg's stop a few days ago... and it can't be used. The threads were so flattened and out of shape right out of the box, I couldn't (wouldn't force it) get it into the head! The threads on the stop could not be repaired or corrected... I went into several shops to see if I could make it work. I'll be returning it.

I started making my own out of a spark plug. Getting it to the point in this photo (all ceramic removed) was easy. The Jeg's stop is also seen in the photo. However... I don't weld, and I don't have tool and die equipment, so I haven't completed it. I know it's a very simple and quick task if you have the tools, as some members of this forum do. But at this stage of the game and considering other things I have to do, I'm not in the position to acquire more tools. So I suppose it's back to Jeg's for a return and perhaps a more expensive one. I'll have them take it out of the packaging and demonstrate that it actually will screw into a 14mm 1.25 hole. Wish there were a good "no bake" way of completing my started homemade piston stop! In my Internet searching, I did see one method where a allen head bolt is inserted through the bottom, attached at top with a nut, and spaced correctly with washers... but this method looked a little shakey to me. See the photo that shows this one both disassembled and assembled. Sorry... I'm a visual person... I need pictures! :shrug:
 

Attachments

  • piston_stop.jpg
    piston_stop.jpg
    75.6 KB · Views: 238
  • mopedarmy2.jpg
    mopedarmy2.jpg
    42 KB · Views: 241
Why don't you just glue the bolt into the spark plug body?

I suppose I could drill out the spark plug to make a bolt a tight fit. The Jegs bolt might fit once the plug is drilled... dunno though... might be too large in diameter. I might have a suitable one in my junk drawer. Once in, perhaps JB Weld would be a good choice to hold a bolt in place? Also, as I understand it, length protruding into the chamber isn't that crucial, just so the stop is long enough to stop the piston a little before it reaches TDC. Thanks (once again!), mrriggs! Perhaps I can finish this myself after all. I do own a drill and do know how to mix JB Weld! :thumbsup:
 
Here's a simple solution that I wrote up for the 650 Society News awhile back using stuff available at any decent hardware store. Get a 1/4" hex head bolt with a long smooth shank, cut off the threaded end, chuck it in your drill press, and turn the tip smoothly and evenly with a file. Use a 1/4" ID nylon spacer as a bushing. Press the bushing into the big end of the spark plug shell; its OD will be a little large, so chamfer the edge of the plug shell to start the bushing and let the outside of the bushing shave away, just be sure it doesn't cock. Set a spacer under the head of the bolt so you can grip it easily to relieve side load while the piston is on the rise. Polish the plunger with 800 grit paper and check that it moves freely. If it needs help, lap it in with a little rubbing compound, etc.

The nylon won't be as durable as a brass or steel tool, but in occasional use it will last for years.
 
A couple suggestions - tap the inside of your gutted spark plug so a bolt will thread through. That would be pretty much a copy of the Jeg unit. Or, find a nut slightly larger than the hole in the top of your gutted plug and drive it down into it. That would provide threads for a bolt to thread through. A little JB Weld to fill in the gaps between the nut and plug may help hold it in.
 
Thanks to all for your input... and patience! Other than grinding/polishing the bolt end, my plug stop is finished. I believe it worked out quite well, without requiring welding, tapping, lathing, or any of the other myriad of skills/tools I don't possess. Total cost was right around $6.50, with the most costly item being the JB Weld. The hardware was only about a buck. Cheap! I know you guys know how to make these, but for those, like me, who might be slightly devoid of the resources to quickly and easily make one, here is what I did:

Items: 1 threaded 5/16th rod.
3 5/16th nuts
1 5/16 washer
1 5/16 acorn nut
1 package of JB Weld
1 red Loctite thread lock (I already had)
1 5/16th drill bit (I already had)

After removing the ceramic from the plug, made simple from hacksawing the retaining ring found at the base of the ceramic (topside of plug), I broke off the electrode and lightly filed the surface. (Note... by removing that retaining ring, it is not necessary to bang away at the ceramic, having ceramic chips and dust flying willy nilly.) I then drilled through the center to allow passage of the 5/16th threaded rod. I then JB Welded two 5/16th nuts (one sitting on top of the other) into the recess of the plug. This turned out to be the messiest, hardest part... but it worked out weld.. I mean "well"! :wink2: 
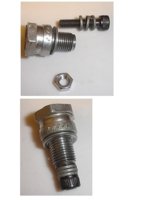
I left the rod in place to keep things centered, being careful not to weld the rod to the nuts. After letting it set overnight, I installed the washer and 3rd nut (these to provide a "lockdown"), and Locktited the acorn nut to give me something better to grip. The whole affair seems very solid.

Many thanks, again!
 

Attachments

  • plugstopfinal.jpg
    plugstopfinal.jpg
    159.9 KB · Views: 215
A couple suggestions - tap the inside of your gutted spark plug so a bolt will thread through. That would be pretty much a copy of the Jeg unit. Or, find a nut slightly larger than the hole in the top of your gutted plug and drive it down into it. That would provide threads for a bolt to thread through. A little JB Weld to fill in the gaps between the nut and plug may help hold it in.

Here's a stupid question, what should be the length of the rod sticking out of the bottom of the sparkplug after assembly? Hugh mentions 1.25", but how much sticks out? There is lots of talk about how to make it, but nothing I can see about depth.
 
Here's a stupid question, what should be the length of the rod sticking out of the bottom of the sparkplug after assembly? Hugh mentions 1.25", but how much sticks out? There is lots of talk about how to make it, but nothing I can see about depth.

I don't have the stop in front of me for measurement, but judging from the pic of mine (in the above post), it looks like I have about an inch or so protruding from the bottom of the plug. I say "an inch or so" because it's not that crucial as you can see that there is a lot of room for adjustment available by screwing the bolt down or up. Very simple... works great. Also, and please others correct me if I'm wrong, when using the stop, length doesn't matter. It's the stopping distance between the crank being rotated clockwise and anti-clockwise, then divided by half. Yikes! :doh: I am not explaining that clearly at all! Too early in the morning!
 
Just a little warning;

Turn your engine over while looking down into the spark plug hole with a flash light.

What do you see?

Be careful it can be bent when a big old bolt is stuck in it's way.

I always back both valve adjusters completly out when looking for TDC, gives you that little bit of breathing room.

Good Luck
 
Yes! Back out the valve adjusters and turn the crank slowly and carefully. You'll get the feel of it after doing it once.
 
The adjusters won't buy you much slack. Do we know how 4-stroke motors work? Make damn sure you install the stop when the piston is rising on compression (BTDC) and dropping on power (ATDC). Both valves will be closed.

I prefer a sliding stop with a degree wheel, indexing to equal drop on either side of TDC, but each to his own. You can avoid moving the crank while removing the degree wheel to make your marks very easily if you have a degree wheel 7" in diameter or smaller and are not too lazy to remove the right engine cover. But mrriggs has made it easy for you; you can trust his numbers.
 
Items: 1 threaded 5/16th rod.
3 5/16th nuts
1 5/16 washer
1 5/16 acorn nut
1 package of JB Weld
1 red Loctite thread lock (I already had)
1 5/16th drill bit (I already had)

Awesome smg65, finally something to compete with the old girl's recipe book! Lovin it! Actually might slip a copy into her recipe book just for giggles.
 
Back
Top