Tks for the reply Jim... I can see now that the bars are not grounded but its not clear to me where the starter switch ground wire is. will have a closer look tomorrow.No, the bars are not grounded. They're mounted on rubber vibration dampeners. Starter switch ground goes from the right switch, across the bars to the left switch and from there the black wire takes it to ground inside the headlight bucket.
-
Enjoy XS650.com? Consider making a donation to help support the site.
XS650.com receives a small share of sales from some links on this page, but direct donations have a much greater impact on keeping this site going.
You are using an out of date browser. It may not display this or other websites correctly.
You should upgrade or use an alternative browser.
You should upgrade or use an alternative browser.
What have you done to your XS today?
- Thread starter I am Carbon
- Start date
-
- Tags
- maintenance
There is no dedicated ground wire for the start button. The switch grounds to the switch housing, across the bars, to the left switch housing, out the black wire to ground inside the headlight bucket.Tks for the reply Jim... I can see now that the bars are not grounded but its not clear to me where the starter switch ground wire is. will have a closer look tomorrow.
Personally - ahem, from very limited experience of wiring three bikes - I like to make sure there is an earth wire from the yokes to the frame. That's because I don't like to rely on conductivity through the steering head bearings. On the XS, used the threaded hole on the front of the lower fork yoke - there's two to hold the brake cable guide? Fitted short bolt, ring terminal and a cable routed to a head-steady mount under the tank.
LTGTR
XS650 Addict
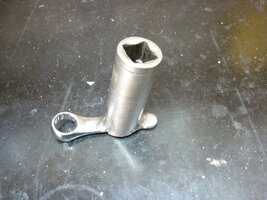
Hardly worth mentioning but I made a "crowsfoot" spanner for torquing the 3 nuts that reside on the side of the crankcase (3 of the 18 fasteners used to join the crankcases).
I know its not really a crowsfoot but I'm not sure of its correct name but it does the same job.
I understand it only works properly if kept at a 90 degree angle to the head of the torque wrench.
I tested it today (on a dummy fastener) - firstly I torqued a nut to 15 ft lb using the crowsfoot and then tested the torque of the nut using the direct method and had to increase the torque to 17 ft lb before I could feel half a fanny hair of movement of the torque wrench before it clicked off.
I have to admit I cant get my head around the idea that the offset wrench delivers the same torque as when the wrench is used normally (of course keeping the offset wrench at 90 degrees to the head of the tprque wrench).
Idea borrowed from a xs650 utube video.
Attachments
You’re right. It’s all about the length of the arm. At 90 degrees you’re neither adding nor subtracting.Hardly worth mentioning but I made a "crowsfoot" spanner for torquing the 3 nuts that reside on the side of the crankcase (3 of the 18 fasteners used to join the crankcases).
I know its not really a crowsfoot but I'm not sure of its correct name but it does the same job.
I understand it only works properly if kept at a 90 degree angle to the head of the torque wrench.
I tested it today (on a dummy fastener) - firstly I torqued a nut to 15 ft lb using the crowsfoot and then tested the torque of the nut using the direct method and had to increase the torque to 17 ft lb before I could feel half a fanny hair of movement of the torque wrench before it clicked off.
I have to admit I cant get my head around the idea that the offset wrench delivers the same torque as when the wrench is used normally (of course keeping the offset wrench at 90 degrees to the head of the tprque wrench).
Idea borrowed from a xs650 utube video.
I’ve always called them a dog one torque adapter. I use them on my Harley.
Well Raymond, a tip-of-the-old-hat to you, my good sir! After way too much tinkering about to find out why my starter switch wouldn't work any more, I thought of your yoke-to-frame ground strap. Despite the fact that I had connectivity between the frame itself and the yokes/headlamp shell with 0 ohms resistance, the starter bottom would not work unless the bars/headlamp shell were directly grounded to the frame. I can't afford the time to chase down the faulty ground, so I ran a dedicated ground wire from one of the ground connectors in the shell back to the frame. Problem solved. Bothers me that I couldn't find the fault, but at least its running again!Personally - ahem, from very limited experience of wiring three bikes - I like to make sure there is an earth wire from the yokes to the frame. That's because I don't like to rely on conductivity through the steering head bearings. On the XS, used the threaded hole on the front of the lower fork yoke - there's two to hold the brake cable guide? Fitted short bolt, ring terminal and a cable routed to a head-steady mount under the tank.
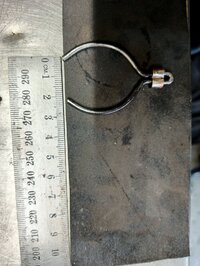
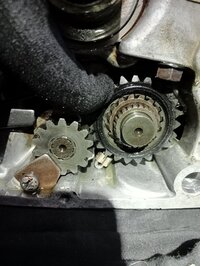
My starter gear is beginning to slip more often when the engine is cold so I tried modifying my old spare starter gear by squeezing in the vice with a 4mm drill bit in the crook of the spring to stop it deforming. I then slipped a 3.2mm wire rope swage fitting over the bend and squeezed it, hoping that will stop the spring spreading as easy.
Haven't installed it yet and not sure if the swage fitting will foul up on the cases but I'll have a try when I can.View attachment 243238
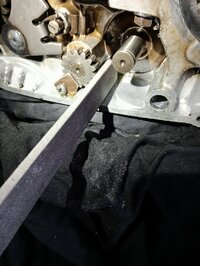
Bike was due for an oil change so I decided to install the starter gear with the wire swage fitting on the clip to hold the tension.Sounds promising.... I like it.
One suggestion I'd make is take a file and round off the hard edges of the swage, the part(s) where it'll rub on the case.
The swage fitting was just slightly touching the part of the engine case that the starter gear clip used to sit in so I could have filed a bit off the swage fitting but I didn't want to weaken it so I filed a bit off the groove in the case that doesn't get used anymore.
I made sure the gear slides freely then put it all back together and it works great with no grinding yet.
Now I can start on the brakes as both the front disc's and the rear disc have started squealing a few months after I sanded the rotors?
LTGTR
XS650 Addict
Oldfart - very interested in your swage fix. Would it be possible to show what you did refer the bit off the groove. I quess its too late for a photo - could you sketch/draw something please.
Just had a look at your original post which I had saved - can you explain how to fit/squash the swage. Is there a special tool. Excuse my lack of knowledge but my interest comes from the fact I have tried every possible method to get more than 4.5 Lbs pull includes all methods on the forum, new clips, old clips.
Regards Ray.
Last edited:
G'day Ray, yeah my bad, I realised after I put it back together I should have taken some pictures of how it looked but I didn't have much time in-between hospital visits to see my son who just had heart surgery and they gave him contaminated blood in the procedure.Oldfart - very interested in your swage fix. Would it be possible to show what you did refer the bit off the groove. I quess its too late for a photo - could you sketch/draw something please.
Just had a look at your original post which I had saved - can you explain how to fit/squash the swage. Is there a special tool. Excuse my lack of knowledge but my interest comes from the fact I have tried every possible method to get more than 4.5 Lbs pull includes all methods on the forum, new clips, old clips.
Regards Ray.
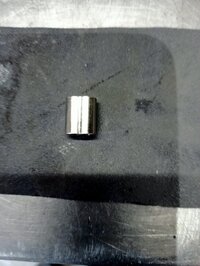
I just filed 1mm off the outside edge of the groove for the original starter gear clip using a flat file and it only took a minute or two after blocking the hole to the gearbox with a tissue to stop any filings getting in there.
To squeeze the swage fitting I just used a pair of crimping pliers but it could probably be done with a center punch or a small chisel.
As I mentioned I tried several swage fittings until I found a good fit and it will depend on which clip is being used.
The 3.2mm swage is perfect for the old thin type of clip, whereas the newer clip is thicker and would need a bigger swage.
I will post some pictures when I take it apart next time to replace the circlip that holds the starter gear in place as it has lost some of it's tension and I couldn't find anything suitable in the circlip selection.
Paleomechanic
XS650 Addict
I agree!No, the bars are not grounded. They're mounted on rubber vibration dampeners. Starter switch ground goes from the right switch, across the bars to the left switch and from there the black wire takes it to ground inside the headlight bucket.
Had exactly the same issue ! Had to remove some paint ( black bars) and run an eye with a wire to the common ground in the harness.
The eye I put on is on the bar clamp bolt underneath
LTGTR
XS650 Addict
Oldfart - thanks for your reply. Look forward to some more info when you replace the circlip. Just for my understanding - the swage slips over the clip, then when the centre of the swage is forced together it results in tightening the clip - or - do you squash the clip first and fit the swage while the clip is squashed.
Regards Ray.
Regards Ray.
G'day Ray, I squeezed the clip in the vice then put it on the gear and then I had to force the swage fitting to slide onto the clip , I was actually thinking it may have been too tight and wouldn't reIease when it should. Then I used the crimping pliers to squeeze the swage fitting hoping to hold the tension on the clip and it was hard to move by hand.Oldfart - thanks for your reply. Look forward to some more info when you replace the circlip. Just for my understanding - the swage slips over the clip, then when the centre of the swage is forced together it results in tightening the clip - or - do you squash the clip first and fit the swage while the clip is squashed.
Regards Ray.
If the swage fitting is put on the clip before it's fitted to the gear it's very difficult to get the clip onto the gear but it may work.
Hope this helps, the circlip is meant to arrive today so I will post some pictures.
The picture of my home made gear clip was my first attempt, the clip needs to be closer to the gear so it clears the cases.
LTGTR
XS650 Addict
Oldfart - many thanks for the trouble you have gone to to answer my queries. I am very interested in using your ideas and seeing the photos.
Regards Ray.
Regards Ray.
Oldfart - thanks for your reply. Look forward to some more info when you replace the circlip. Just for my understanding - the swage slips over the clip, then when the centre of the swage is forced together it results in tightening the clip - or - do you squash the clip first and fit the swage while the clip is squashed.
Regards Ray.
Glad I fitted the hex head screw kit for the clutch a few years ago, it makes it a lot easier to remove especially with a cut down Allen key in a cordless drill.
I put the gear in the vice and tied fishing line to the clip and the other end to a bucket and poured in water until the clip slipped after three and a half litres was added, about 7.5 lbs.
Here's a few pictures of how it goes and what the swage fitting looked like before I cut it in half so it would fit in the case.
Attachments


TheRepairMan
78 XS650SE owner
Moved a bunch of shit that had accumulated along side of the 78 XS to make room for my new XS... 2022 XS R 900.
Last edited:

Going on Hiatus
78 Special mock up with a few changes, but a motor that needs more attention than time I have right now so its going to a quiet corner of my shop.

Matching numbers (for what it's worth) engine for my '76 frame that I want to use lots of good stuff on.
I rolled the engine stand up onto the lift so I can work on it without bending. First job is to tidy up the wiring on the stand.
Well crap. Shed's overflowing... basement's overflowing. Garage is ...um, full shall we say.
Where the hell am I gonna put all this... um... stuff?


Where the hell am I gonna put all this... um... stuff?
TheRepairMan
78 XS650SE owner
And I just thought I had some stuff.Well crap. Shed's overflowing... basement's overflowing. Garage is ...um, full shall we say.
Where the hell am I gonna put all this... um... stuff?
View attachment 247548
View attachment 247549
Similar threads
- Replies
- 32
- Views
- 1K