1974 TX650A Restoration Project

I definitely found those posts and they were very helpful....but they didn't fully have the info I was looking to confirm (which is understandable and I figured worst case I could measure/assess and report back on it).

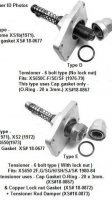
Specifically...the Type C seems to be the 'in-between' year, where they moved away from the sprocket-type but before they moved to the 'small acorn". So I'm fairly confident that my Type C tensioner will thread into the BBK, but what I couldn't find anything on was the length of it and how feasible it would be to thread one of the 'short acorn' caps right onto the tensioner (i.e. is the tensioner a different length? Would the short acorn bottom out, even with a lock-nut?).
I think he's asking what I have been wondering.
What chain tensioner parts are need for the BBK? Type E?
 
If these were mine, I'd put a fork in 'em.

Untitled.png
 
'cording to yammies sorta reliable partz diagrams, the shaft is the same all year 74 up but 5 twins explorations sez different, or that a new number superceded and was a direct replacement for the old?
edit; I'm all for using a rubber washer.........
 
Last edited:
I think you need the type D or E tensioner (I would use the type E w/ lock nut). I seem to recall reading that somewhere, that this is what the big bore cylinder uses. Even if your type C adjuster screw threads in, I think it's going to stick out too much and not allow the small cap nut to screw on enough. If you watch eBay, you can usually score a type E assembly for about $20, sometimes even less.
 
Somerville, If it turns out you need a descent "E type" tensioner and it becomes difficult to find, pm me. My extra E type isn't going to be installed for awhile. There are even descent left side rockers in that 82 head as well.
This Big Block project TX is way too cool to go too unexpectedly slowly for you. (us)
I'm at work but could provide parts pics this evening.
Edit, lft or rt rockers.. are those even interchangeable?
:cool:
 
Ok, just got back from spending a couple hours with the bike. Firstly - thanks for all the help today fellas, I'm very glad I'm doing this real-time this time around (I'm guessing this cam/rocker wear issue would have been caught last year if I was posting the rebuild in real-time).

@5twins Thank you for that.....exactly what I thought might be the issue. I don't have a little acorn, so I couldn't mock it up today, but I did take some measurements that are maybe useful for the 'collective cam chain tensioner' archives, haha.
One idea I had - Is there any reason a second locknut couldn't be used to fill the gap?
IMG_5409.jpg

IMG_5410.jpg
IMG_5411.jpg
IMG_5412.jpg


Ok - some additional pics of the cam and followers. I'm very glad I asked this group...I can say with some certainty that I would not have pegged the visible discoloration as anything significant. (Sorry in advance for so many pictures....I was trying to change the angles and lighting slightly between pics to make it easier to see the surfaces).
IMG_5393.jpg
IMG_5394.jpg
IMG_5395.jpg
IMG_5396.jpg
IMG_5397.jpg
IMG_5398.jpg
IMG_5399.jpg
IMG_5400.jpg
IMG_5401.jpg
IMG_5402.jpg
IMG_5403.jpg
IMG_5404.jpg
IMG_5405.jpg
IMG_5406.jpg
IMG_5407.jpg
IMG_5408.jpg


Let me know what you think. And if the feedback is still replacement - suggestions for options are also welcome (even if answer is 650central, yamahaxs650 and/or Mike's)

@Machine Randy - you rule. Thanks for the offer, I might take you up on it. Wondering if you were changing rockers if you wouldn't change them all?
 
Yeah, that cam's just a good core for a regrind. All the followers are shot too. Hate to be the bearer of bad news, but that's a no brainer... replace 'em. Have a good look at the rocker shafts when you pull 'em. Pics maybe? There's a better'n even chance that was oil starvation..... and it galled the shafts too.
 
Yeah, that cam's just a good core for a regrind. All the followers are shot too.

Oh man. Thanks for shooting me straight @Jim , haha. Can you help me understand what you're seeing here for my own understanding? Is it just the dulling of the polished surface or something beyond that? What would happen if one were to continue to run that cam and followers, out of curiosity?

Ooooh boy.....talk about a rabbit hole......I never even contemplated another cam when I was researching for my rebuild last year. I'd have no idea where to start. Regrind mine? Something more aggressive? What are the implications then on valves and springs and does that turn into a head-rework? (this is where I stop being excited and start getting sort of bummed out about it since it's all work I'd have to farm out).

What would my sage colleagues consider, if in my shoes?? :geek:
 
Can you help me understand what you're seeing here for my own understanding?
Galling. It's where two surfaces exert force against each other without (adequate) lubrication. Think friction welding. The cam and follower (rocker) have deposits of each other on their surface. Yours would be considered pretty minor. Problem is, none is really acceptable for this application because it means the surface hardening (nitriding et al) is breaking down. It will only get worse.
 
The really sad part is it's just begun, otherwise there'd be more heat discoloration. I'd guess the cracked oil pump you found was only a hundred or so miles before you tore the bike down. In the words of Max Smart... Agent 99.... "Missed it by that much." :rolleyes:
 
Problem is, none is really acceptable for this application because it means the surface hardening (nitriding et al) is breaking down. It will only get worse.
Got it. And that makes sense as to why it wouldn't be wise to button it all back up now that it's occurred. Most of my technical knowledge is in the organic side of things, I'm kind of a dolt when it comes to metallurgy or inorganic materials science.

The really sad part is it's just begun, otherwise there'd be more heat discoloration. I'd guess the cracked oil pump you found was only a hundred or so miles before you tore the bike down. In the words of Max Smart... Agent 99.... "Missed it by that much."
Hahaha....I guess laughing about it is better than the alternative...

Been reading about cam options for the last hour or so. Seems like a regrind (or replacement) with a stock profile is a safe bet, but also seeing the other popular options are the Shell #1 from Hoos (which are maybe back in stock soon) or the "Web Cam" 59 or 59a grinds. The new Yamahaxs650.com site has these in stock for $199 after the core charge refund (here). And seeing advice to stay away from anything with a bolt-on sprocket, which intuitively makes sense to me.

When I did my rebuild the valve springs were in spec, so I reused them. The Shell or Webcam would both need performance springs.

Will also need to track down some rocker arm options.

If you do a google search for "camshaft galling," here's what you'll find...
OHHH so it's literally in the dictionary next to galling. Glad I could provide such a textbook example :laugh::laugh::laugh:
 
Here's the big bore rabbit hole as I see it.... More displacement means more potential horses. That means we can burn more gas... that means bigger carburetors . Bigger carburetors means more cam duration and lift to let them carbs breathe. More lift means better springs to coral the valves. Then there's the ports... and exhaust....
Guess it all depends on where you want to draw the line. I bought a big bore kit for my speed twin build. I'll prolly run across ya down that rabbit hole... :rolleyes:
 
I am just loving this thread, and thankful for all of this shared knowledge! That said, you guys have now scared the shit out of me regarding galled camshaft lobes and rocker arm surfaces. I'm certain mine were not so pristine when I put my TX engine back together...
Looking forward to more great photos Somerville.
 
Well.....while I sort out my cam and rocker woes....I'll can get back to our feature presentation with a few more pics of what I got up to Sunday.

Pulled the head and jug off....turns out it doesn't take a real long time to get pretty filthy in there...gonna have to give those gasket surfaces a good clean.
IMG_5353.jpg
IMG_5355.jpg


At this point I realized the reason Jim's top-end thread is so great (and why I had a similar experience last year w/ my rebuild) is because he's starting with perfectly clean parts and leaving out the part that !*#$& sucks. Here's some very unglamorous pics of me stuffing the open motor w/ shop towels and scraping gasket remnants off the cases with a plastic scraper blade and Permatex gasket remover. It probably took 20 minutes or so and one of many grimy scraping jobs of the day.
IMG_5358.jpg
IMG_5361.jpg


Ok....new BBK gasket on my nice new clean mating surface.
IMG_5363.jpg
IMG_5364.jpg


Here are a couple that I thought were interesting showing the stock OEM jug next to the BBK.
IMG_5366.jpg
IMG_5367.jpg


Next one is pre-installing my Hoos cam-chain front guide (with some crappy HW:rolleyes::rolleyes:). Centered within the tunnel to < 0.5mm tolerance which seemed plenty when I mocked up and eyed the width of the chain on the guide.
IMG_5368.jpg
IMG_5370.jpg
IMG_5371.jpg


Forgot to take a pic, but I then pre-installed the pistons in the bores with the jug upside-down from the bottom. Lots of posts here and in the manual for ring gap orientation, so won't rehash that. Made sure to install the interior circlips on each piston as well.

Ok, so something I did find that was a little surprising....I don't know if it was just my kit, or play in my studs....but I actually had a bit of trouble getting the BBK jug onto the motor. It seemed to hang up on the threads. Whether it was the tolerances of the kit, or maybe my threads were splayed out from years of use, I don't know. It could move by hand but was just really snug and would bind every time I tried to push it down (almost felt like it was sort of cocking left, then right). I think the 8 individual points of movement amplified this 'cocking' effect. In any case, I ended up adding some assembly lube to the studs (although grease may have been better) and very lightly tapping left/right to get it on. I was concerned about this damaging something but I could feel it sort of 'wiggling' down the studs each time I tapped it, so I just stuck with it. It ended up taking longer than you might think, but it got on there eventually and I hand threaded a nut on each stud successfully, so I didn't damage any threads.

IMG_5373.jpg


At this point I used whatever ridiculous combination of handy items (dead-blow handle and random block of wood) to position the jug so that I could get the wrist pins in. While I don't show it here, be sure to put those shop towels back into the motor when installing the other circlip...it's tempting fate otherwise...
IMG_5379.jpg
IMG_5382.jpg


And with that, BBK jug and pistons installed.
IMG_5384.jpg
IMG_5385.jpg
 
Back
Top