1978 XS650 Special Project

Hmm
Since I had to make an adjustment to the cam chain tension prior to setting points the first time and after replacing points the points came out of adjustment. I’m worried my cam cabin is end of life.
I also had some plastic bits on my oil filter when I pulled it out to replace.
That usually indicates a need to replace the cam chain guide and while you’re in there freshen up anything else. Although it’s only showing 16K who knows what was done in that time. I’ve found a good indicator is set the advance plate locating pin at 12oclock which should be TDC and see where the timing mark is. If you can’t get it to line up and time chances are your chain is stretched.
 
Last edited:
I'll start researching changing guide and chain.
I looked at the timing I set last night and its holding.
Went on a 15 mile ride between youth sports and timing is still holding.
Heads were about 260F at the end of the ride. Its 55F out
IMG_7716.jpg
 
Cam chains can and will last much longer than 16K miles, but that's only if they're kept properly adjusted - and there's the rub. Most of these bikes never got the proper maintenance they needed, they were neglected. Also, the chain tension should be checked more often than the manual states (every 4K miles). It should be done about every 1000 to 1500 miles. Since that's about the mileage most of us change our oil at, I've gotten into the habit of checking the cam chain tension when I do an oil change. I also prefer to check the tension on a warmed up motor. Setting it on a cold motor may result in a chain that's too tight once things are hot and expanded. The easiest and best way to check and/or adjust the chain tension is to do so while the engine sits there idling. Watch the plunger in the end of the adjusting screw. You want to see a small amount of in-out movement, maybe 1mm to 2mm, and that the plunger isn't coming out past the end of the adjuster screw. More movement than that, or the plunger coming out past the end of the adjuster screw, indicates the chain is too loose. No movement of the plunger means the chain is too tight. This adjustment method is pretty much foolproof, unlike the "static" method outlined in the shop manuals. It's pretty easy to screw that up and get the chain too loose. So normally, I tighten the adjuster screw down until the plunger stops or almost stops moving, then loosen it back up until I get the desired 1mm to 2mm of in-out movement. Quick and easy to do.

But there's another factor that pertains to your model that can contribute to early and more rapid cam chain wear and stretch, and that's the type D cam chain adjuster it came with. If you study the various cam chain adjusters that came on this bike over the years, you'll discover that the type D is the only one that didn't come with a lock nut to lock in your adjustment setting. The acorn cover nut was meant to act as the lock nut. I'm sure you've encountered the scenario where when tightening a nut, the bolt will start spinning when the nut is almost tight. You need to hold the bolt with another wrench in order to tighten the nut fully. Well, the same thing may happen when you tighten the acorn cap nut down, it may tighten the adjuster screw more as you do so. The problem is, there's no way to know if this has happened. The chain may now be tighter than you set it at, and running a chain too tight leads to premature stretching. See post #22 and #23 here for more details and the "fix" .....

https://www.xs650.com/threads/cam-chain-tensioners.1056/page-2
 
When I first did the valves and the timing, the center of the tensioner was sticking out almost a mm
I’ll check it when bike is warmed up this week.
 
I forgot to mention that one of the signs that the timing chain is stretched out is running out of adjustment on the timing plate, which you seem to have encountered. So, even with just 16K miles, there is a good chance your chain is stretched out and needs replacing. Of course, the type D adjuster may have played a part in this. Every time the acorn cover nut was installed after a cam chain tension check or adjustment, it may have turned the adjuster in more and made the chain too tight.
 
Something I dont understand about the correct adjustment of the tensioner.
It is said in a lot of answers and I quote from 5Twins post above "You want to see a small amount of in-out movement, maybe 1mm to 2mm, and that the plunger isn't coming out past the end of the adjuster screw. More movement than that, or the plunger coming out past the end of the adjuster screw, indicates the chain is too loose" This doesnt make sense to me because how can the plunger come out past the adjusting screw.
5Twins refers to another thread above in post 183 (which I have used many times to sort out adjusters) which shows the correct plunger, correct damper washer and correct adjusting screw will always show the plunger flush with the end of the adjusting screw when the plunger is bottomed out against the adjusting screw. In other words the plunger cant come out any further - its bottomed out.
If the chain is too loose, how can the plunger come out past the end of the adjusting screw. Obviously the plunger can follow a chain inwards as it wears.
Am I missing something.
Refer to 5twins post above 183 and the link to the different cam chains.
Thanks
Ray.
 
This doesnt make sense to me because how can the plunger come out past the adjusting screw.
5Twins refers to another thread above in post 183 (which I have used many times to sort out adjusters) which shows the correct plunger, correct damper washer and correct adjusting screw will always show the plunger flush with the end of the adjusting screw when the plunger is bottomed out against the adjusting screw. In other words the plunger cant come out any further - its bottomed out.
If the chain is too loose, how can the plunger come out past the end of the adjusting screw. Obviously the plunger can follow a chain inwards as it wears.
Am I missing something.
This very question had me as well studying my own avaliable type E chain tensioner components yesterday.
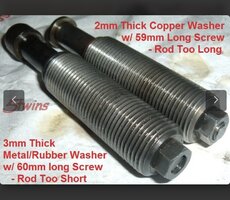
Now I do not have the 2mm copper washer available to see but I do have both length screws and the 3mm steel washer, which ended up being used with the 59mm screw body.
It seems to me the only way the plunger end could come out past the screw body is if the combination of 59mm screw is used with a 2mm washer on the type E tensioner ?
(that combination shown is a 2mm steel washer shown in pic with a 60mm screw on the counter this morning)
 

Attachments

  • IMG_5979.jpeg
    IMG_5979.jpeg
    188.3 KB · Views: 27
  • IMG_5980.jpeg
    IMG_5980.jpeg
    255.9 KB · Views: 24
  • IMG_5981.jpeg
    IMG_5981.jpeg
    275.2 KB · Views: 24
I'm sorry guys, I guess I misspoke in that post. You're right, the plunger can't come out past the end of the adjuster screw, unless the damper washer and screw length are mismatched, and if they are that doesn't mean the chain is too loose if the plunger comes out past the end of the adjuster screw. In fact, the tension would probably be about right if it did come out past by a MM or so. If you loosened it up to make the plunger flush, the tension would be too loose.

XSE 2Timer, the original 3mm thick damper washer is a combination rubber/metal washer. You want it softer than steel so it acts as a damper. You may want to seek out another washer (copper, brass) that is softer than that all steel one you have now. As I mentioned in the write-up I did, that original rubber/metal damper washer is still available from Yamaha (and aftermarket from Mikes, XS650.com, etc.) but is quite expensive. Mike's describes it as an upgrade and improvement but I've found no difference (except the cost, lol). And it also doesn't fit right on the older, longer 60mm screw, keeping the plunger from coming out flush with the end of the adjusting screw. Mike's fails to mention this in their sales pitch, lol.

If you have access to one, you can scrounge the 3mm thick rubber/steel damper washer from an SR/XT/TT500.
 
IMG_5990.jpeg

“Type E” Alls good that ends well 👍
59mm +3 , or 60mm +2 results are the same.
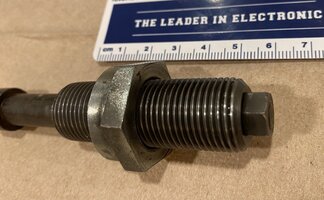
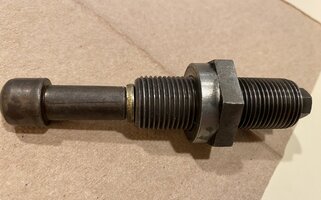
Incidentally my missing copper 2mm washer magically appeared today so that combination has won. And I had no idea that a shorter version of the locknut was a thing, but there it is painted black. No idea where that came from
Good learning !
IMG_5991.jpeg
 
Hmmm, yes I wasn't aware of the short lock nut either, good stuff.

I was having issues when trying to loosen the cap nut, the lock nut would come loose with it. That was no good for trying to do a tension check as the setting may have changed when the lock nut loosened. All the 27mm wrenches I had were too thick, not allowing me to get a 22mm socket or wrench on the cap nut with one of them holding the lock nut. So, I bought a 27mm flare nut wrench off eBay from China and modded it. It was, of course, too thick as it came, just like all my others. It was about 16mm thick .....

WrenchesCompared.jpg


HeadThickness.jpg


So I took my grinder to one side of it and ground it down to about 12mm thick .....

GroundDown.jpg


..... and now it fits fine, exposing the whole head of the cap nut ......

GroundDownFit.jpg


https://www.ebay.com/itm/2031972012...rJWpFDYeMILilA%3D%3D|ampid:PL_CLK|clp:3458402
 
:twocents:
Engine cold, spark plugs out, spin it with the e-start, a "little bit" of plunger in-out, done.
 
OK, here is what it looks like.
I warmed up the bike a few minutes then did this.
plugs were unplugged but not out (did not read gggGary's post till after I shot video and went to work)
When I uncapped the acorn nut, the plunger was slightly out, I turned 1/4 turn CCW then shot this video.
I'm still of the mindset that I will need to change the camchain and the front guide (and more bits/pieces like gaskets I pull apart?

Reminder, I have a 1978


Last edited:
Your video nicely illustrates why I don't like using the "static" method for adjusting the chain tension. You'll notice that most of the time, the plunger is inset inside the adjuster screw but occasionally, it pops out past the end. So, according to the shop manual "static" adjustment method, you would loosen the adjuster to make the plunger flush with it's end. Now, rotate the engine some more and this will happen again, so you loosen the adjuster more. Keep turning the motor over by hand and this will keep happening, and you'll end up with a setting that's way too loose. You have to ignore that occasional pop out and just go by how the plunger is sitting the rest of the time.

Why does this happen? Well, normally while turning the motor over by hand, turning the crank CCW by the rotor nut, tension is put on the front run of the cam chain because the crank is pulling down on it to turn the cam. Cam chain slack is all in the rear run and the tensioner can be set. But you'll notice a couple times during the engine's rotation where it runs on by itself without you needing to turn the crank. As valve springs force valves closed, they push on their rockers which push on the cam lobes and turn the cam by itself. When this happens, the crank isn't turning the engine anymore, the cam is, and this shifts the cam chain tension to the rear run of the chain. This is what causes the occasional "pop out" of the plunger and why you need to ignore it.

So, taking this all into account, let's take another look at your video. Ignoring that occasional "pop out", the plunger in-out movement may be a bit much, and the plunger may not be coming out flush with the end of the adjuster screw. I'd say the chain is a little loose. But to be sure, start the motor and observe the plunger movement and position as the bike sits there idling. With the motor running you won't get that occasional big pop out, it's spinning too fast for that to happen. Like I said, this adjustment method is foolproof.
 
5Twins thanks again so much for the input.

Here is a video (first video below) of why one should NOT run w/ the acorn nut off on a '78. Notice how its spinning.
I did not notice it while filming and as it loosened I heard the cam chain rattling something fierce.

I then in the 2nd video just bumped the starter a little at a time with plugs out.
I noticed a definite change in how it bounced w/ the plugs out. Much less bounce. This 2nd video is where it is currently at.

 
Lol, yes, that's another thing you can demonstrate to yourself if using the adjust-while-running method - how a too loose chain sounds. Tighten the adjuster back up as the engine sits there running and the chain noise should disappear. Keep tightening the adjuster until the in-out movement stops or almost stops, then loosen it back up to get that slight in-out movement you're looking for (about a MM or so), and you'll have the perfect cam chain tension. That is, until you install the cap nut and it makes it tighter, lol.

So, you should put upgrading your type D tensioner to a type E on your "to do" list. All the parts are the same between the type D and type E except for the plunger and the addition of the lock nut. You can usually find complete tensioner assemblies on eBay for $20 or less. All you really need is the longer type E plunger and the lock nut but they don't come up listed alone too often. You can buy a new lock nut from YamahaXS650.com if you do happen to find just the plunger.
 
Last edited:
Not without adding the longer plunger. The longer plunger means the adjuster doesn't need to be screwed in as far to achieve the correct tension, and that provides room on it for the lock nut.

CamChainTensioners.jpg
 
Alright you two. This plunger “pop out” (type D) symptom read to me as a “say what?” I followed as I drove the Volvo Semi & 53’ trailer to wine deliveries in the Seattle district.
13 hours later I pulled the dome cap off my 78E type D cam chain adjuster and manually turned over the engine. Yup, I saw the plunger “pop out” past the screw. So I concluded infact the Type D rod can protrude.. off came the type D tensioner to inspect.
Good news ! Type D has a 60mm screw and the preferred 2mm copper washer. So all it takes to upgrade to a type E is infact the plunger and the locknut and locknut copper washer, which after years of procrastination, is now done. (the type D did not ever seem to err)
IMG_5994.jpeg

IMG_5993.jpeg

and it feels Goood 😆
 
Last edited:
Back
Top