Trust me... it'll slide. Push on the pins while you wiggle the chain side to side. The link will push out.Hmm Okay I’ll try again just didn’t want to go hard On it ... I don’t see this sliding anywhere
-
Enjoy XS650.com? Consider making a donation to help support the site.
XS650.com receives a small share of sales from some links on this page, but direct donations have a much greater impact on keeping this site going.
You are using an out of date browser. It may not display this or other websites correctly.
You should upgrade or use an alternative browser.
You should upgrade or use an alternative browser.
An Adventure in Firsts: '83 XS650 Heritage Special Build/Rebuild
- Thread starter MarieKaramazov
- Start date
See if side plate will pull off. If pulls off great if not go to next step anyway. Pin punch of correct size, tap, tap,tap alternating on the pins. Best place is for link to be on rear sprocket.
Good lucks!
Good lucks!
Just mentioning.
The chain needs to be there if the Sprocket shall be removed. Or tightened .
It can be virtually impossible without chain and brake ( not sure how it is done with spokes )
Since i have cast wheels and stick in a pipe stump in the rear wheel to fixate it.
The chain needs to be there if the Sprocket shall be removed. Or tightened .
It can be virtually impossible without chain and brake ( not sure how it is done with spokes )
Since i have cast wheels and stick in a pipe stump in the rear wheel to fixate it.
If you have a rattle gun no problems. It can also be done without. You do bring up a good point. If he plans on removing the sprocket he probably should loosen the sprocket nut before removing the chain.The chain needs to be there if the Sprocket shall be removed. Or tightened .
MarieKaramazov
XS650 Addict
Not removing sprocket. Need chain off to get better look inside LH cover.
Tried all the above (and a rubber mallet and Wd, and wishing, and tapping with Phillips, I don’t have pin punch, and tried pulling/prying with pliers. )
Thing is if these pins are supposed to slide down Through the hole I don’t see how since the head of the pin is bigger than the hole. But perhaps pushing them flush to hole pops out the cover of the back side.
I gotta walk away or I’m going to start hammering. I just got defeated by a chain link
Watch this.
Since you showed that you have a clip the heads should not be bigger than the holes in the link. May need some penetrating oil and time. Instead of tap,tap,tap may have to go to rap,rap,rap.
Good lucks.
Good lucks.
MarieKaramazov
XS650 Addict
Yup, watched that this morning and tried itWatch this.
MarieKaramazov
XS650 Addict
The do look a bit bigger than the holes though. You can kinda see in pic. I’ll clean that link tomorrow so I can get a clearer look and grab some penetrating oilSince you showed that you have a clip the heads should not be bigger than the holes in the link. May need some penetrating oil and time. Instead of tap,tap,tap may have to go to rap,rap,rap.
Good lucks.
Did you loosen and slide the rear tire forward slightly? That helps take the load off the pins.... and makes reassembly much easier too.The do look a bit bigger than the holes though. You can kinda see in pic. I’ll clean that link tomorrow so I can get a clearer look and grab some penetrating oil
Trust me... the pins will fit through the holes. They went in to connect the ends... they'll come back out to disconnect them.
I prefer to have the master link away from the sprocket, on the underside where the chain is slack,.........yes +1 with jim slacken off the chain adjuster as well
MarieKaramazov
XS650 Addict
I did not! I'll try that as well.Did you loosen and slide the rear tire forward slightly? That helps take the load off the pins.... and makes reassembly much easier too.
Trust me... the pins will fit through the holes. They went in to connect the ends... they'll come back out to disconnect them.
Also, re the pushrod, I "unscrewed" and then rescrewed the worm gear/arm so it'd sit at the right height (it needed to go lower) and also loosened the clutch cable adjuster and nut at handlebar (which was a bit fussy and wouldn't come all the way out). It was likely caused by my mistake as I'd originally unscrewed the worm gear by accident and must of screwed it back in at wrong height as how high it sits once it's connected to cable depends on which position you start screwing it in at. Anyway, cover is on, pushrod and worm are friends again.
Agree to take tension off of the chain. Sometimes you can tap a very thin bladed screwdriver in behind the plate and gently pry it off. Need to pry at both ends so it is coming off parallel to the chain behind it.
Glad you have the clutch push rod issue sorted. It's how we all have to learn, especially with nobody on hand to show how it's done. BTW, loosening the adjuster at the clutch lever means winding the adjuster into the housing. Sounds like you were winding it out?
To adjust the clutch, wind the adjuster at the lever perch all the way into the housing.
At the other end, under the l/h cover, loosen the locknut with a ring spanner, wind the screw in the centre inwards - clockwise - until you feel it just touch the ball bearing, then back it out a small amount, maybe 1/8 turn. Hold the screw in that position as you tighten the locknut. Check play at the lever - should be just a little bit of free play.
There is rarely any problem removing a spring link, although they are slightly more fiddly to fit on O-ring chains. I always have the link at about the 2 or 3 o'clock position on the rear sprocket. With spring clip removed, the link usually just pushes out to the rear - use the nose of the pliers to push a pin in and pull the link out from behind with fingers. Sometimes, have had to tap with hammer and drift, such as an old screwdriver. If the head of the pin really is larger than the hole, then your chain has been abused for reasons that I cannot think of. In that very unlikely event you would need a chain breaker. Or grind the head off with an angle grinder.
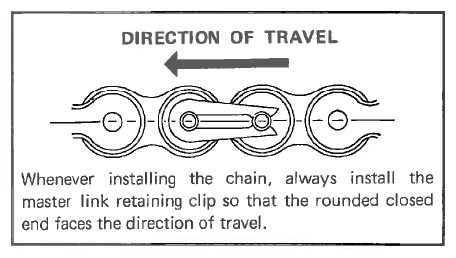
When reconnecting the chain, and this is where I disagree with the video, I put both ends of the chain on the sprocket in same position as before. As long as the ends are in adjacent dips, the spring link should push in from the rear with fingers only needed. Especially if you have moved the wheel slightly forward but that isn't usually necessary. With an O-ring chain - remember to have the four O-rings in their correct places - helps to push the side plates together with pliers to squash the rubber before re-fitting the spring clip. Closed end to the direction of travel.
To adjust the clutch, wind the adjuster at the lever perch all the way into the housing.
At the other end, under the l/h cover, loosen the locknut with a ring spanner, wind the screw in the centre inwards - clockwise - until you feel it just touch the ball bearing, then back it out a small amount, maybe 1/8 turn. Hold the screw in that position as you tighten the locknut. Check play at the lever - should be just a little bit of free play.
There is rarely any problem removing a spring link, although they are slightly more fiddly to fit on O-ring chains. I always have the link at about the 2 or 3 o'clock position on the rear sprocket. With spring clip removed, the link usually just pushes out to the rear - use the nose of the pliers to push a pin in and pull the link out from behind with fingers. Sometimes, have had to tap with hammer and drift, such as an old screwdriver. If the head of the pin really is larger than the hole, then your chain has been abused for reasons that I cannot think of. In that very unlikely event you would need a chain breaker. Or grind the head off with an angle grinder.
When reconnecting the chain, and this is where I disagree with the video, I put both ends of the chain on the sprocket in same position as before. As long as the ends are in adjacent dips, the spring link should push in from the rear with fingers only needed. Especially if you have moved the wheel slightly forward but that isn't usually necessary. With an O-ring chain - remember to have the four O-rings in their correct places - helps to push the side plates together with pliers to squash the rubber before re-fitting the spring clip. Closed end to the direction of travel.
Last edited:
Maybe too late by now, but make sure you have a good strong battery in your VOM. They last a long time but eventually do need to be replaced. I started getting inconsistent readings on mine awhile back, especially when trying to measure low resistance levels on the ohms scale, and finally put in a new battery when I couldn't think of anything else to try. That solved my problem.Welp, this is strange. Measures a little shy of 2in, so about 49-50ish mm. Cover went on okay just placing it this afternoon so I figured I was seeing/feeling things that weren't real last night, but then just now it didn't seem to fit on right again--it's acting like a seesaw around the pushrod area, not going flush on right or left at the same time. It has been getting dark both times I've had problems so I'm just going to have to look at it again tomorrow. @Jan_P Yeah I can see rod is going in the right place, that doesn't seem to be the issue.
That's the weird thing--I can't get a stable reading crossing the wires, that's why I haven't deducted. Sometimes it's 0, other times it's .7, then it's .4 to .3 to .2 to .1...and so on. Whichever number does show, it never stays on screen. I have it set to the OHM setting...all I can think of is there's some special trick with this meter I haven't realized.
Load test was good! 12.4V after killing it. 12.03V 30 minutes later (key still "on" with this reading; 12.3 with key off). Surprising...
Stator wire exam
I couldn't get too close or pull it apart too much without taking off the chain--which I was running out of time to do cuz it was dark and haven't done that before. I'll get at it tomorrow. I did however rig up a thing to move chain enough and peel back hosing a bit carefully to get to this:
View attachment 177738
(More pics in thumbnail gallery). From what I can see, inside the outer rubber housing there's (at least) 3 rope like wires and at least one of those is showing fraying, or at least it's worn to the inside (the silver bits)
MarieKaramazov
XS650 Addict
Chain: 2, Me: 0.
Tried penetrating oil and loosened the chain as much as possible--which believe it or not took hours because I had to remove the exhaust and axle nut etc and everything was quasi-seized and stubborn or just insanely put back like the weird chewed up bowtie shape that was the reused cotter pin, but that part all got completed so at least there was that. I went at the link with a rubber mallet, tried separating back piece using a Philips and a mallet, tried it in various positions (on sprocket, off sprocket), and I tried staring at it. Any more force and I'm going to be damaging things, if I haven't already. Thing is, it's not even moving. Maybe the penetrating oil will do something by tomorrow. As far as what chain I have, I saw it said lm530 pro on the master link. Searched that and found someone else on here years ago cut theirs off cuz it wouldn't come apart haha. That'll be me if tomorrow doesn't show me anything new. Tried prying from the back as well as much as I could given the angle. Thanks for the help so far everyone. Only angle grinders I've used were pneumatic, which is not a setup I have...so maybe just a chain breaker of some kind if tomorrow is a 0

I'd briefly tried opening it but then figured I better not as I wasn't sure that was to be lifted and the only entry point looks like a little divot on the bottom and a Phillips didn't lift it. I'll look at that again tomorrow as i think it will resolve some of the "off" feel in the adjustment now. I was adjusting it from the inside. Perhaps it pops out when I'm screwing from the inside, I usually have exterior of cover on ground. Thanks!
Tried penetrating oil and loosened the chain as much as possible--which believe it or not took hours because I had to remove the exhaust and axle nut etc and everything was quasi-seized and stubborn or just insanely put back like the weird chewed up bowtie shape that was the reused cotter pin, but that part all got completed so at least there was that. I went at the link with a rubber mallet, tried separating back piece using a Philips and a mallet, tried it in various positions (on sprocket, off sprocket), and I tried staring at it. Any more force and I'm going to be damaging things, if I haven't already. Thing is, it's not even moving. Maybe the penetrating oil will do something by tomorrow. As far as what chain I have, I saw it said lm530 pro on the master link. Searched that and found someone else on here years ago cut theirs off cuz it wouldn't come apart haha. That'll be me if tomorrow doesn't show me anything new. Tried prying from the back as well as much as I could given the angle. Thanks for the help so far everyone. Only angle grinders I've used were pneumatic, which is not a setup I have...so maybe just a chain breaker of some kind if tomorrow is a 0
Ahaaa, so you must mean coming in from the outside of the cover by opening this guy (below).At the other end, under the l/h cover, loosen the locknut with a ring spanner, wind the screw in the centre inwards - clockwise - until you feel it just touch the ball bearing, then back it out a small amount, maybe 1/8 turn. Hold the screw in that position as you tighten the locknut. Check play at the lever - should be just a little bit of free play.
I'd briefly tried opening it but then figured I better not as I wasn't sure that was to be lifted and the only entry point looks like a little divot on the bottom and a Phillips didn't lift it. I'll look at that again tomorrow as i think it will resolve some of the "off" feel in the adjustment now. I was adjusting it from the inside. Perhaps it pops out when I'm screwing from the inside, I usually have exterior of cover on ground. Thanks!
It's brand new, but maybe the battery was not so new or good...Maybe too late by now, but make sure you have a good strong battery in your VOM. They last a long time but eventually do need to be replaced. I started getting inconsistent readings on mine awhile back, especially when trying to measure low resistance levels on the ohms scale, and finally put in a new battery when I couldn't think of anything else to try. That solved my problem.
Attachments
If the chain is a throw away then cutting the link would be easiest.............If not, then you could try to do it this way....Run the chain link back ti the back of the rear socket as in the previous pic.........using 2 small screwdrivers, or something along those lines, gently drive then between the link plate and the previous/next link, (as per arrows), try to get as close to the end of the link plate, ............. use small increments, evenly, one end then the next, so as to keep the plate as square as possible. .......Using a back and forth motion it should work.......Well you know, hopefully, nothing to loose.........
just have to hope the ends of the link haven't been burred at all other wise the link plate may not pass over them.............you said you used a rubber hammer so they should b ok

just have to hope the ends of the link haven't been burred at all other wise the link plate may not pass over them.............you said you used a rubber hammer so they should b ok
Ahaaa, so you must mean coming in from the outside of the cover by opening this guy (below).
View attachment 177851
I'd briefly tried opening it but then figured I better not as I wasn't sure that was to be lifted and the only entry point looks like a little divot on the bottom and a Phillips didn't lift it. I'll look at that again tomorrow as i think it will resolve some of the "off" feel in the adjustment now. I was adjusting it from the inside. Perhaps it pops out when I'm screwing from the inside, I usually have exterior of cover on ground.
Yes, that little round cover is there for your clutch adjustment. You need to prise it off - use a flat-headed screwdriver, maybe wrap a rag to avoid scratching the alloy cover. Sometimes, helps to work it from a few sides. It shouldn't be too tight. But then again, on your bike . . .
To refit, just push it back in. Might need to give it a tap with a soft drift - piece of wood? - and your rubber mallet. On the other hand, if it gets loose from frequent removal & replacement, you can work round the tangs with pliers just gently bending them outwards a smidgeon.
Waiting to see how the saga of removing the chain works out. It doesn't look too bad/rusted up from the photos? But if you're having problems removing the spring link, it's probable the chain is knackered. If so, it's fair game to use necessary force to take it off. A chain splitter should do the job.
You should replace both sprockets and the chain as a set - old sprockets will be worn and they will wear a new chain if you don't change 'em.
Chain tool ?
Not sure if mentioned
In these days there are almost always a tool to be found out there
A poor quality chain breaker can be used
something like that
https://www.ebay.com/itm/Motorcycle...752260&hash=item34306debe9:g:JOUAAOSwmAFfkcoK
It is a lot cheaper than a new chain .But the cheap ( Breakers ) ones are not of good quality .So Paying a bit more is probably better.
If you intend to use it more times.
There are even cheaper ones
But for pressing out that link it would be enough I believe.. ( I also believe it would come out with a soft punch and tapping the ends )
Please google
motorcycle chain breaker
You se the principle and then can compare what tools are in the box vice grips and so.