Anyone interested in a thead about my first time?

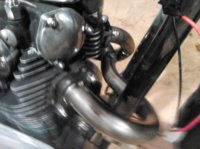
Lest, here is a link to those exhaust inserts you asked about. Omar's call them exhaust port optimizers. I believe they were developed by Michael Morse.

http://omarsdtr.com/stxopt.html


Thanks for the link, anybody out there give this a go ? ? ? ? ?
I'm about 225 plus gear so I sort of feel the bike needs a little more umff.
I'm also a cheap ass so I want the quick and cheap horses not a total refase/ scratch rebuild race engine ect. any sugestion?????
Think I'll start another thread now..... :doh:
 
I am proud to say I have a 'one kick' bike! For each time I try to start the bike, I receive one kick back in return from the bitch...thats how its supposed to be, right? I am happy to say that I did get it running, but the engine is only firing on one cylinder. (So that only makes me half of a F*ck up?)

Basically I took one step forward and about 4 steps backward today. I filled up on oil and almost immediately found a leak at the start motor cover. I went to tighten down the bolts and had one break on me. I also discovered a leak at the clutch push rod seal. This one really ticks me off because that was a brand new seal. Despite the leaks, I was determined to move forward. Kick it over quite a few times and heard the occasional few pops from the engine. I did get it running for a few seconds, gave it a little throttle and it backfired through the carbs and killed on me. I have been able to get it started about 4 or 5 different times now, but each time is the same story: Firing on one cylinder, backfire through the carbs when i try to rev it even slightly and then it kills. I am running a Pamco, and since both plugs are supposed to fire at the same time at TDC every rotation, should I be looking more towards a carb issue vs electrical for the side that isnt firing? I also found gas back spraying from the carbs into my air filters. So I have more problems to trouble shoot, which means more searching and reading countless threads. Any advice is welcome here too!
 
Now you know why they only made 3 Reverse Head Roberts Specials.

Backfiring and gas spraying back might indicate an intake valve(s) to tight. Or timing chain and timing issues. Start with loosening the valves. Clatter is okay for short term troubleshooting.
 
I have had the same starter seal leak.... this thread was helpful....
http://www.xs650.com/forum/showthread.php?t=20844
Its oil tight now... I also have a small pushrod leak you mentioned.... hate it but I will leave it until this winter.

Conserning your one cylinder fire.... could be a coil.... just switch the pluggwires and see if the other side fires... then you will know.
Ditto the intake valeve check.
what kind of condition are the carbs in? Taken off a running bike or dug up out of the ground?

best of luch keep us posted
 
Last edited:
Conserning your one cylinder fire.... could be a coil.... just switch the pluggwires and see if the other side fires... then you will know.
Ditto the intake valeve check.
what kind of condition are the carbs in? Taken off a running bike or dug up out of the ground?

best of luch keep us posted

I should have switched the spark plug wires right away to test the system, but I wasn't thinking at the time. :doh: 
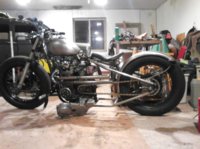
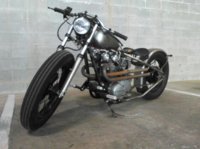
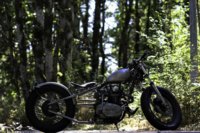
I bought the Pamco from MikesXs well over a year ago. I havent even used it to run the bike and its practically brand new, but I don't think I will be getting much help from 'Mike'. I will also go through and do a cam chain adjustment and recheck the valve clearances. The carbs were in bad shape when I got them, but the previous owner still said the bike was a 'runner'. I disassembled the carbs, soaked everything in parts cleaner, and then did a cleaning with compressed air and rebuild with new gaskets and jets.
 
Last edited:
This thread has been dead for two years, but I have been slowly working on my project. Since then, a lot of changes and progress has been made. I will let the pictures do most of the talking..

Over the winter, I bought a PMA/Regulator from Hugh and installed a sturdy wiring harness with a capacitor in hopes of getting the bike running. My attempts were unsuccessful. You can read this thread http://www.xs650.com/forum/showthread.php?t=39622 if desired for details. The short of it is I had a plugged exhaust pipe and a cylinder with messed up spark plug threads (threads were too loose). I installed a threaded insert and was able to start the bike today!

My next plans are to mount the seat, build the foot controls, and wire the lights.
 

Attachments

  • 2015-03-29 20.02.27.jpg
    2015-03-29 20.02.27.jpg
    157 KB · Views: 154
  • 2015-03-29 20.17.03.jpg
    2015-03-29 20.17.03.jpg
    151.3 KB · Views: 182
  • 2015-03-29 20.17.14.jpg
    2015-03-29 20.17.14.jpg
    179.4 KB · Views: 165
  • 2015-03-29 20.17.27.jpg
    2015-03-29 20.17.27.jpg
    159 KB · Views: 164
  • 2015-03-29 20.17.38.jpg
    2015-03-29 20.17.38.jpg
    171.3 KB · Views: 158
what happenedto the bucket seat? looked comfy. That's one crazy pipe.
I like.

As much as I wanted to make that old bucket seat work, I am on a time crunch and decided to purchase a seat from Biltwell - Solo Seat 2 and I am so glad I did. The seat is awesome build quality and fits the look of the bike. For not even wanting to buy a seat in the first place, I am 100% satisfied!

I also extended the exhaust out about another 15 inches so so it ends just past the seat/rider.
 
Hey Rogue21, that's a nice chop you're building there, looks great. If you don't mind I need to raise an issue about your brake stay, though.. I've taken the liberty of downloading one of your images and drawn some lines with ms paint to illustrate my point then I'll offer a solution. Hope you don't mind but I do think it important.

The red line I drew shows the line between hub centre and the brake stay lock nut on the hub and it's pretty much in line with your brake stay which isn't a good thing tbh.

The blue line shows the path the brake stay bolt on the hub would take if no brake stay was fitted, when you apply the brakes it's going to go round and round, orbitting the hub. The yellow line shows the immediate line of directional force the bolts wants to go when the brake is applied, the force always acts tangentially when fixed to a tie rod. What this means is when you apply brake force your tie rod is going to get pulled down. It might not move a hell of a lot but over time it could well work harden that flattened bar and crack it which won't be nice. Ideally the forces need to be transferred along the length of the tie bar as a tensile load. As it is most of the stress is going to be on the thinnest part of it where it meets the frame.

The green lines show how to arrange it so braking forces are transferred into the tie rod as a tensile load rather than a flexing load. The bolt on the hub plate hangs straight down and the brake stay / tie rod goes to it horizontally meeting at a right angle to each other. This is pretty much how stock bikes are set up.
m7drS3h.jpg


I realise you want to keep the lines clean and have it look uncluttered but safety is more important. Saying that.,... there is a solution or 3.

You could either let the hub plate hang down and extend your stay / tie rod until it meets it at 90 degrees... doesn't have to be exactly 90 but 90 is optimum.

or weld a sturdy bung to the inner side of your frame, see black spot in image, and somehow bolt you stay/tie rod to it.
tbRtUkK.jpg


Lastly... I just found this http://www.chopcult.com/forum/showthread.php?t=10766
and it's probably what I'm going to do, just so damn tidy and looks rock solid... depends how my wheel goes up in my david bird hooptail, I should be able to get that tucked in there.
Good luck with it, have ya made any more progress since last post?
 
Thanks for the feedback TLCbobber! The brake stay was one of those early design ideas that I came up with but should have probably changed since. As of right now, the rear brake is not hooked up, but I do have plans to do so (like you said, safety is important). This is something that will most likely be changed.

Within the past two weeks I moved from the Midwest out to the west coast (the bike came with me!). But unfortunately, I have no garage and zero space to work. The apartment complex I live in doesn't even let you change your own oil without prior administration approval so I don't know how far I will get doing metal work.

The good news is I have been able to actually ride the bike! It still needs some odds and ends (rear brake for one). There is a motorcycle shop called MotoFactory PDX that is not too far from where I live, and they look like they do good work. I will probably have to pay them a visit to finish off some of the work.

I've got some new pictures uploaded, but I think I need a better camera one of these days...
 

Attachments

  • 2015-05-10 21.51.35.jpg
    2015-05-10 21.51.35.jpg
    163.8 KB · Views: 157
  • 2015-06-08 16.55.24.jpg
    2015-06-08 16.55.24.jpg
    146.5 KB · Views: 146
  • 2015-06-08 16.55.37.jpg
    2015-06-08 16.55.37.jpg
    145.2 KB · Views: 143
For the most part the engine runs well and doesn't give much trouble with backfires, but I haven't had time to do much tuning yet. I hooked up a timing light and at idle the TDC mark was bouncing around the 'Fire' mark (sometimes a little ahead, sometimes a little behind, sometimes right on). I am not sure if this is typical or maybe I was using old equipment :shrug:
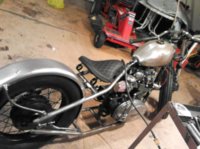
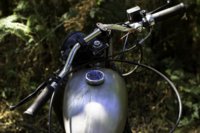
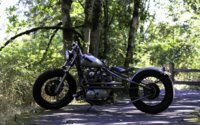
. As I reved the engine, the timing marked moved to steady "Advance" position.

I've also got an issue with blowing the fuse to my light circuit (headlight, turn/brake signals). Originally I wanted to integrate the brake lights and rear turn signals, but I don't think the lights I have will be bright enough. I will probably be mounting a tail light to the top of the fender and using the current lights only for directional signals.
 
no worries, man. I kinda hated to be "that guy" lol, wasn't gonna say anything since thread was old but then I saw it reopened recently, I had a duty to share. I think stainless fatigues faster than mild steel too. I'm sure you'll work something cool out, though, cos the rest of the bike is sick. I like ya style.

What's the story with ya front wheel? I can't decide if it's a rear rim laced on there or not. Looks nice n fat with that rubber on anyway. Wouldn't mind mine like that but I'll probably have to stick with stock 19". I like both anyway, I like the skinnier wheel up front and I like the balanced look yours has. Choices choices.

Shame about the accommodation aspect, but I guess with managed complexes they have rules to stop people pissing eachother off... in the end nobody can so anything.
 
What's the story with ya front wheel? I can't decide if it's a rear rim laced on there or not. Looks nice n fat with that rubber on anyway. Wouldn't mind mine like that but I'll probably have to stick with stock 19". I like both anyway, I like the skinnier wheel up front and I like the balanced look yours has. Choices choices.

The front wheel is just a stock 19" rim (powder coated black) with a Firestone tire. The front tire is 4.00-19 and the rear is 4.50-18. I bought both online from Coker...they have a large selection, but from what I remember, I paid more than I wanted but I think they really add to the look of any bike. But I'm typically a fan of more aggressive tires in general.
 
I finished my project this past summer and the bike caught some attention from a local photographer/website. http://www.enginethusiast.com/
They highlight some of the local cars and motorcycle in the area and were nice enough to snap a few photos of my project! I wanted to share these with the forum, but give photo credit to the Enginethusiast community.
 

Attachments

  • untitled-12.jpg
    untitled-12.jpg
    79.2 KB · Views: 143
  • untitled-15.jpg
    untitled-15.jpg
    45.2 KB · Views: 122
  • untitled-8.jpg
    untitled-8.jpg
    118.8 KB · Views: 130
  • untitled-3.jpg
    untitled-3.jpg
    74.4 KB · Views: 148
  • Enginethusiast-Joe-Yamaha-XS650-Bobber.jpg
    Enginethusiast-Joe-Yamaha-XS650-Bobber.jpg
    102.9 KB · Views: 135
And just a few more for your viewing pleasure!
Edit: It looks like the pictures uploaded a little dark...not sure why that is?
 

Attachments

  • untitled-15.jpg
    untitled-15.jpg
    45.2 KB · Views: 115
  • untitled-18.jpg
    untitled-18.jpg
    128.4 KB · Views: 143
  • untitled-19.jpg
    untitled-19.jpg
    144.4 KB · Views: 147
  • untitled-21.jpg
    untitled-21.jpg
    68.4 KB · Views: 125
  • untitled-22.jpg
    untitled-22.jpg
    62.4 KB · Views: 115
  • untitled-13.jpg
    untitled-13.jpg
    45.1 KB · Views: 117
Back
Top