How to re face your gauges

While putting these back together I'm spreading a bit of thread locker on the raised knob surrounding the two screw holes on the metal frame for exactly that reason to act as a damper so the gauge face doesn't fret on the screw heads. Will check if the little BS34 carb needle washers will work here also. If not I'll measure and order some SS washers from China.
Thanks !!
I only have 1 more speedo and I'm out of faceplates
 
These guys sell decals for 72 and the one year only 75
https://www.diablocycle.com/Gauge-Faces-c-379/
Hear is what's on there now and it looks like the ones they have listed for the 74 would work because of the odometer / trip odometer placement
It's odd because I thought that the 74 had the trip odometer on the bottom it's been 25 yrs since I have had one
 

Attachments

  • 20230302_160921.jpg
    20230302_160921.jpg
    408.6 KB · Views: 50
  • 20230302_160929.jpg
    20230302_160929.jpg
    306.8 KB · Views: 50
  • pi_22158.jpeg
    pi_22158.jpeg
    11.1 KB · Views: 44
Last edited:
Took me a bit but separated a ring from it's body on the matching speedo. Heat from an electric heat shrink gun, some corrosion stopper and gentle tapping round n round the back with it face down on a board and gentle pushing flexing round and round the sides. basically breaking up the glue and allowing the oil corosion blocker to penetrate. Then the rubber glove twisting and they came apart. This one came out better, the threads on the first black ring are nearly non existent, but this one has good threads on both black and chrome. After opening, lots of careful scraping glue out of the threads with (of course) windshield wiper stainless strip ground to match the thread's V shape. Two opened, two to go.
 
Hear is what's on there now and it looks like the ones they have listed for the 74 would work because of the odometer / trip odometer placement
It's odd because I thought that the 74 had the trip odometer on the bottom it's been 25 yrs since I have had one

Went trough this in 2016. Post #38, also Post #38 has to be used with earlier posts as referenced.

https://www.cornwalllive.com/news/cornwall-news/mcdonalds-remove-tasteless-sign-opposite-8133444

The reason the 74/75 speedo is not referenced as different by retailers is because there doesn't seem to be any Yamaha reference to a change when looking at part no's in parts manuals.

Dogbunny also did a thread on 74/75 Gauge differences. The cups and gauge housings also change as does the tripmeter reset nob position. Ask him he may have it bookmarked.

May also be helpfull with some information for your 75 in here
https://www.xs650.com/threads/gauge...0-83-gauge-repair-honda-70-71-750-4-ko.52013/
 
Quite interesting to me. I was 12 ish when I first showed my patience taking the chrome rim off of tractor clocks to “Clean the lense”.Looking forward to learning more at almost 64.
 
Went trough this in 2016. Post #38, also Post #38 has to be used with earlier posts as referenced.

https://www.cornwalllive.com/news/cornwall-news/mcdonalds-remove-tasteless-sign-opposite-8133444

The reason the 74/75 speedo is not referenced as different by retailers is because there doesn't seem to be any Yamaha reference to a change when looking at part no's in parts manuals.

Dogbunny also did a thread on 74/75 Gauge differences. The cups and gauge housings also change as does the tripmeter reset nob position. Ask him he may have it bookmarked.

May also be helpfull with some information for your 75 in here
https://www.xs650.com/threads/gauge...0-83-gauge-repair-honda-70-71-750-4-ko.52013/
Thanks !!
 
Gauge ring #3 three seemed to be quite happy right where it was. My hands were getting beat up but no joy.
After a sleep on it and a lengthy search for the rubber oil filter grip tool, and a bit of help from allison.
KIMG3175.JPG
It came off rather easily.
KIMG3182.JPG
But there is some sort of adhesive used.
cleaning up threads called for a bit of tool making.
The thread is 1.00 pitch just like a 6mm bolt. but on the black ring there's a flange very close. So a special tight clearance thread cleaner upper was made
KIMG3180.JPG KIMG3181.JPG
Props for that dremel quik, flex-mount cut off blade set.
Worked very well getting all the glue out. The ring threads on easily.
Put the first set completed back on the 72 in the shed.
KIMG3188.JPG
Me and bench top disaster areas.
KIMG3176.JPG

By doing some swapping around one set of gauges will get nice original faces and one set will get new face decals.
Hint don't go gonzo trying to pull the black thumb wheel off the ODO reset shaft. :doh:
That's going to be a futzy-fussy repair project.
Now there's another set of 72 gauges on the way here thanks to an XS650 denizen. :thumbsup: :)
 
Last edited:
Hint don't go gonzo trying to pull the balck thumb wheel off the ODO reset shaft. :doh:

Yeah I ruined one, thinking that it screwed on, I tried unscrewing it and stripped the inside. This photo doesn’t show it clearly ,but It simply pushes straight on and off, the shaft has flat side that keeps the knob from spinning on it. Then a tiny screw holds the knob onto the shaft.
963C77EE-0DBE-4143-9BE6-E9F3EB3D27A8.jpeg
 
Yeah I ruined one, thinking that it screwed on, I tried unscrewing it and stripped the inside. This photo doesn’t show it clearly ,but It simply pushes straight on and off, the shaft has flat side that keeps the knob from spinning on it. Then a tiny screw holds the knob onto the shaft.
View attachment 236938
Had your guidance but didn't heat it enough first, I think there's some glue in there too. Anyhoo the shaft moved out a bit, and heard something small hit the floor.
this little plastic cam ring gave up and snapped.
KIMG3190.JPG KIMG3191.JPG
The good news is the extension came right off after some soldering gun heating.
Guess I'll try to superglue it back on the shaft, but think it's greasy nylon type plastic..... :shootme:
Interesting one of these has brass gears on the trip odo shaft the other has nylon gears.
 
Had your guidance but didn't heat it enough first, I think there's some glue in there too. Anyhoo the shaft moved out a bit, and heard something small hit the floor.
this little plastic cam ring gave up and snapped.
View attachment 236947 View attachment 236948
The good news is the extension came right off after some soldering gun heating.
Guess I'll try to superglue it back on the shaft, but think it's greasy nylon type plastic..... :shootme:
Interesting one of these has brass gears on the trip odo shaft the other has nylon gears.
Hot glue to put it back on the shaft ?
 
With a bit of fiddling I was able to replace the broken nylon disk
229437-59c1d059c01d0491e6c3fd29986af334.jpg

with a slightly different one from a beat up 80 special speedometer gggGaryized to fit.
I did some swapping and ended up reusing a face from a different speedo with a bit of touch up work on the black.
early speedo 70-71.jpg
I'm trying hard to use cleaned up stock parts on this bike as much as possible for a survivor vibe. But Jim's paint..........
Week two, one gauge done. :doh:
 
Trying to rescue, match a tach face to the speedo. Flat black rattle can applied with fine brushes then wiping with solvent soaked q-tips.
Practicing on a faded flaking speedo face

KIMG3210~2.JPG
 
Last edited:
Did the jewel lenses arrive ok?
Yes Sir!
But it was close, the Post office first class sorting machines HATE lumps in first class mail.
Envelope torn, both lenses were cracked, but a bit of super glue and all's good.
Thank you!

use two stamps and plainly mark the envelope non machinable for less than 1/4" thick envelopes with lumps.

What is the Non-Machinable Surcharge for First-Class Mail®?
A nonmachinable mailpiece is sorted outside of the standard automated mail process. A surcharge applies because it is more expensive to processes.

I sent 100's of valve cover o-rings around the world this way.

1678561892184.jpeg

 
Last edited:
Great thread.Anyone ever heated a faceplate to flatten?Apologize in advance if I missed it.This was a leftover spare set. I’m using it for an updated test stand and thought I’d open it up and get the mounting acorn nut out.While in here thought I’d try a test on this step.Not a resto tach project this at this time,it will work as is for the stand purpose,however a possible candidate to do so if I need it later.
 

Attachments

  • 149AA609-F73C-4FDD-B7E9-A35ECB35C664.jpeg
    149AA609-F73C-4FDD-B7E9-A35ECB35C664.jpeg
    290.9 KB · Views: 54
  • BAD1F9BA-C7B8-41D0-85AE-D43CB6DFAE53.jpeg
    BAD1F9BA-C7B8-41D0-85AE-D43CB6DFAE53.jpeg
    317.3 KB · Views: 46
  • B3ECFBFA-86C0-47BD-AAC8-2F17BE342C83.jpeg
    B3ECFBFA-86C0-47BD-AAC8-2F17BE342C83.jpeg
    310.2 KB · Views: 45
If I did I'd sandwich it between two flat plates heavier is better, and put it flat in a warm oven mebbie 150, 180F for an hour let everything cool before taking off the weight.
Perhaps wax or parchment paper on the printed side?
 
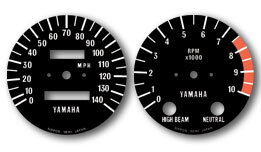
After endless waffling I went with the British face plate replacements on SoDak's gauges.
KIMG3392.JPG

Couldn't stand the knurls showing on these handlebars so ordered Emgo's that are supposed to be correct for XS1- XS2
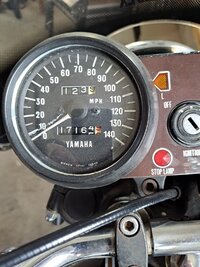
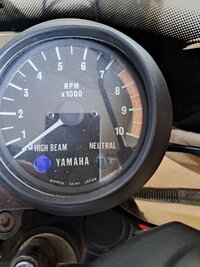
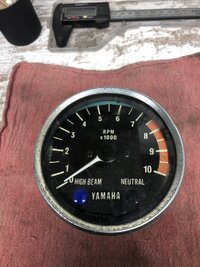
A second set of 70-71 gauges is back together with touched up original faceplates.
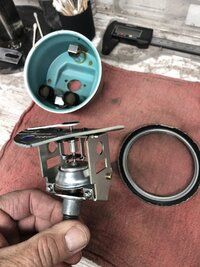
On both sets I removed, scraped off old adhesive and reglued the very thin and delicate trim rings and light jewels. The jewels got a coat of clear wheel paint to restore gloss.
I sourced some 2mm x5mmx.3mm SS washers from aliexpress to hold those slightly worn 'round the screw hole faces on this set.
KIMG3393.JPG
Been using gel style blue locktite on the faceplate screws, it seems to set VERY slowly, if at all.
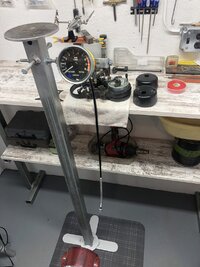
@jpdevol you had asked recently: Got some gray loom covers, also from aliexpress.
KIMG3394.JPG
for sizing; after depinning 6 small lightbulb wires from the connector was JUST able to get them all pushed through the 8mm, with the crimped ends still on, had to stagger the ends, wiggle, push and finally drag them with tiny long nose, needlenose pliers. If the cover had been any longer I would have had to use a pull string, a good idea anyways :doh:.
KIMG3395.JPG
The other cables and looms in the pic are originals, maybe touched up with some silver paint ;).
 
Last edited:
Yep, thanks to gggGary & ya'll, got the British faceplates and the silverish loom (2 sizes IIR) among the ever growing XS2 parts pile. Might chicken-out on the gauges and ship'em off to Baraboo:sneaky:
 
Back
Top