Is it my turn? Anything to do with lathes, mills and other shop tools

Fake bearings?
The bane of random web buying.......
or somethings cocked?
did you V block the spindle check it for straight true?
One can assume past sins on ANYTHING past the half century mark, us included. :lmao:
 
You are already guessing over greased?
Double check the bearings you got are true sets, inner, outer races, wouldn't be the first time.........
 
A spindle
 

Attachments

  • spindle_01.jpg
    spindle_01.jpg
    163.1 KB · Views: 58
  • spindle_02.jpeg
    spindle_02.jpeg
    173.6 KB · Views: 59
  • spindle_03.jpeg
    spindle_03.jpeg
    163 KB · Views: 54
  • spindle_04.jpeg
    spindle_04.jpeg
    145.8 KB · Views: 55
  • spindle_05.jpeg
    spindle_05.jpeg
    220.8 KB · Views: 48
High tech bearing installation tool
:twocents:
Can you Finish with some hammer blows on a driver all the way around the race till the sound changes, roughly, it' goes from thumps to ringing,..................
That may be hard, impossible to do on that set up.
 
I just received some more comments from my friend regarding bearings etc:

"Well, Paul, you know the answer, it's like resistance in circuits.Energy is being wasted in the bearings - worn bearings, poor lubrication (really, it only prevents corrosion, no sliding surfaces), too much preload (which he addresses). As they are new, perhaps the bearings aren't quite square to the spindle (tapped in rather than pressed or pulled in using a collar on the outer race). Or poor quality bearings or grease. Very 'clean' synthetic bearing greases can be very expensive. Too much grease causes churning and heating. It was presumably ok before the bearing change, except for problems caused by wear.

Shouldn't be too hot to put hand on, or anywhere near that for a lttle machine. Heat expands spindle, outer tube radiates and conducts away the heat, so temp difference, expansion causes extra load on bearings, runaway condition.

On larger machines, a pair of tapered roller bearings back to back at the bottom, to address sideways end end load forces, then ball bearings floating at the top, allowing small changes in length. Precison grinding machines are left to warm up to a constant temperature before use, then left running all day, until end of day.

There's very little general definitive advice on determining preload, apart from any specific to the manual for the machine. He's using dial clocks, so has a neasure of what's happening - he doesn't say whether he's using them to measure the preload applied.

A 1°C increase on an 8 inch long steel shaft would cause a 0.001" increase in length (12 millionths per degree per inch). In Boris units, assuming a 1" spindle with 1/8" wall thickness (0.75" bore), a change in length of 0.001 would cause 1288 lbf compression on the spindle (assuming the outer causing didn't stretch, which it would). E=FL/Ax, where E (Young's modulus; note apostrophe, engineer not physicist) = 30x10^6 for steel, L (original length) = 8", A= 0.3436 in^2, x (change in length), and F is the resultant force in barnyard units. so, much less backlash. Solve F = EAx/L.

Say, spindle and casing both change length equally, 650 lbf, quite a lot on small bearings. The purpose of the preload is to always ensure that there is a residual force under all cutting conditions keeping the bearings under load (i.e., "together"), a bit like pre-stressed reinforcing of concrete beams, so that the concrete never has a tensile force upon it under loaded conditions.

I couldn't find in a quick search the axial load for a (approx) 1" bore ball bearing, but, for example
https://www.lily-bearing.com/ball-b...wdOPczukLMUTQ44EngKXb0Jq3lffPn8xoCxfcQAvD_BwE

... a 1641 (1" bore) has max static radial load of 1345lbf - only about double of our 600+ lbf. Static because that's the loading all the time it isn't in use. Not causing failure, but reduces available permissible force when under load. I do note (i) these are radial not axial loads, and (ii) that the max dynamic load is much higher, but just highlighting how much force there appears to be in his preloading.

Advice: I would slacken off then take out backlash/clearance (use DTI) and try it, tightening until satisfactory results when cutting."


Good Luck.
 
@gggGary ,

Hammer, heh, heh,heh, you said hammer, heh....

Now before the general membership rises up in unison to lynch me I have a disclaimer.
I did get out the hammer and an aluminum drift.

Once the bearing inner was/were fully pressed onto the shaft the spindle back gear was removed and the tapping about the outer race began. This bit ceased quickly as I do know the sound and feel of fully seated. At no point did I impinge on the races to drive the bearings home.

First fit was close but rotational resistance was a bit much. The high tech bearing press was then established on the spindle nose and only then was I applying pressure on the races. I took up the slack on the assembly and proceeded to tap on the high tech bearing press.
I performed this operation until I saw a bit of axial and radial clearance.
From that point I again assembled the high tech bearing press one more time in the original setup.
Once all clearance disappeared the assembly was tightened to the point where rotational resistance just began to appear.

So is it scientific? In a word, no. Is it accurate or precise? Not by any measurable standard. Is it as good as I usually do? No, but perfect!

A couple of installation tips.
Frozen spindle with all evident burs removed.
Warm bearings.
Even warmer head stock.
Very fast setup and proper pieces.
A washer (thick) to press on the race and bearing at once
A pipe to press on just the inner for preload.
Work fast.
 
@Paul Sutton ,
THANK YOU.
In the words of an old metal worker "I'd rather be looking at it than looking for it".
This applies to information as well. Never enough until you're incapacitated by sensory overload.

i actually understand most of the terms and puzzled out the rest.

In talking with Timken this translated to
"short fiber, medium sponge, phosphate, for medium RPM up to 2,500"
In English then , Lubriplate.

I'll update as I can
 
Okay , buckle up , short sharp rant.
So in no particular order I have
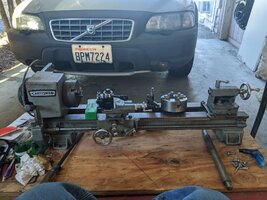
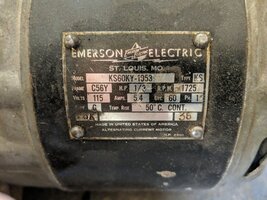
purchased and shipped a lathe 1/3 of the way across the country
I have struggled with the deterioration due to years of neglect.
I have exorcised the wanton destruction of flying monkeys with hammers.
I sourced obsolete and discontinued parts from the likes of mymachineshop.net and littlemachineshop.com
Someone left the side door open at practical machinist and was able to post WTB .
An ebay seller I've known for years says "does this look familiar?" and I had new half nuts.
Clausing. If you ever speak with Brian or Tom about old inventory thank them for being there.
Help has arrived in the form of anonymous packages containing everything from HSS to bearings, to random pieces of stock. I'll just say Thank You and quit wondering who you are :)
I have limited tools
I'm starting over, at 65. with an eons old 6" metal lathe.
And all this one facebook keyboard warrior can say is
"I was taught to never place anything on the ways"
Then proceeds to school me on care and feeding of machinery in general, lathes specifically and my lathe in particular.


The reply went like this.
It's not your lathe. It's my lathe.
If it were your lathe you could happily restore it to museum quality non functional beauty.
I intend to use the hell out of this lathe once it's functional and quite possibly never pretty.
If your intent is to demean, denigrate, deride and "mansplain" care and feeding of a lathe to a retired millwright then have at it , somewhere else, to someone else, some other time.


The technical division of the mad Irish army made the next week of internet connectivity exceedingly difficult for this mutt. I have some very interesting family and friends.


Look , I have never, ever, demeaned or derided anyone's work. If I can't stand to look at it I just don't.
I can see potential beauty where someone else sees scrap.
I possibly didn't respond well to criticism in this case.
I didn't enjoy being taken to school by a 30 something keyboard warrior.

But he's right.

Good shop practices are good shop practices, then, now, and always.
If he had stopped there without a near copy and paste from NavPubDoc, MM & MR 3-2 intro to machine practices I wouldn't be typing this wall of text.


In conclusion, don't leave ANYTHING on the ways or gawd almighty will kill a kitten.
And the next time you're confronted by some invasive species of keyboard warrior, let it go. Your time is far better spent working on or with your machines.
:EOR
 
I didn't get pics of the process because getting the sweaty hands in and out of gloves was just a mess. Okay , I'm lazy. It just means I'll have to type more.

The Coupler, Direct Drive , 141-023

This, like many of the Atlas parts is Zamak or a close relative.
At some point the chuck had been stuck to the spindle.
The spindle shows some damage but the coupler took the brunt of it.
Inside that counter bore is an external snap-ring.
As received I didn't have the clearance to get the snap-ring out of the groove because the coupler was so badly squished. The snap-ring came out in pieces.
The spindle end was badly swollen, possibly from hammer blows, and not allowing the coupler to slide free. It took hours of patient rubbing to get the necessary clearance.

Then a condensed version of creating a bit more clearance for the drive pulley and bushings.
An entire afternoon of "smoking" the shaft and dealing with the high spots while checking with a mic to make sure I didn't go drastically undersized.

Then removal of the spindle back gear. This was an all day sucker.

So back to the coupler. It was unusable as it was and they seem rare as rooster teeth.
Inspiration.
I closed down the jaws of the 3 jaw and placed the damaged end of the coupler over them.
Rotate, expand, retract, rotate, expand, retract, rotate, repeat....
Major gains were made.
4 jaw.
Trade out the three jaw for the 4 jaw and place a woodruff key on one of the jaws in an attempt to more or less nearly circularize the remaining damage.
Rotate, expand, retract, rotate, expand, retract, rotate, repeat....

I then had clearance around the entire shaft for circlip installation.
It's still ugly as sin but it engages and disengages.
The ball detent even survived.

I'll detail the lead screw unfornication another time
 
Last edited:
Someone pounded on the headstock end of the lead screw thinking that it came out of the support casting that direction. Seems reading the parts breakdown wasn't an option. That or monkeys can't read.

While pounding on the lead screw end the end was so severely peened over that removal of the spacer behind the spindle drive gear was impossible. This resulted in hours of careful file and stone to restore the spindle diameter so the spacer would go off and on. Of course the 1/4 - 20 threads were buggered and had to be chased.

Then the casting had been tweaked just enough so that when the attaching screws were tightened the lead screw bound up. No small wonder as the spindle bore was pointing back at the bed. Looking back at the bore the years of neglect had left the natural bearing surface black with baked on goo and smooge. This all had to be carefully removed while not taking so much that the spindle fit became a hotdog down a hallway.
 
I'm already looking ahead. The follow on to the 6" lathe you see here is either a DSM 59 Hardinge or it's bigger brother the HLV-H. An alternative to the DSM is the nearly direct copy the Feeler.
These are referred to as "second operation lathes". The machines provide the tooling and CNC programmed meat operates them.
The point is I don't have the room for a CNC turning or milling center and honestly couldn't keep one busy. In fact I probably couldn't keep an old Brown & Sharpe auto screw machine busy.
I don't see runs of much more than several hundred in my future.
The one job that may turn into a 3 shift 24/7 nightmare will be a slow ramp up and will eventually have to compete for market share anyway. I hesitate to elaborate mainly because I don't want to bore anyone more than I already have. The other reason is it's a job so far removed from motorcycles that it really doesn't belong here.
Initial testing showed promise. Quality control was an issue due to using less than ideal equipment. Materials were an issue because some suppliers think that copper is copper, aluminum is aluminum and steel is steel. I'm fortunate that the experience gained was at least worth the weight of the scrap I made.
I should have the first test bar on the lathe this week.
 
There has to be someone smarter than me here. Multiple members here keep telling me so. ;-)
I'll supply any additional information I can but looking for "Emerson Electric" on the web was more than a little futile.

For the time being I can deal with CW only. Being able to reverse it would be a huge plus.
 

Attachments

  • motor.jpeg
    motor.jpeg
    394.2 KB · Views: 49
  • wires.jpeg
    wires.jpeg
    310 KB · Views: 49
Back
Top