Is it my turn? Anything to do with lathes, mills and other shop tools

I've had five 'real' lathes, all but one made in China, the odd one out was made in Taiwan. Why so many? Well, I was moving all the time for a 25 year period, so rather than ship them all around the country, I'd sell them and buy a new one when I got to wherever I was going. It's always exciting to buy a new whatever: House, car, lathe, mill, motorbike, you know the feeling. And believe me, second hand Chinese lathes sell like hot cakes with very good resale.

So, why Chinese? Simple they are cheap, if you buy from a big distributor, parts are available and you get a warranty. And, they are quality machines!

My last buy was about 10-12 years back: An Impala 280 x 600. Never heard of the brand before and the distributor was just a small outlet, who never got any more in after I bought mine, and I suspect I would gave been one of just a few sales. I bought it based on build quality. Most Chinese lathes are covered in bog before painting to smooth the rough castings, the Impala had no bog whatsover.

It has served me well despite not having auto cross feed, geared head, gearbox and the auto longitudinal feed works off the change gears, lead screw and half nuts.

As it turned out, the Impala is a re branded Optimum Maschinen, a German manufacturer operating in China. Parts are probably not available anymore as Optimum moved to variable electronic speed control shortly after I bought mine and some of the other bits and pieces differ from the newer models.

I had to replace the on/off switch which broke a year or two ago, and while I was at it I replaced the rotary forward reverse switch with a toggle and rewired it to suit. Aside from the on/off switch, I've never had to replace anything else. It should outlast me.

In between lathes I looked at so called 'real' machines: Myford, Southbend, Hercus, etc. But decided not to pursue them as I didn't want to spend my time and money bringing them up to a workable machine. I already have a number of hobbies, I didn't want to add 'restoring old lathes' as another!

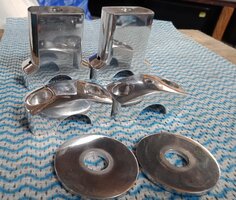
I used a vertical slide on my lathes for years for milling operations, so I don't see any problem with a two in one, after all, it is one step up from a vertical slide.

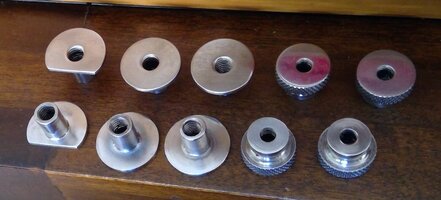
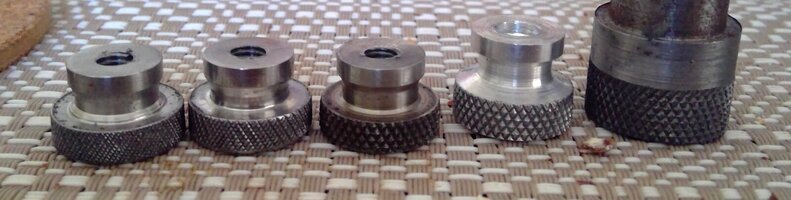
These risers were made on a lathe, using a vertical slide for the milling.

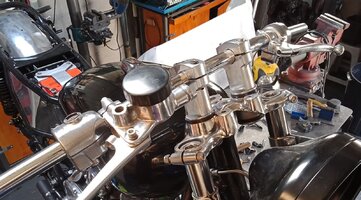
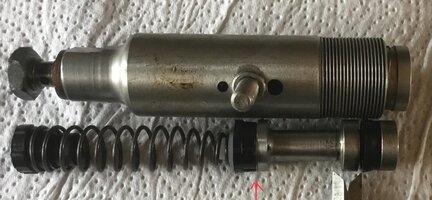
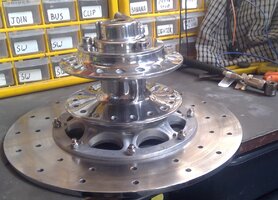
You don't need a big lather either, I made two stainless steel master cylinders for a Triumph (similar to that in the picture) back in the early 90s on my first lathe, a 9x20. Plus a number of other parts.
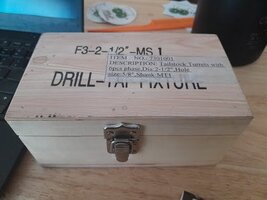
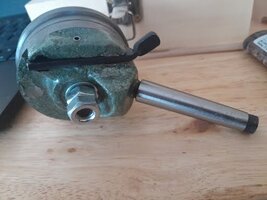
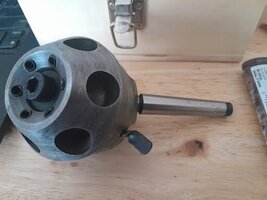
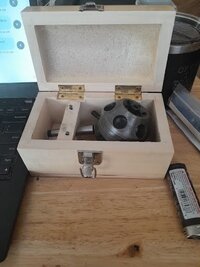
 

Attachments

  • 7 (1).jpg
    7 (1).jpg
    284.9 KB · Views: 52
  • risers front right.jpg
    risers front right.jpg
    294.6 KB · Views: 61
  • FBE13029-B287-4297-9FD6-B38AFDD77A02.jpg
    FBE13029-B287-4297-9FD6-B38AFDD77A02.jpg
    212.2 KB · Views: 54
Last edited:
Hey Bosco, a quick search on your local Marketplace shows a number of listings for smaller South Bend lathes that look like good candidates to me, at least for a more detailed look. Here's a sample:
https://www.facebook.com/marketplace/item/718840066529970
https://www.facebook.com/marketplace/item/1480078689064723
https://www.facebook.com/marketplace/item/3333666860206809
You have to take pleasure in bringing one these machines back to sound operating condition, though. If not, stick with new.
Thanks @atom4488. Ideally I’d like to get one that doesn’t require too much work to get it into good operating condition. I’ll keep an eye open. Appreciate the search and feedback.
 
The gorilla in the room with old lathes is worn out ways. I've looked at a lot of old lathe ads and the seller seldom even posts a pic of the ways near the head stock. The quick "walk away test" is to place the carriage near the head stock, lightly snug the travel lock screw, then travel it to the right, if it starts to drag, bind after a few inches the ways are shot. If heavily worn it'll be right near the headstock. There is no practical cure for worn ways and operation of such a lathe is pure frustration. Next up is knackered headstock bearings especially the babbit bearings on really old units.
 
The gorilla in the room with old lathes is worn out ways. I've looked at a lot of old lathe ads and the seller seldom even posts a pic of the ways near the head stock. The quick "walk away test" is to place the carriage near the head stock, lightly snug the travel lock screw, then travel it to the right, if it starts to drag, bind after a few inches the ways are shot. If heavily worn it'll be right near the headstock. There is no practical cure for worn ways and operation of such a lathe is pure frustration. Next up is knackered headstock bearings especially the babbit bearings on really old units.
Thx for this tip. I think I understand what you’re describing for the test.
 
There is no practical cure for worn ways and operation of such a lathe is pure frustration.
There's outfits that will resurface the ways.
My Atlas ways are worn. Considered having them recut.... 'till I found out what it cost.... :yikes:
 
Not sure which thread to post in, not about shop tools but things made in the shop.
Recently purchased good deal on NOS fiberglass flat track seat tank combo from a guy, down side is tank didn't have a gas cap. It has a threaded fill spigot which I measured to be 1.687-12 UN
I contacted every glass guy in Christendom, and no one could say it was theirs or had an idea who made it, all the current stuff out there if it's threaded takes 1.5-12 or 1.25-12. So had to turn up my own. Perhaps someone can recommend the preferred tank sealer?
The other is an old BSA 25 chassis, similar to the Victor 441, guy who had it previous beat the swingarm out and buggered the threads on the end so I first turned off the bracket at the far end so I could get it in the lathe, cut off the offending length and turned up an end, had my buddy weld it on, then I had to thread it and make a nut, 13/16-20,
and have the end plate welded back on.
Nice to know I still can.
IMG_20230306_140514046.jpg
IMG_20230306_140618438_HDR.jpg
IMG_20230306_140642369_HDR.jpg
IMG_20230306_140657944_HDR.jpg
IMG_20230306_140651652_HDR.jpg
 
Don't you want this in your shop, even if there is no conceivable reason to own it?
Described as a vertical turret lathe.

View attachment 234500
For scale that table is 52" across.
That is a monster! They say, "Necessity is the Mother of invention!" But who thinks of this stuff? Not Rube Goldberg!
 

Attachments

  • turret_4.jpg
    turret_4.jpg
    27.1 KB · Views: 41
  • turret_3.jpg
    turret_3.jpg
    28.3 KB · Views: 37
  • turret_2.jpg
    turret_2.jpg
    27.9 KB · Views: 37
  • turret_1.jpg
    turret_1.jpg
    32.8 KB · Views: 31
Seen a couple other guys do this, machine the casting web from the front hub ahead of polishing. I have about 3-4 hubs intended for upcoming builds that I'll be doing this with so I'm at step two. Step one was to make the arbor/holding fixture. Step 2 is roughing out the web. Step 3 will be the polishing. I've noticed some small casting voids/porosity but nothing to worry about.

IMG_20230316_114215790.jpg
IMG_20230316_114443052_HDR.jpg
 
Done it and it sure looks pretty, but honestly, I worry a bit about strength with it gone.
The web is WAY more than needed for a casting sprue.
So you made me look, and I've been running this on madness for a good long time with the webs removed.
Tiny sample but she don't get babied much.
1678983859053.jpeg
 
Last edited:
I machine the front hub on my 74 TX some time ago, I didn't remove the bridges altogether, just enough so
I could get in there to polish. The flanges were all over the place.
 

Attachments

  • 118588045_2789564217970273_5133335168325013229_n.jpg
    118588045_2789564217970273_5133335168325013229_n.jpg
    289.9 KB · Views: 56
Stainless T nuts.
I have aluminium T nuts securing the air filters and oil cooler, but decided to replace them with stainless, its been a while since I turned stainless so I'd forgotten what a PITA it is working with it. Cut a piece off on the bandsaw, its now hardened, drill a hole its now hardened, turn it on the lathe, its now hardened.
Hardening after cutting isn't too bad, but after drilling a hole, impossible to get a tap through, so, out with the flame thrower, heat the piece up, let it cool, then back on the lathe again to tap the thread.
I've got 6 T nuts to turn up and four knurled T Nuts.
Knurling aluminium is a little different to knurling stainless, aluminium is very forgiving, regardless of diameter, the knurl comes out pretty much the same, but not stainless, the circumference has to be an exact multiple of the 1.5 pitch of the knurling wheels otherwise the knurl is off.
One of the knurled nuts slipped in the chuck, so has a bit of a score around it, damn!
 

Attachments

  • WIN_20230403_16_23_42_Pro.jpg
    WIN_20230403_16_23_42_Pro.jpg
    123.3 KB · Views: 41
Knurling and the role sizing plays.

These pics tell a story:

From the left, one two and three are stainless, four is aluminium and five black steel, all knurled with 1.5mm pitch rollers.
Number one (SS) was sized at 16.2mm, you can see the knurling is quite small, it has pyramiding but very muddled. Number two (SS) was sized at 16mm, knurl is a little courser, no pyramiding and also a little muddled. Number three (SS) was sized at 15.76, a multiple of 1.5, quite a good knurl, nice pyramiding, 1.5mm apart and not muddled. Number Four (aluminium), sized at 16.3 and again quite good knurling, nice pyramiding with no muddling. Number five (black steel), sized at 16.6 and again quite a good knurl, reasonable pyramiding with just a little muddling

As you can tell, aluminium and black steel are quite forgiving when knurling, sizing isn't really that important, pyramidding isn't perfect when sizing is off, but the knurling is fit for purpose. Stainless on the other hand is not forgiving at all. None of the knurls are perfect if viewed through a loupe, but three, four and five are good enough to the eye and fit for purpose.

BTW, muddling is a technical term meaning mixed up!
 

Attachments

  • WIN_20230405_16_24_24_Pro.jpg
    WIN_20230405_16_24_24_Pro.jpg
    117.7 KB · Views: 46
Last edited:
Muddling, I like it, I always called it Doubling as the roll made dual impressions. Always irksome to try and correct.
Used to turn up circular tracks for orbital pipe welding machines, Liburdi/Dimetrics type, we had purchased an old Mitchell Scottish lathe around 24" swing with a removable way section, put an 8" riser block under the head and tool post and with the way removed could turn a 2" thick, 48" diameter aluminum face plate with face plate jaws bolted on. We would turn these track rings up to 40" diameter and as the weld heads were friction drive the outer surface needed a medium to coarse diamond knurl.
At the slowest turning speed capable the rolls would sing, I would have to keep flood coolant on the rolls and hold my fingers on the ends of the roller pins to gage the temperature. Every once in a while one of the rolls would seize up on the shaft and stop rolling and dig a trench 3/4 of the way around till you could get it stopped.
View attached pdf for orbital pipe welding examples
https://www.yesmachinery.ae/pdf/AdaptARC.pdf
 
Last edited:
I went down a rabbit hole on YouTube today ( again 😄) watching how watch parts are machined, it’s pretty amazing how such tiny and fragile parts are made. Here’s a sampling for those who have are bored or have too much time on their hands. 😁


But this one took the cake, watching how the most expensive wrist watch in the world is made. Seeing guys doing machine work while looking through a microscope that projects the image on a monitor screen is pretty mind blowing.

 
And here they are, 10 stainless T nuts, 6 plain, 4 knurled. What fun these were to make, drill the hole, heat them up, let them cool, tap the thread and turn to size, heat them up, let them cool and then knurl them.
All but one came up ok, the last one's knurling doesn't have great pyramiding, but, fit for purpose.
All that work for 10 little items you can't even see.
 

Attachments

  • WIN_20230406_12_25_07_Pro.jpg
    WIN_20230406_12_25_07_Pro.jpg
    116.8 KB · Views: 38
  • WIN_20230406_12_44_38_Pro.jpg
    WIN_20230406_12_44_38_Pro.jpg
    169.6 KB · Views: 38
Last edited:
Always enjoy seeing what people are doing, while I have several projects in the works I don't have much to show of my handy work so will have to supplant with things I've built for my employer.
Did my apprenticeship for a medical instrument company in Maryland in the 70's, then worked in several job shops and in 1984 landed in the shop of an industrial welding contractor making replacement parts for remote controlled orbital pipe welding systems. After about 6 years the engineering manager pulled me into the engineering group and a designer and builder of machining tools that could be operated remotely for high radiation or other hazardous environments. Stayed with that company for 21 years but in the end the original owners wanted to retire and took the company public and sold it to an investment group. First thing they did was get rid of all the older experienced people.
I think they expected all of us to go away and die, instead there were an couple rival companies started, one of which by my late wife who had been their QA VP.
I went to work for her as their engineering manager, though really still just a tooling designer and busted our asses the next 4 years to finally get into the black right about the time she passed away from cancer. The next year we were acquired by a larger boiler and piping repair company, Babcock Power. They ran us the next 7 years with big promises of marketing support but in reality had no interest in doing boiler repair as all their other divisions were geared for building replacement components so mid 2015 shut us down and put everyone on the street and sold all the equipment I designed to our closest competitor.
At a 61 yr old mechanical designer/machinist with dated CAD experience it was tough and worked some contract field jobs for a year but it's a young mans game humping heavy pipe cutting equipment up into power boiler superheaters and ended up working for a local gun builder, Masterpiece Arms, chambering barrels for long distance rifles for a year.
In 2017 a girlfriend of my current wife said her uncle who was engineering manager at the truck parts company he worked for was looking for someone who could design and build test equipment and hired me. Now I'm designing and building testing systems and assembly line tooling for heavy diesel truck engine oil pumps, water pumps and fuel pumps.
Pictured below are the 3 oil pump testing cells I've built, close up of one, and close ups of fixtures for Navistar and Detroit Series 60 oil pumps. So far I have fixturing for 8 different pumps that can be used in any of the 3 systems.
When I interviewed with the owners son all he cared about was that I could not only design but make the parts as well.
IMG_20230407_132634331.jpg
IMG_20230407_132414014.jpg
IMG_20230407_132428314.jpg
IMG_20230407_132450230.jpg
 
Back
Top