Well, that's a bit far...I am near Portland.

Still, if I can be of any help don't hesitate to ask.
Well, that's a bit far...I am near Portland.
When ya get to that point, post pics of "rat chewed wires" it'll help us assess and advise
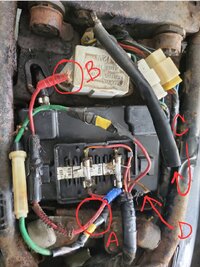
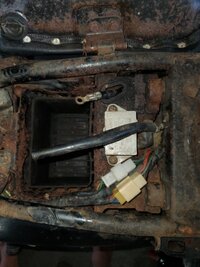
A to B is not stock wiring, don't know it's purpose - maybe to fix issue with original box. C, is battery negative as you ID'd. D may have been return feed from ign switch. Green wire & fuse holder not stock, same as AB.
One can get wire, terminals, solder and repair all that. Or...:
https://www.mikesxs.net/yamaha-xs650-fuse-box-with-connector-plugs-cover.html
https://www.mikesxs.net/yamaha-xs650-battery-negative-cable-to-frame-74-84-oem-447-82116-00.html
https://www.mikesxs.net/yamaha-xs650-battery-positive-cable-for-74-84-oem-447-82115-001.html
Not from my preferred supplier, but in this case perhaps best route. Opinions?
DE that is a super-clean, modern install.Seeing as you have considerable wiring repair to do anyway, I'd look at converting to blade type fuses. The old glass fuses were iffy when they were new and they're 40+ years old now.
View attachment 221429
This is how I did it on my '79. I'm sure there are other examples of the conversion on the site.
Good question. Maybe? I'm not scared of it (my father was an electrician and i know how to solder), but maybe the best approach is to get new to match existing and get it running. During the tear down I can decide if I want to upgrade. It seems short money to just fix it with a new part. And maybe I leave it. Some of me likes the original path.DE that is a super-clean, modern install.
Mdad - that is a modern set-up and a quality component. It, however, requires some wiring modification, terminals and soldering. Are you up to it?
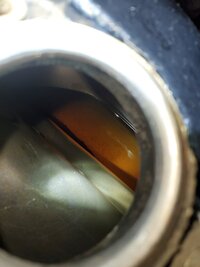
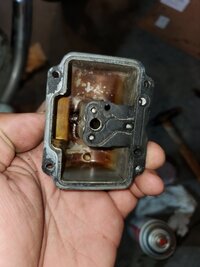
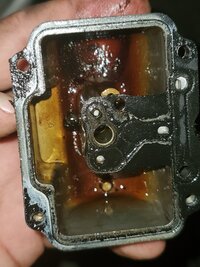
Pulled bowls and dumped gas. My eyes said they werent terrible. The floats had some gunk and there were some floaties but not as much as i expected to see. i did a wipe with some gum out and put them back. I also tried to get a look in the tank. The one spot shown is the only spot i can see. I will still drain and put some fresh non ethanol in for the test start. Once i fix the electrical.Before attempting to start it, drop a float bowl and have a look inside. If it's all gummed up with gas residue, the carbs will need a cleaning. Attempting to start it like that will suck that gunk up into the carbs and plug them up big time.
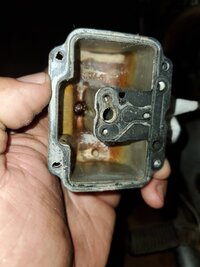
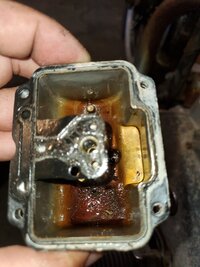
Well, i made my full disclosure in my first post! I was expecting goop at the bottom so what i saw was better than expected. The seal was still on when i took the picks, but i imagine they need a very thorough washing. At this point, i want to ensure the bike generally works before i pull it apart. My goal is road ready by 2032.Boy, you are new at this, lol. This is what good float bowls look like .....
View attachment 221487
Yours are filthy. Run the bike with them and I think you'll have nothing but problems. Carbs need to be "eat-off-it" clean inside.
What is the black cable that comes through the frame, top of battery box?A to B is not stock wiring, don't know it's purpose - maybe to fix issue with original box. C, is battery negative as you ID'd. D may have been return feed from ign switch. Green wire & fuse holder not stock, same as AB.
One can get wire, terminals, solder and repair all that. Or...:
https://www.mikesxs.net/yamaha-xs650-fuse-box-with-connector-plugs-cover.html
https://www.mikesxs.net/yamaha-xs650-battery-negative-cable-to-frame-74-84-oem-447-82116-00.html
https://www.mikesxs.net/yamaha-xs650-battery-positive-cable-for-74-84-oem-447-82115-001.html
Not from my preferred supplier, but in this case perhaps best route. Opinions?