Build Thread - 1978 XS650 Special Edition

Ghaniba

XS650 Enthusiast
Messages
31
Reaction score
1
Points
8
Location
Northeast, CT
Hey folks,

First post on this fantastic forum here today. I've been reading for a couple of days, but wanted to have pics ready for when I made my first post.

A bit about me - I've ridden dirt bikes and motorcycles, but I'm far from what I'd say 'pro' in any way. I've done almost no maintenance other than oil changes & air filters, etc to a motorcycle. I do have decent technical skills and some fabrication skills and a general understanding on how engines work. I do my own car repairs and have a built Jeep, so I'm not a complete novice to the world of powered vehicles!

My story - Probably 10 year or so ago, my friend had traded his old hotrod for this bike. It wasn't in the best of shape, but he got it to run and rode it for a bit, but didn't really do much more with it. It came into my possession after trading for it - a part that we can say was under a $200 value. For those interested, it was a TurboXS RFL blowoff valve that I had leftover from a previous project.

This bike has been with me, for probably 4-5 years. I had ridden this bike when my friend had it running. It wasn't fast, it wasn't pretty, but it had some charm I couldn't quite put my finger on at the time. It hadn't run in a year or so before I received it, so it's basically sat for 6 years.

When it came into my possession, we got it to fire, but it wouldn't idle. Obviously, some old bad gas and gummed up carbs. It's been in my basement since.

I went downstairs and spotted it amongst the rubble and said to myself, I've been putting off that tinker project for quite some time. I poked around the internet for some carb rebuild kits for it and low and behold, I found I wasn't the only one with some intrigue for this old bike. There's a true following! I mention this to a few other people that I know that have a passion for bikes and -all- of them spoke of these bikes as legends, how much fun they are, how reliable they could be, etc. One person even mentioned that "they'd hold with a 900cc Harley of the same vintage, but not be pouring oil or spitting off parts going down the road!"

I one-day'd a Clymer book for it from Amazon - fantastic little book.

I called up "Mercury" over at 650Central and threw in an order. Some new fuel line, couple of carb rebuild kits, a turn signal lens and a few other bits. They should be in any day.

So, I know nothing about it, but I'm diving in, head first, here goes!

Dave

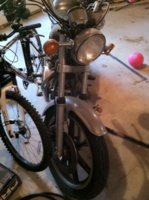
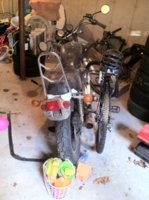
=-=-=- Pics! -=-=-= These are taken AS IT SAT Yesterday afternoon. Dusty, Dirty, Little kids sandcastle building kit spilled near the tire, etc!
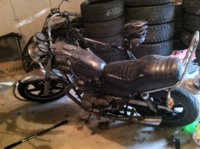
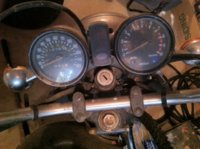
photo 1.JPG photo 2.JPG photo 3.JPGphoto 4.JPG
 
Good luck and I look fwd to the progress! Getting ready to get my feet wet also...and right now its looking more and more like it's a big damn ocean and I'm a small effin fish lol
 
Good lck with you gents with your projects.
Ghaniba, Thanks for the picture.
Keep us informed of your progress. We're here to help is you get stuck.
 
Thanks for the support guys!

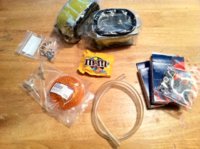
My parts actually came in a day earlier than I expected!
photo 1.JPG

Mmmmm! Those M&Ms will go great with a Guinness while tinkering on this bike! Good thing I'm not allergic to peanuts!

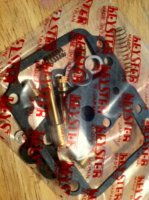
Looking at one of the carb rebuild kits, now I'm a tad intimidated! I've not a clue where any of those parts go yet! I better get to reading!
photo 2.JPG

Dave
 
Let me say Welcome to the board. Now on the the important stuff.
To do a good job on cleaning and rebuilding your carbs you want to read the carb guide.
Leo
 
It's amazing how time goes by! Almost 2 years since I started this thread - and more interestingly - almost 2 years since I ordered the parts and actually got around to start tinkering!

Well, I drained the fuel from the bike, found the carbs to be quite clean inside after digging into them. I seem to recall the previous owner (a close friend of mine) having hte carbs reworked the last summer this bike was really ridden. I gave it a spray of some carb clean anyway while I was in there.

I threw it all back together with a nice new Gel Cel battery and some fresh fuel, and she cranks but no fire.

I pulled a plug - no spark from either side.
I checked the coils and they Ohm out propery, as per spec from the repair manuals.
I did the "Slap Test" and it pulled the wrench in as expected when the key came on.

I stumbled when it talked of testing the condenser... Is there some trick to that? All of my fuses under the seat are good too. I'm at a little bit of a loss currently. Anyone have any other ideas to check?

Dave

Use a VOM and check for voltage on both sides of the ignition fuse, and on both sides of the kill switch. If you still have those old original fuse holders (glass fuse type), its best to replace then with new automotive blade type fuse holders. Those old fuse holders can look good but have high resistance and cause large voltage drop to the intended load, such as the ignition coils.

If you have 12 volts after the kill switch then check at the coil primary terminals.
 
Just too add my $.02. The slap test has nothing to do with the ignition, that's a test for the charging system.
You can try running a jumper wire from battery positive to the red/white wires at the coils. This bypasses all the switches, fuses and wiring. If you get spak with the jumper you need to do as RG said and check everything between the battery and coils.
Leo
 
So I had a friend come over and babysit me while I replaced the points, since I really don't know much of doing them, until now.

In any event, fresh fuel, changed the plugs, condenser and points, set points properly and what would you know...

She runs!

Took it for a quick spin down the road and back. Rear caliper is dragging. Looks like the front and rears are the same on this bike, how hard are they to rebuild? Anyone have a source for a complete caliper for one?

Dave
 
For new Mike's Is the only source. On Ebay you may find NOS calipers but they don't show up often and cost a lot.
Before you replace, tear down, clean, inspect. Replace any needed parts, reassemble and be happy.
Mike's has rebuild kits which are the square section o-ring the dust shield and a clip for the shield. His replacement pistons are stainless steel.
The stock pistons are chromed steel and do rust. If not to rusty they can be reused.
Easy to repair what you have.
I would also do the same for the master cylinders. I've had good luck with the rebuild kits. Done two with good results.
Replaces the 30+ year old rubber lines with braided stainless lines. The old rubber may look good but they rot from the inside. The bits that rot off can plug things up.
Brakes are something you should do well. Iffy brakes can get you hurt.
Leo
 
One more thing, the front and rear calipers are almost identical. The bleeders are different. On the front they point straight out from the caliper, the rear it points at a 90 degree angle.
Leo
 
Ok, more chaos. I've been riding the bike, probably put on 300-400 miles or so. Running nicely. Now it's stopped charging. I've read through the charging guide, but I'm a little thick.

Since it's a 78, it doesn't have the solid state setup. I've verified the battery is good (with much harassment at the parts place) - Gel Cell.

It passes the slap test, pulls a big wrench right in when the key goes on - which as I would understand means the entire wiring through the key switch, the kill switch and all the way to the stator is ok. Is this a correct assumption?

I read mention of the 3 white wires - They come off the Stator and go where exactly? I can't seem to figure this out. I'm probably just missing something somewhere really silly.

Seeing as it's been riding and charging (no way you'd go that many miles on just battery) is there somewhere people would check out first?

I know I really should just break down n' buy the $500 solution for the ignition AND the charging, however I'm in a tough spot right now. This bike stopped charging, I traded my Buell off, and THE next day the transmission went on my BMW. That's going to eat a lot of my toy money...

Dave
 
Start cheap. Trace your wiring and make sure nothing is unplugged or broken. Check your brushes. Are your three whitewater giving a consistent reading when the bike is running? What is it? If wiring is fine and brushes are fine, my guess would be reg/rec. A really shot battery can cause similar problems.
 
The slap test is to determine if power is flowing through the rotor, not the stator. Yours seems to.
When the engine is running and power is flowing through the rotor, this excites the stator into creating power. It sends out this power on the three white wires. This power is three phase AC. It gets sent to the rectifier where it gets converted to DC power that the bike can use.
Follow the wire bundle from the stator up to a large plug. Now with it idling, use your meter and probe the side toward the stator. The three white wires. Use the AC scale. Think of the three white wires numbered 1, 2 and 3. Probe 1-2, 2-3 and 3-1. You should get an AC reading of around 8-10 volts.
If not shut the bike off. Unplug that big connector. On the stator side use your lowest ohms scale. Touch the probes together. This gives you a reading of just the leads. Remember this reading.
Now test the ohms on the 3 white wires, as above. Think 1,2,3 test in pairs. You should get the same reading on all three pairs.
When tresting you need to subtract the readsing you did first from the test readings. Like if when you touch the leads together and you get say .7 ohms. You test and get 1.6 ohms, subtact the .7 from the 1.6 and you get .9 ohms. Depending on the year and test procedure they spec .46 or .9 ohms.
Also test using a high ohm scale from the white wires to ground.
If your reading seem way off un hook the yellow wire that is close by that big plug. It grounds through the safety relay and can give false readings.
Have you gone through the charging system trouble shooting? It can be found in the XS650 tech section.
Leo
 
Whelp, I dug in again and found the brushes to be about 6mm. Also, dirty as hell in under the stator. Cleaned it all with some light sandpaper, new brushes put in, fired it back up - zero charge still. At this point, I've checked all the wires for connectivity, so it'd be the stator, the rectifier or the regulator. :banghead:

As a wise man once said... "That'll do pig, that'll do."

Ordered the Pamco / PMA kit (without e-advance) and had it shipped next day. I like tinkering as much as the next guy, but at some point, why am I still bothering? :p

With that said, this new e-advancer dohicky - Can that be added later?

Dave
 
Why not replace the stator and do the solid state jeep Chrysler regulator Radio Shack rectifier if money is tight. Down to your last 20 grand. 25 bucks for solid state setup. Retired has one on his bike. Xs leo showed me his and I put one on mine. Lots of good stators cheap enough haven't priced one probably 100 bucks. Tinkering is part of owning and maintaining a Yamaha 650. I call it trouble shooting. Since you have already bought the new brushes the logical thing replace the stator. The PMA is not saying all my charging problems are over. More or less you just don't have to change brushes. Still prone to fail my opinion the weakest link probably regulator rectifier since it has to give off heat caused by dumping excess voltage. They do produce more watts. Thanks for explaining the trouble shooting Leo. I don't understand the pig shit but a fool an his money soon part. :D Welcome to the site :thumbsup:
 
Back
Top