I've used a bench grinder in the past to make my own ball end allen's. It's pretty easy to do.... just keep a bowl of water handy so's not to ruin the temper.
-
Enjoy XS650.com? Consider making a donation to help support the site.
XS650.com receives a small share of sales from some links on this page, but direct donations have a much greater impact on keeping this site going.
You are using an out of date browser. It may not display this or other websites correctly.
You should upgrade or use an alternative browser.
You should upgrade or use an alternative browser.
carburettors from the grave...
- Thread starter kopcicle
- Start date
-
- Tags
- carburetors
leodr
XS650 Enthusiast
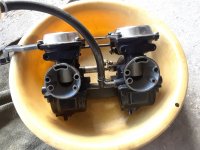
Ok, I finally removed my carbs. You were right about removing the two air boxes and then i had to also remove front intake manifolds to make it easier.
Now to find problem that I was having as to why bike was revving uncontrollably. I looked at diaphragm and both are good. I looked inside float bowls and everything looks good and clean. I do not know what to do next? Should I start to remove jets even though everything looks good? Perhaps I do not have carb problem but maybe a vacuum leak somewhere else.
Here is picture of removed carbs.
Leo
Attachments
Ok, I finally removed my carbs. You were right about removing the two air boxes and then i had to also remove front intake manifolds to make it easier.
Now to find problem that I was having as to why bike was revving uncontrollably. I looked at diaphragm and both are good. I looked inside float bowls and everything looks good and clean. I do not know what to do next? Should I start to remove jets even though everything looks good? Perhaps I do not have carb problem but maybe a vacuum leak somewhere else.
Here is picture of removed carbs.
Leo
For the life of me i can't understand why the carbs were taken of.............no air leak tests were done......simple checks like throttle cable sticking........This thread is now going to be 100 pages long and we will still only be up to changing the air jet..........Whats that???........
Maybe the mods should start a new thread for this guy.......
leodr
XS650 Enthusiast
I guess I am getting on everyone's nerves. My cable is not sticking since it is idling fine then it starts to rev up by itself and then i put choke up and it goes down then back down on choke then it goes up very high in revs and if is starting to shake and move from main stand?
Leo
Leo
leodr start a new thread, I'll move these posts over.
Now that you got the carbs off do an eyeball synch, look through them facing a light, compare the gaps under the butterflys.
Now that you got the carbs off do an eyeball synch, look through them facing a light, compare the gaps under the butterflys.
I've tried that and it ruined MY temper......I've used a bench grinder in the past to make my own ball end allen's. It's pretty easy to do.... just keep a bowl of water handy so's not to ruin the temper.
Takes patience to be good a half assin' stuff.....I've tried that and it ruined MY temper......

Oh, punt , it's that time again .
Just a tool tip regarding slotted jets and screwdrivers. Gunsmith's screwdriver kits are excellent, if expensive tools for any slot head screw, jet or plug.
Like this kit for example:
https://www.ebay.com/itm/Wheeler-56...MI767X7KGJ4gIVWYuyCh2yMQZUEAQYASABEgLYQ_D_BwE
Like this kit for example:
https://www.ebay.com/itm/Wheeler-56...MI767X7KGJ4gIVWYuyCh2yMQZUEAQYASABEgLYQ_D_BwE
Very good tip , Just expensive.
Yes it is really expensive. I actually gave one of those kits to my youngest son for Xmas some years ago, as he was going to a gunsmith school. It also has some specific special tools for Mausers, Colt1911, and other iconic firearms, as well as a selection of pin punches.
For motorcycle and car use, there are less comprehensive gunsmith screwdriver kits on the market. Check out Brownell's or other suppliers in the gunsmithing sector.
For motorcycle and car use, there are less comprehensive gunsmith screwdriver kits on the market. Check out Brownell's or other suppliers in the gunsmithing sector.
For carbs, I've been pretty happy with this. Bonus is that it fits great in my tool box at the race tracks, and the little thumb socket makes it easy to swap jets on the fly. https://www.amazon.com/Mikuni-Tool-...+kit&qid=1557258980&s=gateway&sr=8-1-fkmrnull
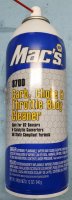
Just a note on aerosol carb cleaners.
Found some auto forums discussing their displeasure with the new cleaners, mostly old farts like us with fond memories of the effectiveness of carb cleaners of the past. The blame appears to be the exclusion of the potent methylene chloride, as used in paint strippers.
More info found by Google search of "carb cleaner methylene chloride" or "carb cleaner dichloromethane"...
Last edited:
Just a note on aerosol carb cleaners.
Found some auto forums discussing their displeasure with the new cleaners, mostly old farts like us with fond memories of the effectiveness of carb cleaners of the past. The blame appears to be the exclusion of the potent methylene chloride, as used in paint strippers.
More info found by Google search of "carb cleaner methylene chloride" or "carb cleaner dichloromethane"...
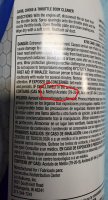
Ha! You made me look. This is the ingredients list from the MSDS for Berryman B-12 Chemtool , my personal fave.
It cuts gunky residue better than Gunk brand spray cleaner.
bbbbBump!
Raumulin
XS650 New Member
more
Hello Wise Council,
Thank you for the months of advice I have garnered reading thread after thread as a guide to reto-modifying a 1980 XS650G I acquired in May of this year. Call it a COVID project. And I’ve been wanting to build a cafe racer for a while.
To the point of my post/question, gggGary, in the thread Carburettors from the grave you posted several pictures (post #5 here). One in particular I have interest in, the one with a dime as a scale indicator. The layout of the fuel mixture screw in that picture, is that the assembly layout: screw, spring, o-ring, and washer? I have ASSumed from my reading posts (“How do I remove the o-ring”) and intuition that it should go screw, spring, washer, then o-ring. As I have not been able to locate a parts diagram for these needles (mentioned several times the manufacturer did not create). Getting this absolutely correct is important to me as I am dialing in the carbs and am having some struggles with the RHS running rich. The carbs were in pieces in a box when I acquired the bike. I would like to make sure that everything is a assembled correctly for the obvious reasons.
Thank you all for the sage advice and the jocularity.
Here a couple pics of the before and thus far.


Your mix screw assembly sequence is correct. You want the little washer between the spring and o-ring so the spring doesn't dig into the o-ring and destroy it. Also, the purpose of the o-ring is to seal into the bottom of the mix screw hole. It wouldn't do that if it wasn't the last part placed on the screw.

Raumulin
XS650 New Member
Thank you Twins. I appreciate the feedback.Your mix screw assembly sequence is correct. You want the little washer between the spring and o-ring so the spring doesn't dig into the o-ring and destroy it. Also, the purpose of the o-ring is to seal into the bottom of the mix screw hole. It wouldn't do that if it wasn't the last part placed on the screw.

You ARE paying attention! Good on you! Idle mix screw parts in that picture are not in assembly order. I'll try to get that reshot and corrected.Hello Wise Council,
Thank you for the months of advice I have garnered reading thread after thread as a guide to reto-modifying a 1980 XS650G I acquired in May of this year. Call it a COVID project. And I’ve been wanting to build a cafe racer for a while.
To the point of my post/question, gggGary, in the thread Carburettors from the grave you posted several pictures (post #5 here). One in particular I have interest in, the one with a dime as a scale indicator. The layout of the fuel mixture screw in that picture, is that the assembly layout: screw, spring, o-ring, and washer? I have ASSumed from my reading posts (“How do I remove the o-ring”) and intuition that it should go screw, spring, washer, then o-ring. As I have not been able to locate a parts diagram for these needles (mentioned several times the manufacturer did not create). Getting this absolutely correct is important to me as I am dialing in the carbs and am having some struggles with the RHS running rich. The carbs were in pieces in a box when I acquired the bike. I would like to make sure that everything is a assembled correctly for the obvious reasons.
Thank you all for the sage advice and the jocularity.
Here a couple pics of the before and thus far.
View attachment 177673 View attachment 177674 View attachment 177675
Similar threads
- Replies
- 5
- Views
- 919