I am back with a Yamaha

Thanks for the information 5twins, much appreciated. Carb kits and jets are on the way....Now I am going out and take down the Christmas lights. Happy New Year all.....
 
I read several threads on starting with Mikuni 38 carbs. The suggestions were all along the same vein, leave the throttle alone, kick over with the choke on, once fired turn the choke halfway after the idle rises. I'll be darned if it didn't work (I did do a couple of prime kicks with the key off prior-can't help it a vintage Triumph habit.) The bike sat and idled, even with the stock jetting, and would respond to the throttle. Don't get me wrong there was a lot of popping and cracking and it certainly wasn't smooth but it was encouraging, should be a sweet running little motor with a dial in. I do have an oil leak on the cover on the left side next to the shift lever, where you do the starter block off. A gasket is on the way and I will address it during an oil change, also on the agenda along with numerous other tasks....
 
There are several common leak points under that left cover and the gasket you mentioned isn't at the top of the list. What is would be the cluch pushrod seal or around the countershaft sprocket. On the sprocket, if the nut comes loose, it will leak like crazy. The countershaft seal may be fine, it's the loose nut that lets oil leak out. That nut needs to be really tight to seal this area, like 94 ft/lbs tight. Farther down the list is the shift shaft seal. It may leak but isn't as common as the first two I mentioned. Take the cover off and have a look-see, try to determine just where the oil is coming from.
 
There are several common leak points under that left cover and the gasket you mentioned isn't at the top of the list. What is would be the cluch pushrod seal or around the countershaft sprocket. On the sprocket, if the nut comes loose, it will leak like crazy. The countershaft seal may be fine, it's the loose nut that lets oil leak out. That nut needs to be really tight to seal this area, like 94 ft/lbs tight. Farther down the list is the shift shaft seal. It may leak but isn't as common as the first two I mentioned. Take the cover off and have a look-see, try to determine just where the oil is coming from.
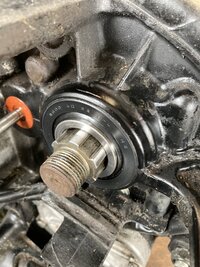
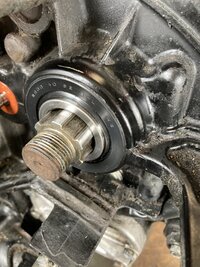
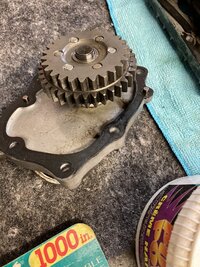
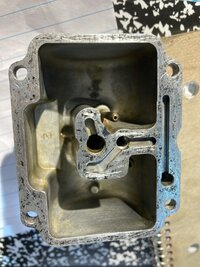
Thank you kind sir, now that I think back I believe I had this issue with a XS project a number of years back when I changed out to a one piece clutch rod. It is puking pretty good, so you are probably spot on when leaning toward the countershaft nut or seal. I will crack it open in the next few days and take a look. Again very much appreciate the input.......

I have got parts on order for a maintenance, front master cylinder rebuild, front seals, small solenoid, brake light switch, and so on. I added a clutch rod seal and countershaft seal tonight along with a cover gasket. Now that I know it will run, it is time to start to make a list, organize the parts when they come in, and start checking things off when a deed is done. After that, a good buff and polish on what chrome that is left, and apply a little paint. I think it could make a decent little bar hopper with some TLC.......
 
Last edited:
I think I may have dodged a bullet. Jam nut was little more than hand tight, probably done with a channel locks if I was to venture a guess. Seals look good, although I do have replacements. I really can't see an oil trail though but will keep looking. In the shot of the countershaft seal, is it sitting too proud, or do they protrude slightly from the case, thanks in advance for any input....
 

Attachments

  • IMG_1002.JPG
    IMG_1002.JPG
    430.4 KB · Views: 67
  • IMG_1003.JPG
    IMG_1003.JPG
    422.2 KB · Views: 66
The seal sitting slightly proud doesn't hurt anything as long as the lips of the seal rides on the spacer... which yours does. I'd say it's good.
 
Seal looks fine. Just install the nut really tight. What you're trying to do is seal the inner end of the sleeve sitting on the splined shaft against the inner race of a bearing inside the motor. You're trying to make a metal to metal seal, that's why the nut needs to be so tight. If it's not tight enough, oil will leak past it and run out the shaft on the splines. So, when you get a leak here because the nut is loose, it's not the rubber outer seal, it's lack of a seal between the metal sleeve and bearing race.

To help seal it up, I add some gasket sealer to the back of the sprocket where it contacts the metal sleeve, and also under the lock washer and nut .....

SprocketMountSeal.jpg


SprocketMountSeal2.jpg


..... then torque it to 94 ft/lbs. I just upped the torque to this a few years ago. I was using about 72 ft/lbs but every time I'd pull the cover off, I'd notice oil streaks on the sprocket emanating from the splined shaft .....

InsideLeftCoverDirty.jpg


It was leaking a little, not enough to drip or make a big mess, but it was leaking. Increasing the torque to 94 has "fixed" this. I guess it just needed to be a little tighter to make that metal to metal seal.
 
Excellent idea about the sealer on the rear of the sprocket, nut, and washer. I will use it. I looked high and low but could not find an oil trail, I did see a slight tear in the bottom corner of the starter cover case gasket so that is being replaced. I pulled quite a bit off today to include the starter which is going to get a good clean when I check the brushes, I am still waiting on some parts but there is plenty to do in the mean time. Of course the sump filter screen is torn, so Mike's will be wearing a little more plastic off the credit card. Thanks Gentlemen for the input....
 

Attachments

  • IMG_1005.JPG
    IMG_1005.JPG
    534.2 KB · Views: 40
I notice from your pic that you still have the original red colored pushrod seal. There's a good chance that's worn and needs replacing, but I'd reassemble things first (with a tightened sprocket nut) and run it some. If you still get some oil drips, there's a good chance it's that pushrod seal. When you pull the cover, look to see if the case is wet and washed clean under that seal. That's what oil leaking out of it will do .....

BadSeal.jpg


Here's the replacement I installed after 200 miles, bone dry so I'm calling it good .....

Seal200Mi.jpg


But, along with the seal, there's also a bushing that the pushrod moves through, and it can wear out too. If it's worn, the pushrod can wiggle around too much and even a new seal won't seal up. Here's the old bushing I removed (on the left) and you can easily see how much thinner it is compared to new ones .....

PushrodBushings2.jpg
 
Added a bushing to the list along with a one piece clutch rod. I might end up keeping this one, I will probably be too upside on parts to sell it. Enjoying the process though......
 
I read over the carb manual three times and please correct me if I am wrong, but the below style B38 bowl with the trough style flow system takes the VM22/210 style pilot jet with holes, correct????? Somehow my carbs have the pilot jet with no holes, the BS30/96. Thanks in advance for helping out a mechanically challenged Old Man again..........
 

Attachments

  • IMG_1007.JPG
    IMG_1007.JPG
    436.9 KB · Views: 47
  • IMG_1006.JPG
    IMG_1006.JPG
    312.2 KB · Views: 43
OK I apologize in advance for being a dumbass. I assumed I had 76-77 38's because they were jetted that way with the 122.5 main and 25 pilot. Upon researching further, I have 78-79 B38's, they have the holes in the front and thanks to a couple of in-depth threads I have seen the error of my ways. I am surprised it ran at all with the solid pilot jets. Now off to order the correct carb kits as I slink into the shadows.....
 
Don't get carb kits, about the only thing any good in them is the float bowl gasket, lol. You're better off buying any parts you may need individually. As far as the pilot jets go, Yamaha had special no-hole VM22/210 pilots made for them. To determine if the pilot jet is a VM22/210 type or a BS30/96, you have to see which end the metering orifice is on .....

Pilots.jpg


So, you're sure you have '78-'79 carbs? Are the vents for the float bowl internal, around the edge of the bellmouth like the carb on the right below .....

LabeledCarbMouthsSmall.jpg


You will also want to check the slide, needle, and needle jet. The '78-'79 slide and needle differ greatly from the '76-'77 items. The '78-'79 slide mounts the needle up higher so it is much longer than the needle used in the '76-'77 carbs. But, it's possible to swap the older slide and needle in, so maybe that's why the jetting was different. You jet around the needle and needle jet size. The '76-'77 carbs had a very large Z-8 needle jet and that's why the mains were so small (122.5). The '78-'79 set had a much smaller Z-2 needle jet and that allowed for a much larger main (135).

Carb Specs Reduced Size.jpg
 
I swear after this 5T I believe I will start dabbing in Chinese arithmetic. Ok I have the no holes VM22/210, the metering hole is at the top and apparently I do have the older 76/77 carbs looking at the shot. I also have the shorter needle, so I think I am ok to go with the kits I have. The only thing I am not sure of, can I swap out the mains a couple of sizes up and not change the needle and use the bigger pilot jet with holes. Maybe it is just me, but damn confusing. Thank goodness for the good people on this site, and you in particular.
 
Yes, you can use the pilots with the holes. The way they flow in this set-up, air is delivered to the top of the jet. Therefore, air bleed holes down the sides of the jet aren't needed. Yamaha probably saved a few bucks having them made without the air bleed holes (less machining). Make sure you have 4M1 needles and Z-8 needle jets, and the old style slide. It retains the needle with just a large plastic disc held in by the big return spring .....


Early Slide.jpg


When you increase the main jet size, you often need to lean the needle setting a step. If you don't, the bleed-over into the upper midrange from the larger jet will make it too rich. The bike will break up and stumble in the upper midrange, say 4 to 5K, under heavy throttle applications.
 
Thanks so much 5 twins, the above diagram is spot on for what I have, the plastic disc and return spring. Now I know for sure and I will lean it out with the clip. Nights like tonight make regret giving up drinking. You are the "Man" my friend, much appreciated....

George
 
For the record, I ran my XS650 with the wrong style jets in it for a long time. WAY out of sync too. Wrong size mains. I even took a 2,000 mile trip that way. AND, I am my own PO. :yikes: It seemed fine. It's certainly better now. You've got this!
 
This has truly been a learning experience, and no excuses from my end, completely my fault. It is in my nature to charge straight ahead and get the job done. (Who needs directions when putting something together, right.) Believe or not I can dial in a four carb Honda CB750K from the next county over and have it purring, but these twin B38's have made me humble. Next time, slow down, do complete research, and made sure of what you have and most of all, what you need. Once again this site and its members are always here ready to throw that life preserver.

I will be buying a new barbecue grill before spring, maybe I will even read the directions this time.....
 
Back
Top