My 20+ year project

This last weekend I finally got some shed time in after my week away and then another week of catching up on "domestic chores".
I picked up the new braided brake lines, and then the fun began.
I had taken the old lines with me and asked the fella who makes the lines to make the new ones exactly the same, which he did.
Fitted up the rear line first, and although it was a bit fiddly It fitted ok.
The front ones were a different story, I started with the single line from the master cylinder to the 2 way manifold, seemed a bit on the tight side but was still acceptable. then the 2 lines leading to the calipers, do you think I could get these right, no way, I tried swapping them round, turning them over, nothing would work they were too short, checked them against the old ones, exactly the same, what was going on here.
I then realized I had the manifold mounted in the wrong mounting hole and it was 90 degrees out, unscrewed it turned and mounted the right way and the line from the master cylinder was much better, but the other 2 still would not fit right, what was going on here!
Then after a long while it finally dawned on me, idiot, I had the calipers mounted on the wrong sides swapped them over and all was good, for a while....
Whilst doing all the work on the front end I had never fully tightened the axle nut, so after fitting up all the brakes I decided to torque the axle nut correctly before I did the brake bleeding just to check all was good withe nothing binding, well after tightening up the axle the wheel would not turn, the left hand caliper mount was jammed up tight against the rotor. Back off the axle nut and all was good, what now?
I checked the parts diagram thought I must have missed a spacer but everything was there, I remembered the old caliper mount had some pretty serious gouge marks on it when I was cleaning up the brake parts. ( My new calipers came with new mounts).
Here's the old one.
IMGP0019.JPG

Obviously the PO had had the same problem at some stage, but I don't recall any problems when I was riding it 20 years ago.
All I could think of was I had to move the rotor inboard or the caliper mount out, so in the end after removing the rotor and remounting it I ended up finding a washer to fit between the speedo drive housing and the inside of the fork leg and this centered the rotor nicely in the caliper mount.
IMGP0009 (2).JPG

Here's how the rotor sits now with the spacer in place, looks a bit crooked but it was hard to get square onto get a decent pic.
IMGP0005 (2).JPG

I'm not sure if I'm totally happy with this solution, so if anyone can shed any light on this I'm all ears.
 
I'm not sure if I'm totally happy with this solution
I'm wondering if that washer "splayed" your fork lowers out a tad. That could give excessive stiction (friction) in the forks.....
 
The stepped end of your axle is supposed to accomplish the proper spacing for you. When you tighten the axle, it pulls the stepped end through the left fork leg and that should space the wheel over properly. The clamp on the bottom of the left fork leg should be left loose as you tighten the axle so the leg can "float". Once the axle is tight, you should pump the forks a few times to allow the left leg to center itself on the axle.

Your fender may be the issue. Maybe it's pulling the fork legs together too much when mounted. Loosen it's mounts while fitting/tightening the axle and left leg axle clamp.
 
I'm not referring to the lower "floating" on the axle. For the purpose of this discussion, we can take the axle out and set it on the bench....
When I installed my wheel a few weeks ago, you couldn't fit a playing card between the wheel "stack" and either fork leg. If I'd have tried to push a washer up in there, I'd have had to physically spread the lowers apart. Keep in mind here our axle's sittin' on the bench.... If your wheel stack plus the extra washer fit between the lowers without interference Mick, you're golden. I'd say it's a good fix. If on the other hand, you had to spread 'em... you're gonna need a plan B.

To get the fender in correctly, I install just the axle, torqued and and axle clamp tightened. Measure the distance between the fender mounting bosses on the lowers. Then measure outside to outside on the fender mount. If they don't agree, tweak the fender mount in or out until they do. The closer you get those two dimensions, the less "stiction" you'll have.
 
I'm wondering if that washer "splayed" your fork lowers out a tad. That could give excessive stiction (friction) in the forks.....
This was my initial concern Jim, but the washer slipped in nicely without having to wedge it in.

The stepped end of your axle is supposed to accomplish the proper spacing for you.

That's what was troubling me 5T, before torquing it everything sits nice, when It's tight that's when I have the binding issue.
I initially fitted everything up without the fender attached and thought this may have been the problem, but fitting an old fender that I have (the original) made no difference.

Keep in mind here our axle's sittin' on the bench.... If your wheel stack plus the extra washer fit between the lowers without interference Mick, you're golden. I'd say it's a good fix. If on the other hand, you had to spread 'em... you're gonna need a plan B.

This is what I am hoping Jim. What I am going to do today is pull it all apart again, do some measuring, try and take some pics and then I will report back.
 
Here's what mine looks like. The stepped part of the axle gets pulled through the leg and acts as the spacer, no added washer required .....

full


For some reason, it seems your axle isn't pulling through like it should.
 
Here's what mine looks like. The stepped part of the axle gets pulled through the leg and acts as the spacer, no added washer required .....
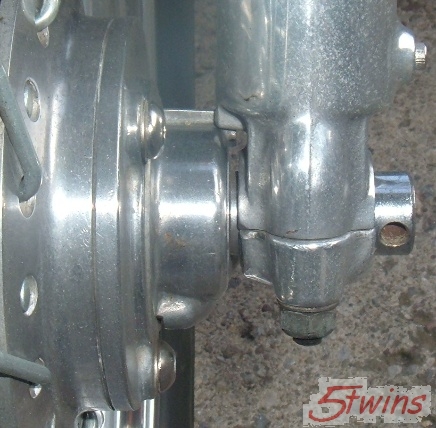
Thanks for the pic 5T, I completely understand the concept, and what is supposed to happen and mine pretty much looks like the one in your pic including the small gap between the speedo drive and the inside of the bottom clamp, but when I tighten up the axle nut with the bottom clamp only finger tight so I can spin the axle in it the left side rotor contacts the caliper mount and locks it solid.
So today I pulled it all apart again and did some measuring to the best of my ability and took some pics.
The first 3 pics are the lower fork leg gaps taken just below the dust seals, at the fender mounts and close to the bottom.
IMGP0003.JPG
IMGP0007 (2).JPG
IMGP0005 (3).JPG

A difference of just over 2.3mm.
Here are a couple of pics showing the rotor after tightening up the axle as described above.
Left side rotor, hard up against caliper mount.
IMGP0013 (3).JPG

Right side rotor, sitting pretty well central.
IMGP0014 (3).JPG

Now a couple with the washer inserted, note I did not have to force the washer in at all it sat in there like it was made to fit with no need to force the fork legs wider.
IMGP0016 (3).JPG

IMGP0017 (2).JPG

As you can see the left rotor is now sitting much more central in the mount and the right side is virtually unchanged.
After looking at 5Twins pic above the only other thing I can think of is that the speedo drive housing on mine has somehow worn down where the boss contacts the recess in the lower fork leg allowing the fork leg to be pulled inboard when tightening the axle, or maybe I am just grasping at straws now.
To be continued....
 
It appears the fork leg is being pulled in as you tighten the axle. The clamp on the leg bottom is hanging up somehow on the axle. Did you pump the forks a few times after tightening the axle, clamp still loose? That will often times center the leg on the axle. You can also just give the fork leg a tug outwards.

If worse comes to worse, I guess you're going to just have to use the spacer washer, but you really shouldn't need one there. The assembly is designed to work without one.
 
is that the speedo drive housing on mine has somehow worn down where the boss contacts the recess in the lower fork leg allowing the fork leg to be pulled inboard when tightening the axle
As 5T points out, that shouldn't happen Mick. Theoretically you could put a speedo drive in there say a quarter of an inch thinner, and the axle should just suck in to compensate for that. It shouldn't pull the lower with it. Sounds like, as 5t says, the lower is catching on the axle and being pulled in for some reason. A rather large burr on the axle maybe? But if using the washer works....
 
Yes, some of these poor old bikes have had a tough life. You should consider yourself lucky if yours has survived this long with nothing more than a few burrs to show for it, lol.
 
I thought about this a fair bit overnight and went out first thing this morning pulled the wheel off again and just pushed the axle through without the wheel in place and with the bottom clamp finger tight as I always have it when doing up the axle. The raised section on the axle slides through perfectly with no hint of grabbing or binding. So I guess the washer will have to stay put as it it achieving the same purpose as tugging the fork leg out when tightening the bottom clamp.
Theoretically you could put a speedo drive in there say a quarter of an inch thinner, and the axle should just suck in to compensate for that. It shouldn't pull the lower with it.

Yeah, that's the frustrating part Jim, I cannot figure out what is going on.

If worse comes to worse, I guess you're going to just have to use the spacer washer, but you really shouldn't need one there. The assembly is designed to work without one.

Totally agree with you 5T, and like you say it's an old bike and things aren't always going to go the way we would like.
 
On the bright side Mick.... your washer fixes it. Be happy;)
 
I had a busy day in the shed today and managed to get a couple of jobs done that I had been doing a lot of reading up about and was concerned that I might have had some problems with.
First up installing the clutch mechanism in the left side cover and adjusting the same. Well after a couple of false starts at getting the worm in the right position I got everything in correctly bolted up the side cover and after reading and watching a video on the adjustment procedure I had it all done in fairly quick time, well for me anyway.;)
Next up was bleeding the rear brake.
I had read up a fair bit on this procedure and problems people had getting a firm pedal when doing a fresh fill so I was attempting this job with some trepidation, I also might mention that when it comes to anything involving filling or draining oils and fluids I'm the bloke who usually manages to get it everywhere or kick over a container full.
So, after putting a bit of thought into it I reasoned that the best way I could think of filling everything with fluid and minimize the trapped air would be to inject the brake fluid from the brake bleeder all the way through to the master cylinder reservoir.
I had a 50 ml syringe so I attached a length of hose to it that would fit the bleed nipple, I then filled it with brake fluid and very slowly injected into the system.
It worked perfectly, 2 syringes and I had the reservoir full, I then connected up my vacuum bleeder to the bleed nipple and drew about 50 ml back out of the system along with a few tiny air bubbles.
Leaving the vacuum bleeder attached I then bled the brakes the traditional way pumping the brake pedal and after a few pumps and a couple of top ups I had a nice firm pedal.
I surprised myself, and no spills :D, although the real test will be when I attempt it on the twin disc front.
Here's my brake bleeder set up, note the Lab wash bottle worked perfectly for topping up the reservoir without spilling brake fluid everywhere.
IMGP0004 (2).JPG

And last but not least, my bike back on it's own 2 feet again at last:):):)
IMGP0001 (2).JPG
 
On fork wheel spacing; sounds to me like fork tube or triple tree issues. I hate to say this but bent tube(s) or a twisted triple? I have run into that LH caliper being a tight fit before but it was awhile ago.
 
Last edited:
FWIW that LH disc does tend to run quite close to the outside of the caliper slot.
couple shots from madness. I haven't touched this fork but there's a new tire sitting here.....
DSCN8814.JPG DSCN8819.JPG DSCN8820.JPG
 
Thanks for the video Gary, I tried out your technique and both tubes were dead straight, not a bit of movement at the wheel, so that rules one thing out I guess.:thumbsup:
That's a fairly substantial looking fork brace you have there, is that home made or can they be bought somewhere?
 
Thanks for the video Gary, I tried out your technique and both tubes were dead straight, not a bit of movement at the wheel, so that rules one thing out I guess.:thumbsup: :bike::bike:
That's a fairly substantial looking fork brace you have there, is that home made or can they be bought somewhere?
Brace came with the bike, a period hotrod, haven't seen another quite like it.
 
Back
Top