My son just bought a tracker. The builder left the mount on the frame and included the stand. It sits in the garage till needed. It is simple to mount the stand for maintenance, then remove the bolts and stand. Just one option. 36th Georgia has a good one tooView attachment 252933
I'm torn on the center stand mount! To cut off or not?End result I would like the frame as clean as possible, but I really do enjoy having a readily available center stand....going for a lean/clean scrambler here
-
Enjoy XS650.com? Consider making a donation to help support the site.
XS650.com receives a small share of sales from some links on this page, but direct donations have a much greater impact on keeping this site going.
You are using an out of date browser. It may not display this or other websites correctly.
You should upgrade or use an alternative browser.
You should upgrade or use an alternative browser.
New here!
- Thread starter Peepz
- Start date
Want he saidRemove it and buy an over center pit jack.
A.
Awesome. I’ve got a gs500 scrambler project that I think the height would work on those stockersIf you’re looking for stock rears, I may have a couple sets, ya, I plan on replacing them once I get the ride height figured.
Frame blasted, somewhat de-tabbed, crude build-stand slapped together from my spare wood pile. Curious if you guys nearly reassemble before painting the frame? Just ensure you have all the tabs u want etc. in the correct places? Obviously I'm a ways out from that, just curious as to build order some of you experienced guys follow? I'm thinking set ride height first, get shocks rebuilt and fitted, wheels and tires sorted, then move on to the fun-to-me stuff like the electronics tray.

Yes, if you've detabbed the frame, you'll want to reassemble everything to make sure your new tabbing works to hold everything as it should. Then tear back apart and paint.Curious if you guys nearly reassemble before painting the frame? Just ensure you have all the tabs u want etc. in the correct places?
Looking good!Frame blasted, somewhat de-tabbed, crude build-stand slapped together from my spare wood pile. Curious if you guys nearly reassemble before painting the frame? Just ensure you have all the tabs u want etc. in the correct places? Obviously I'm a ways out from that, just curious as to build order some of you experienced guys follow? I'm thinking set ride height first, get shocks rebuilt and fitted, wheels and tires sorted, then move on to the fun-to-me stuff like the electronics tray.
View attachment 253937
IMO it’s good to get them running and even riding and shake them down. Nothing worse than grinding on nice new powder coat or paint because this tab has to be moved or that bracket angle has to be changed because of some unforeseen circumstance that seems to be building custom motorcycles
 it’s a lot of extra work so it depends on the level you’re taking the build to. But Montana winters at long so you got nothin but time… and hopefully a heater lol
Cool, that's the plan then! Basically build er then worry about paint! Thanks!Looking good!
IMO it’s good to get them running and even riding and shake them down. Nothing worse than grinding on nice new powder coat or paint because this tab has to be moved or that bracket angle has to be changed because of some unforeseen circumstance that seems to be building custom motorcycles
Thought this was interesting, when removing the center stand mounts it seems the factory welded this cross tube to the center stand mount, not the side rail of the frame, at least the part where they overlap

So for now I laid a few beads to tie to two back together, the cross member to frame rail, then dressed to somewhat look like a factory weld again

So for now I laid a few beads to tie to two back together, the cross member to frame rail, then dressed to somewhat look like a factory weld again
A 22 year old switch? Might be worth a multimeter check, my wife killed a new on in half that time on a Civic. Lots of keys and fobs on her ring. IMHO.Yes, 200 six. Ignition problem recently popped up on original ignition. Starts but dies when I release the key switch. I suspect the condenser but will replace plugs, wires, cap, rotor, points, condenser. The key switch was newly replace when I worked on/restored the car in 1991. (That is next inline)
")
Fobs on her ring……. Oh errr!A 22 year old switch? Might be worth a multimeter check, my wife killed a new on in half that time on a Civic. Lots of keys and fobs on her ring. IMHO.
Fobs on her ring……. Oh errr!
I don’t think the QC was too stringent on the line back then. I’ve seen a few welds on these frames that looked like I did them! LolThought this was interesting, when removing the center stand mounts it seems the factory welded this cross tube to the center stand mount, not the side rail of the frame, at least the part where they overlap
Ya...I'm not the best welder but I think I could've been an employee on that lineI don’t think the QC was too stringent on the line back then. I’ve seen a few welds on these frames that looked like I did them! Lol
I've been known to wear threads out assembling, disassembling, re-assembling...Yes, if you've detabbed the frame, you'll want to reassemble everything to make sure your new tabbing works to hold everything as it should. Then tear back apart and paint.
Nice stand and nice work on the frame!Frame blasted, somewhat de-tabbed, crude build-stand slapped together from my spare wood pile. Curious if you guys nearly reassemble before painting the frame? Just ensure you have all the tabs u want etc. in the correct places? Obviously I'm a ways out from that, just curious as to build order some of you experienced guys follow? I'm thinking set ride height first, get shocks rebuilt and fitted, wheels and tires sorted, then move on to the fun-to-me stuff like the electronics tray.
View attachment 253937
So, decided to attack the triples and the forks first! Decided to detab the lower, I think it worked out ok. 
Started by lopping off the "nugget" I didn't want. Then went to work with the file sander, gently

Once I got it close I had to fill that old bolt hole with a few tacks, then continue sanding to desired contour.

Came out pretty good! I want to get this lower triple painted up because once that new tapered bearing gets pressed on, it's on! Lol, don't want to try and work around it.
Started by lopping off the "nugget" I didn't want. Then went to work with the file sander, gently
Once I got it close I had to fill that old bolt hole with a few tacks, then continue sanding to desired contour.
Came out pretty good! I want to get this lower triple painted up because once that new tapered bearing gets pressed on, it's on! Lol, don't want to try and work around it.
When assembling this bike in the mock up stage, do you guys think it's ok to leave the tapered triple tree bearings dry of grease? The reason I ask is, eventually i will have to disassemble to have the frame powder coated and I don't want to have to dig a bunch of new grease out of the neck of the frame to avoid burning a bunch of it off in the powder oven?
Yup, won't do any harm. The grease is there to smooth the service loads and just dry assembled there's no service loads.
We learn a new term everyday, "service loads". I like it.
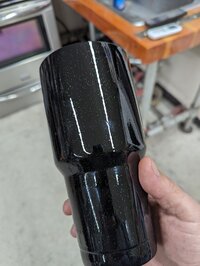
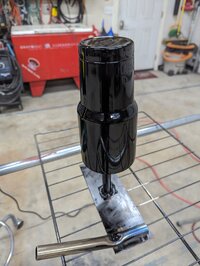
Pumped the brakes for the last few weeks, dabbled in powder coating awhile back and finally decided to return to it and learn it right. I figure I can be coating all the small bits as I go on this build. Here's a few shots of a yeti mug I just shot black then added some green candy clear over ... definitely not perfect, still trying to get the process down