New to me XS 650...

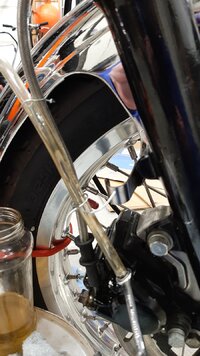
Beta version of bobbed front fender. Approximately 3 inches off both ends.
20220125_185852.jpg
 
Last edited:
Absent the fender, any fender really, the bike looked like it had stretched forks. Nothing against choppers, but, not my style. And, I plan on fair weather riding mostly so protection is not paramount.
 
Last edited:
I am fitting some pieces onto the new handle bars, the front fender and the cam end covers. I want to locktite each piece but may need to adjust a little later. Does the blue locktite "shear" or "smear"? That is, is the locking function destroyed ,"shear" when you loosen to adjust or does it"smear" and retain its usefulness when you loosen and retighten?

I had a situation where I wanted to have a group of screws (in a hot oil-bathed environment) run down to a specific depth, and stay there. Not holding anything, just dangly position stops. Used Loctite blue. Later, was able to adjust their heights, and the blue held them to their new positions. Sorta a combo of shear and smear, the plastic blue kept the threads nicely jammed...
 
You'll be happy you've installed a fender because with the single disc, this fork really needs bracing of some sort. Adding a dedicated fork brace will help even more .....

1JaeEIl.jpg


tjq4vMZ.jpg


mo4cWPo.jpg
 
Thanks. Yes a brace would be good. I saw one advertised recently but cannot remember where. One thing I may do is slide the tubes up 1 inch in the trees. That stiffens things quite bit if the side stand geometry allows. I am over my knee dragging days so clearance should be OK
 
Well, you can slide the tubes up in the trees a little, but not that much. At full fork compression, there's only about 1/2" or so of space between the lower and the bottom tree. Slide the tubes up too much and the lowers will slam into the lower tree upon full fork compression. I raise mine about 1/4" .....

CzNiDXD.jpg


drxitXO.jpg
 
You'll be happy you've installed a fender because with the single disc, this fork really needs bracing of some sort. Adding a dedicated fork brace will help even more .....

1JaeEIl.jpg


tjq4vMZ.jpg


mo4cWPo.jpg
Does that brace clamp over the rubber, below the rubber, or is the rubber trimmed to accommodate the brace?
 
I have finished draining the brake system, removed the old MC and lines and am now routing the new single brake line. 90 cm is seeming to long. Also, went to YouTube to check annealing the banjo bolt washers. Then... decided to review XS650.com and noticed mention of quenching, ignored on YouTube, so I toss this out jere.
Absent the fender, any fender really, the bike looked like it had stretched forks. Nothing against choppers, but, not my style. And, I plan on fair weather riding mostly so protection is not paramount.
I have the privilege or curse of living in a region settled by Germans and Dutch in the mid 1800s. An awful lot of straight property lines divided by straight county roads. A few interesting roads follow geographical features, but not many. I did alot of "knee dragging" curves riding in the foothills of Southern California 30 and 40 years ago and had a riot doing it. Now I will enjoy rather sedate riding enjoying the power band while not setting speed records. When I co6e across a brace I will add it.
 
You pop the rubber dust wiper up and install the brace under it, directly on the metal of the fork lowers. You wouldn't want a brace clamped on rubber, sorta defeats the issue of stiffening up the forks.

I replace the original fork dust "wiper" with the full boots or "gaiters" pictured. They protect the fork tube and fork seal better plus I like the "old school" look.
 
A 90cm line should be perfect with lower than stock bars. That's what I use on both of mine and have put it on other guy's bikes with lower bars as well. Route it like so .....

83BrakeLineRoute.jpg


..... down behind the headlight and then in front of the bottom triple tree .....

LineGuide.jpg
LineGuide2.jpg


Brake Line Guide.jpg
 
Last edited:
I found those bosses, mounted a rubber lined cable clamp and got the mounting. 1 thing, I wish I had specified the end fittings were splayed 90 degrees. 2 thing, I wish I had time to rewire the handle bar controls to the headlight bucket. 3 thing, new dense foam grips were fitted and hot (hot) tap water in a bowl softened the original grips enough to ease removal off the throttle tube. 4 thing, a soft tooth brush and soapy water could clean up the lower and upper triple trees while things are apart.
 
Last edited:
Replaced the clutch cable this week. I hung the new one from a garage door track overhead and smeared 20W50 on the exposed cable. I used the dip the finger in the oil and rub it on the cable method.. Google it or go to the KY jelly website. Repeated a couple times. Google it or go to pornhub. When oil was dripping out I removed the sidecover. Sorry, no dirty pictures. While open I counted 18 teeth on the countershaft sprocket(and a clean cavity in the enclosed space) so a 32 tooth rear sprocket is on hold. NEW M/C bleeding is slow. I get a little movement pulling the lever, then nothing unless I wait 15 minutes. Mighty Vac just pulls air around the nipple so I will just have to exercise patience (laziness?).
 

Attachments

  • 16465348780839033700179925023931.jpg
    16465348780839033700179925023931.jpg
    256.6 KB · Views: 50
Replaced the clutch cable this week. I hung the new one from a garage door track overhead and smeared 20W50 on the exposed cable. I used the dip the finger in the oil and rub it on the cable method.. Google it or go to the KY jelly website. Repeated a couple times. Google it or go to pornhub. When oil was dripping out I removed the sidecover. Sorry, no dirty pictures. While open I counted 18 teeth on the countershaft sprocket(and a clean cavity in the enclosed space) so a 32 tooth rear sprocket is on hold. NEW M/C bleeding is slow. I get a little movement pulling the lever, then nothing unless I wait 15 minutes. Mighty Vac just pulls air around the nipple so I will just have to exercise patience (laziness?).
YouPorn.com is also a free source for lubrication technique information.
 
Have you pulled the bleed nipple right out and inspected the bottom end of it? I found one once that had been over-tightened and had the bottom end squashed closed. I had to replace it. Yes, the MityVac does suck some air around the bleed nipple threads, but it shouldn't be all air. There should be a fair amount of fluid too. Have you disassembled and cleaned out the caliper?

The last totally dry system I did took pulling about 3 reservoirs-full of fluid through with the MityVac before I started to get any lever pressure.
 
The last two times I bled the front brake lines, I struggled so much to get pressure ( using my MightyVac ) that I decided to try something different next time, I purchased an inexpensive syringe that I want to try hooking up to the air bleed nipple on the caliper and force fluid up to the master cylinder. I suspect that when I am having so much trouble, that there is a pocket of air inside the caliper that I’m having trouble moving. I haven’t had the occasion to use this yet…….but I’m ready! ;)
EC3578A6-B1D4-4D4E-A709-B1A2474B9DDC.jpeg
 
You can push fluid with the MityVac as well as pull it. You simply connect the bleeder hose to the other fitting on top of the unit, usually capped off with a rubber cap. You'll want to pull fluid first to fill the bleed line for several inches, then switch the line connection and push that fluid back in and up through the system. I've resorted to this several times in the past if I encounter a really stubborn system.
 
Thank you Mailman and 5Twins.. And of course all the other who have offered advice so far. I re-attacked this problem today. First, I had been working arround the gas tank. My fear of splashing fluid on it caused me to take the time to remove the tail section and tank. Then I tried bleeding with the bleeder 1/4 turn and 1/2 turn open. And I tried. Mighty Vac pulls fluid for a while, then pump the lever, get a bubble, then clear fluid but no lever pressure. Repeat. As a note, I tied the bleed tube to semi verticle as seen in the picture to easily monitor the fluid flow. Also, used the Mighty Vac catch can for both vacuum and pumping. The small size gives you 5 or 6 reservoir volumes before you have to empty it. I went through 24 oz of brake fluid getting the same results and started to wonder if I was an idiot expecting different result from the same method. I had wrapped the bleeder threads inteflon tape whichlimited the air leakage for a while but soon, with the Mighty Vac I was pulling a stream of bubble past the treads. Axel grease on the threads worked very well to seal them but started to leak a little later on. This is where doubt comes in. Is the caliper bad? Am I sucking air past a banjo fitting? Is the 2 or 3 year old DOT3 in unopened containers bad? Is the new M/C defective? I went to get more brake fluid and considered ordering a new M/C. 1/2 way through the third 12oz brake Fluid container I finally got some pressure at the lever. Cleaned up the bleeder threads and bled the system.
1646710837794.jpeg
 
Back
Top