New to me XS 650...

Thank you Mailman and 5Twins.. And of course all the other who have offered advice so far. I re-attacked this problem today. First, I had been working arround the gas tank. My fear of splashing fluid on it caused me to take the time to remove the tail section and tank. Then I tried bleeding with the bleeder 1/4 turn and 1/2 turn open. And I tried. Mighty Vac pulls fluid for a while, then pump the lever, get a bubble, then clear fluid but no lever pressure. Repeat. As a note, I tied the bleed tube to semi verticle as seen in the picture to easily monitor the fluid flow. Also, used the Mighty Vac catch can for both vacuum and pumping. The small size gives you 5 or 6 reservoir volumes before you have to empty it. I went through 24 oz of brake fluid getting the same results and started to wonder if I was an idiot expecting different result from the same method. I had wrapped the bleeder threads inteflon tape whichlimited the air leakage for a while but soon, with the Mighty Vac I was pulling a stream of bubble past the treads. Axel grease on the threads worked very well to seal them but started to leak a little later on. This is where doubt comes in. Is the caliper bad? Am I sucking air past a banjo fitting? Is the 2 or 3 year old DOT3 in unopened containers bad? Is the new M/C defective? I went to get more brake fluid and considered ordering a new M/C. 1/2 way through the third 12oz brake Fluid container I finally got some pressure at the lever. Cleaned up the bleeder threads and bled the system. View attachment 209250
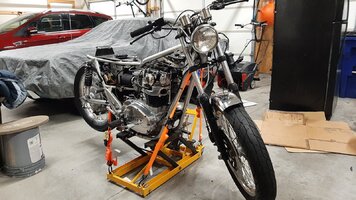
I did a lot of second guessing. How hard can it be? I have done autos often over the last 30 years, generally with a leg man pumping, some swearing and maybe a beer or two to pass the time. After the second bottle of fluid I started to wonder about the sensibility of pumping and air bubble DOWN a brake hose and was considering ways to mount the M/C low, the caliper high, not spill fluid and open and close the bleeder valve wihtout twisting and upsetting the caliper.:)
 
After a week of getting experience and education on my front brake system I put away the various tools, rinsed the Mighy Vac hoses, cannister and couplings, tossed rags in the wash machine(Mrs TW out on errands) and wiped down everything with dishsoap/water solution to get any splashes, fingerprints and accumulated road grime. Humble progress this winter. Jet change 132.5 to 130. Handlebars and risers with some slick machine work.Slightly bobbed front fender. NEW M/C[ and brake line.. Still to go is
oiling the Uni filters and opening the mufflers to rewrap the silencers for a slightly lower vertical twin noise signature.. That may change my carb mixture scenario.. Arkansas here we come.... :)ATTACH=full]209292[/ATTACH]
 

Attachments

  • 16467863082446730415317136085142.jpg
    16467863082446730415317136085142.jpg
    349.5 KB · Views: 66
The "build" plan on this bike was "simple " The small headlight bucket is pretty cramped. The front brake light switch, horn and indicators are absent. Well I think a brake light activated by the front brake is a really good idea. My state requires a horn so I should figure that out too. I found the green/yellow (clipped back) for brake light and I found the pink for the horn. Is the wiring for these 18ga?
16470401360166130040133052920658.jpg
16470403196035619203981778728417.jpg
 
Last edited:
While I am waiting on connectors for horn and front brake light switch, and copper washers for head bolts, I disassembled a muffler. I can gauge how much packing to order.View attachment 209749
My XS11 has a muffler constructed similar to that. It has no packing. It’s quiet. It’s quiet enough that we could carry a normal conversation standing on either side of it. Not so for yours?
 
My XS11 has a muffler constructed similar to that. It has no packing. It’s quiet. It’s quiet enough that we could carry a normal conversation standing on either side of it. Not so for yours?
It is not horrible idling, I don't have to shout over it, it is a little too raucous on throttle 2500-5000. Maybe I will try unpacked for spring start up.:) The packing may be to tight at the back end, probably from over packing the frontend then shoving it into a taper.
 
My Hella Hi/Lo horn set arrived. Fitting a working horn makes me legal in WI. I located my hot/brown and my Horn/pink. Proper connectors and double thick shrink wrap was used on all connectors. I found a spot I think will work and performed the installation. I choose the low tone 380hz from the pair. The mount for the horn was carefully formed (bent with a channel lock), the wires routed and connected and ... nothing. I mentioned this in "What have you done..." thread and @Jim had some good advice. I tried an independent ground, nothing. I cleaned up the Horn button with rubbing alcohol reassembled and still nothing. I connected a batter charger to the horn, NOTHING! Battery charger to the HI note, 480hz, horn and get a big beep. Finally, I plugged the hi note horn into my harness and BEEEEP.
Now, I will do a fuel tank fit test on the installation then remove the errant horn and replace it or relocate a new fitment.
16480468322675007137587992703052.jpg
 
My Hella Hi/Lo horn set arrived. Fitting a working horn makes me legal in WI. I located my hot/brown and my Horn/pink. Proper connectors and double thick shrink wrap was used on all connectors. I found a spot I think will work and performed the installation. I choose the low tone 380hz from the pair. The mount for the horn was carefully formed (bent with a channel lock), the wires routed and connected and ... nothing. I mentioned this in "What have you done..." thread and @Jim had some good advice. I tried an independent ground, nothing. I cleaned up the Horn button with rubbing alcohol reassembled and still nothing. I connected a batter charger to the horn, NOTHING! Battery charger to the HI note, 480hz, horn and get a big beep. Finally, I plugged the hi note horn into my harness and BEEEEP.
Now, I will do a fuel tank fit test on the installation then remove the errant horn and replace it or relocate a new fitment. View attachment 210191
Even tucked in tight the horn is an interference fit. Moved it here. Now route and zip tie wires and cables then remount the tank.
16480618309744210185587601486513.jpg
 
While the tank is still off it is easy to replace headbolt washers. Removed headnuts, gently cleaned rubber residue with an xacto blade then installed washer, nuts and torqued 20, 25, 27 lbft.
 

Attachments

  • 1648071534243144793374404523204.jpg
    1648071534243144793374404523204.jpg
    289.1 KB · Views: 48
  • 16480716307421415507223455974032.jpg
    16480716307421415507223455974032.jpg
    319.1 KB · Views: 51
  • 16480719479991577402472208291628.jpg
    16480719479991577402472208291628.jpg
    361.8 KB · Views: 50
While the tank is still off it is easy to replace headbolt washers. Removed headnuts, gently cleaned rubber residue with an xacto blade then installed washer, nuts and torqued 20, 25, 27 lbft.
Prolly best you retorque the inboard nuts too. If the torque on them has changed over time, as these heads are want to do, then the tension on the head is uneven.
I'd catch 'em all just to be safe.
 
Prolly best you retorque the inboard nuts too. If the torque on them has changed over time, as these heads are want to do, then the tension on the head is uneven.
I'd catch 'em all just to be safe.
Does that mean removing the upper "cylinder head to frame" mounts? This is exactly why I posted this though it had been covered elsewhere. I wondered about that issue as I was sitting back (with cocktail)proud of myself for the progress today.:cool:
 
Break them loose first though, they may be stuck on the threads. In fact, I would remove, clean, lube (anti-seize), and re-torque all the others too. Yes, that upper engine mount will need to come off, but that gives you the opportunity to clean and lube all those fasteners too. Even though the nuts are a locking type on the engine mount, I find they don't lock as well after they've been on and off a few times, so I add regular split ring lock washers to them.
 
Who knew a little riding could involve so much wrenching?:) Headbolt nut were clean and clear, probably new odometer mileage of 1200 on them. I did not locktite or antisieze them. Easy enough to go back. Which is preferable here?
 
The gaps were off on mine. Resetting them to the proper spec brought the charge rate back up. I actually didn't even have to play with the adjuster screw. Here's a diagram I "doctored". Note the part about putting the cover back on and how it will reduce the output slightly .....

QMb3A1k.jpg
I removed my voltage regulator and made adjustments. The "core" was at .038 in , I set it to .030/.031 in. The point gap was near .016 in, I set it to .013/.014 in. The spring tension screw Looknut can be tightened/loosened with a 9/32 ignition wrench if you don't have a 7mm.
16487496515007405690132886829665.jpg
 
Last edited:
I removed my voltage regulator and made adjustments. The "core" was at .038 in , I set it to .030/.031 in. The point gap was near .016 in, I set it to .013/.014 in. The spring tension screw Looknut can be tightened/loosened with a 9/32 ignition wrench if you don't have a 7mm.View attachment 210865
It won't be long before you can display that in a museum. You won't find an employee at a car or motorcycle shop who would know what to do with it.
 
Yes, I don't think it's been mentioned, but most of us replace that old unit with a solid state automotive one. For your bike, that would be a VR115 or one of it's equivalents. They can be had new from an auto parts store for around $30 but if you shop eBay, you can often find them for less, sometimes as little as $10 or $12. Although that old original is a real tank, it's output is very inconsistent. I discovered this once I installed a voltmeter. At 3500 to 4000 RPMs, when the output should be maxed out, it would sometimes drop very low. I think the vibration affects it's function and output. The automotive unit produces a nice, steady 14.2 to 14.5 volt output, no fluctuations.
 
It won't be long before you can display that in a museum. You won't find an employee at a car or motorcycle shop who would know what to do with it.

Yes, I don't think it's been mentioned, but most of us replace that old unit with a solid state automotive one. For your bike, that would be a VR115 or one of it's equivalents. They can be had new from an auto parts store for around $30 but if you shop eBay, you can often find them for less, sometimes as little as $10 or $12. Although that old original is a real tank, it's output is very inconsistent. I discovered this once I installed a voltmeter. At 3500 to 4000 RPMs, when the output should be maxed out, it would sometimes drop very low. I think the vibration affects it's function and output. The automotive unit produces a nice, steady 14.2 to 14.5 volt output, no fluctuations.
In highschool autoshop in the 70's we learned we might run into these if we had to fix cars from the 50s or 60s. :) A VR115 may be a project soon. There was mention uptrend on this and links maybe about the retrofit. This is accessed by taking the seatpan/tailsection off on my bike and as I get closer to buttoning it up the gap checks were one thing that seemed sensible. I can test performance via the Battery Tender plug to verify that I am good. Thanks for good input.
 
Back
Top