Hello, gentleman - the saga continues… after getting it running and taking it for a (very) cold couple of rides I decided to go ahead and finish the wheels. I have saved this for the end of this project, as I
hate to work with tires...
I started with the front, oddly enough this bike had a brand-new front tire on it when I got it, so I just need to replace the rusty old spokes and wheel bearings. This tire came off fairly easily, I am assuming because it was already installed on the bike and generally does not have a lot of “meat” to it.
It felt so wrong to cut the spokes… just like something you shouldn’t do, but bolt cutters made short work of it:
The old wheel bearings came out without much fuss after I discovered that the sleeve in-between the bearings can tilt to expose an interior striking surface. I heated the hub with a torch prior to pressing in the new ones and they went in easy. I’m glad I replaced them, as even before beating them with a hammer and punch they felt very loose and gritty.
@5twins You could not be more right about taking lots of pictures. It made assembly SO much easier. I would recommend an overall shot for each side, and then a close-up of the hub and rim for each side where the valve is. Marking the relative position of the valve on the hub was also very helpful. This was a daunting task at first, but once you get started there is an obvious pattern to it.
Trueing the wheel went well, I actually had a great time doing it. Don’t make the same mistake I did and tighten the spokes in an opposing pattern (like an engine head), I can tell you - that results in a very wonky wheel. Start with the valve hole and tighten sequentially as you rotate the wheel.
@Mailman, the second video you posted provided a great explanation of how to chase down any wobbles. I called it quits at ~0.01” of horizontal and vertical runout.
I was able to get the front tire on myself, but I am not super confident on my balancing job... From what I have read, a DIY balance job requires the wheel/tire to rotate smoothly on a stand. Thus, you can find the heaviest part of the wheel as it will always end up at the bottom. I have balanced my bandsaw wheels like this several times. Problem is, the bearings in this wheel are a little stiff and don’t allow the best freedom of movement. Any ideas? Other approaches? I’m sure I could get the grease out of there with some solvents to loosen them up, but I rather not mess with the factory grease if it could be avoided. As of now it is roughly balanced and may even be balanced well enough, was going to take it for a ride and see how it felt.

I put the front wheel on temporarily so I could start on the back. I also decided to replace the drum brake shoes and springs while I had it apart, along with all the locking tabs. A closer examination also revealed that the sprocket and chain would probably use replacing. Dad warned me these things were money traps... Got some good help for this part, “Stick around son and you can hear Daddy yell f@!$ at the tire…”
The rest of the back tire went very well. The shorter spokes resulted in less room to maneuver, so if anyone is doing this for the first time I think it would be best to start with the front. I ended up putting a new tire on the rear and paid $30 to have it mounted and balanced, it was worth
every penny!
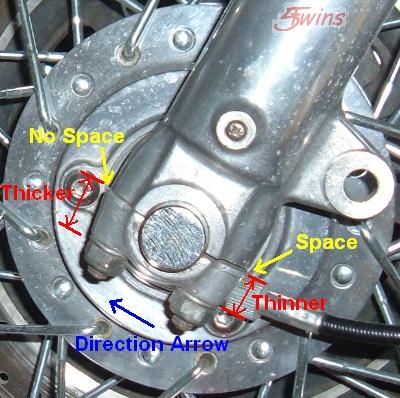
Then, tragedy struck... I was torqueing down the front axle when I accidently broke one of the studs of the axle clamp. I had the torque wrench set to 25 ft-lbs and was tentatively tightening the bolt (i.e. "surely this thing will click soon, just a little more...") when the stud broke - launching the nut at relativistic speed around my shop. Still not sure what happened... I am thinking that the bottom of the clamp was flexing, putting more and more energy into the stud, that or the torque wrench malfunctioned. Any ideas?
So, I am now going to track down a new stud and VERY CAREFULLY remove the broken one. Luckily, I think there is enough of the old stud to grab with the puller. Will probably end up putting some heat on it to help it out. Any other tips on getting this thing out in one piece? Does anyone have the dimensions of the stud handy? Mikes want $8 for one and I think I can do better at Ace Hardware or Fastenal. Thanks in advance for any feedback - will keep you posted!