You are the perfect candidate for an upgraded regulator and rectifier. See posts 2 and 3 here .....
https://www.xs650.com/threads/diy-reg-rec-5twins-and-jim.55842/
https://www.xs650.com/threads/diy-reg-rec-5twins-and-jim.55842/
No, it just means it's weak. Low power from the regulator can cause it, weak battery... wore out brushes can cause it, a bad ground can cause it... as well as the rotor. Best thing to do is ohm the rotor and see if it's about 5 ohms between rings and open ring to case. If it is, the rotor's good and you'll need to look elsewhere.Jim. Question. If my slap test is super super week does that mean my rotors toast without measuring it?? I haven’t measured ohms yet
Temperature will affect resistance. How much of a temp change between readings?
Fwiw.... and counting the Honda rotors, I'm well past the 300 mark on rewinds now with no failures. Yours would be the first. What are the odds....does that mean my rotors toast without measuring it??
Rotor rings are 5.4-5.5IMHO that means it's time to do some more testing.
#1 is your battery holding a strong charge; 12.8 volts after charging and after 24 hours.
#1 with a good VOM (ohmmeter) check the rotor. ideal is 5.0 to 6.0 ohms
What do you get?
#2 Are the brushes long enough? 4500 miles is getting to the normal life expectancy of a brush, that outer ring may cause faster than normal brush wear.
#3 Check that you have +12 on one brush and a solid ground on the other.
A test light, think turn signal bulb, should light brightly with on lead on each brush with ignition on.
Rotor is 5.4-5.5 ring to ring…ring to case i get “OL”…guessing that infinity and a good thing. Lol. Not an electrical guy by any means…No, it just means it's weak. Low power from the regulator can cause it, weak battery... wore out brushes can cause it, a bad ground can cause it... as well as the rotor. Best thing to do is ohm the rotor and see if it's about 5 ohms between rings and open ring to case. If it is, the rotor's good and you'll need to look elsewhere.
Process of elimination.
Here’s a picture of the outer brush. It’s only 9.7 mm. Are you saying this needs to be 12 or more?? If so then it definitely shotIMHO that means it's time to do some more testing.
#1 is your battery holding a strong charge; 12.8 volts after charging and after 24 hours.
#1 with a good VOM (ohmmeter) check the rotor. ideal is 5.0 to 6.0 ohms
What do you get?
#2 Are the brushes long enough? 4500 miles is getting to the normal life expectancy of a brush, that outer ring may cause faster than normal brush wear.
#3 Check that you have +12 on one brush and a solid ground on the other.
A test light, think turn signal bulb, should light brightly with on lead on each brush with ignition on.
Means the rotor's good... look elsewhere.Rotor is 5.4-5.5 ring to ring…ring to case i get “OL”…guessing that infinity and a good thing. Lol. Not an electrical guy by any means…
New brushes are ~14mm, the wear limit is 7mm minimum. So yours -at lease one of them - are well worn, but within spec. It never hurts to clean them and the slip rings - particularly if the bike has been sitting for a spell.Here’s a picture of the outer brush. It’s only 9.7 mm. Are you saying this needs to be 12 or more?? If so then it definitely shot
Well the outer ring brush was only 9.7mm. I just replaced it with an OEM brand new one, which measures 12mm so that definitely could be an issue even though I’m not at the cutoff wear mark yet but still….Means the rotor's good... look elsewhere.
Just a suggestion... there's good info here in Tech on troubleshooting charging issues.... JP's given you a PDF on t-shooting it. Pick one, follow it. They're written for non electrical guys like yourself
I need the type B rectifier. This write up talks mostly about regulators. What rectifier can I use? My regulator is fine. Again I need a new rectifier.This section deals with the earlier B type regulator. It's written by 5twins. So, take it away 5twins....
View attachment 198851
OK, here I'll talk about the 'B' type regulator needed for the '70-'79 charging systems. There was a change in the 650 charging system in 1980 and it had to do with how the brushes were wired. On the '70-'79 systems, the inner brush is grounded full time to the stator housing through it's mounting screws and the outer brush is fed regulated power from the regulator. The 1980-on systems are sort of the opposite. Their inner brush is fed constant power from the harness (switched on and off with the key) and the outer brush is fed a regulated ground from the regulator. So, that means 2 different types of regulators are needed. As Jim discussed above, the '80 and newer systems require a ground switching type 'A' regulator. The '70-'79 systems require a regulator that switches or regulates power to the outer brush and that is called a type 'B' regulator. The most common one we use is the VR115 from Standard Motor Products. Many other manufacturers make this under a different part number and I'll list some later.
Now, this is a regulator only, not a combined reg/rec like the '80 and newer models used. The '70-'79 models used a separate rectifier. The same Windy Nation rectifier Jim used above can be used as a replacement. You can mount the VR115 in the same spot as the original regulator on the '74 and newer models. I'm not sure about the '73 and older models but it can probably be done as well .....
View attachment 198839
Only one mount will align with an original so a small triangle-shaped adapter or extension plate will need to be made up to reach the other .....
View attachment 198840
There was a small issue with the lower right mounting bolt in the pics above. It stuck out too far and hit the side cover so I simply flipped it around. The bolt head was still a bit close so I put a button head Allen in .....
View attachment 198842
Wiring it up is pretty simple. The black and green wires from the VR115 will match up to the same colored wires in the 650 harness. The red or orange and yellow wires on the VR115 get combined and connected to the brown wire in the 650 harness. The VR115 harness is very short, way too short to reach up on top of the battery box where the regulator harness plug is. Instead of cutting the VR115 plug off and soldering extension wires on, I simply make up a little jumper harness .....
View attachment 198843
The regulator end gets 4 individual spades that are plugged into the VR115 plug .....
View attachment 198844
To keep them in place, I install a couple cable ties .....
View attachment 198845
On the harness end, a matching plug to the harness is installed and I make the transition from 4 wires to 3 by combining the red (or orange) and yellow wires on one crimp .....
View attachment 198846
The extension harness is routed behind the battery box up to the regulator harness plug .....
View attachment 198847
And that pretty much covers it. Here's a list of some VR115 substitutes from other manufacturers, same regulator just under a different part number .....
GRX-528 Motorcraft (Ford)
VR 1010 NAPA Echlin
VR727 Wells
1V1033 Airtex
C622 AC Delco
VR-1760 Ace
VR291 GP Sorensen
R292 BWD
KVR179 Borg Warner
The silver one pictured above is the NAPA VR 1010 .....
View attachment 198848
Well the outer ring brush was only 9.7mm. I just replaced it with an OEM brand new one, which measures 12mm so that definitely could be an issue even though I’m not at the cutoff wear mark yet but still….
 Yes wear limit is really worn out. Book says new is 14.5mm. I just checked 4 new aftermarket brushes all measured 14.5mm. How old is your battery? Did you charge and check it after say 10 hours? All of this stuff matters for troubleshooting.
I need the type B rectifier. This write up talks mostly about regulators. What rectifier can I use? My regulator is fine. Again I need a new rectifier.

Battery is a little over a year and a half old. It was fully charged last night and just a few minutes ago after taking off the charger last night I’m getting a surface voltage of 12.7 which is fine.
I found a few of these used in great working order. Now if I get rid of my original rectifier on my 1975, I would still keep the regulator while using this product correct?? This does not replace the regulator AND the rectifier, as an all in one unit does it??This section discusses updating your rectifier. It's also written by 5twins.
View attachment 198913
Alright, now let's talk about rectifiers. As mentioned, on the '79 and older bikes, it's a separate component, but it's basically the same thing that is built into the combined reg/rec used on the '80 and newer models. A rectifier is a rectifier is a rectifier, they all basically do the same thing - convert AC current to DC current. There's no need to pay big bucks for a motorcycle or auto specific one, a much lower cost one from the electronics world works just fine. All you need to do is make sure it's a three phase type and it's amp rating is high enough to handle the 650's amp output, which isn't much, lol. According to the shop manual, it only puts out about 11 amps max. So, we usually choose a rectifier rated at 25 to 35 amps. You will find many rated much higher, like 50 to 100 amps, but they cost more and it's way over-kill. A favorite and one that has a very good track record is the $10 unit from Windy Nation like Jim used in his combined reg/rec above. I've used the same one but as a stand-alone unit. The rectifier gets hot in operation so you'll want to mount it on something to act as a heat sink. A little square plate of aluminum is fine. I got a bit fancier with mine, and it's probably over-kill, but I used a section of heat sink from an old computer .....
View attachment 198914
The wiring connections are marked on the side, and you can also see a little of the heat sink compound I applied squeezing out. I also incorporated a little clamp for the wiring loom into the mount for the hanger bracket .....
View attachment 198915
Here's a better explanation for the wiring .....
View attachment 198916
Now, this isn't your only option. As I said, there are many rectifiers out there that would work. Some have used this low cost Chinese eBay offering. The draw to it probably (besides the low cost) is it comes mounted to a heat sink already. All you need to do is wire it and make a hanger bracket for it, as I've done here .....
View attachment 198917
View attachment 198918
I also found it pretty easy to replicate the flat sided mounting bolt of the original. I just sliced the side off the new bolt with a cut-off wheel in a Dremel .....
View attachment 198919
View attachment 198920
Then it can be easily hung off the bottom of the battery box in the original location .....
View attachment 198921
One little "gotcha" you may encounter is that the spade terminals are too wide to accept the usual 1/4" female spade crimp. But that's no big deal, they're easily cut down, again using the cut-off wheel and Dremel .....
View attachment 198922
Wiring info is clearly marked on the side but here's a labeled pic .....
View attachment 198923
But I should mention that a couple guys have had issues with these, had them crap out in a short time. But they've worked just fine for others. Guess it's the chance you take buying cheap Chinese stuff.
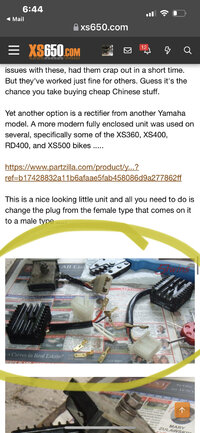
Yet another option is a rectifier from another Yamaha model. A more modern fully enclosed unit was used on several, specifically some of the XS360, XS400, RD400, and XS500 bikes .....
https://www.partzilla.com/product/y...?ref=b17428832a11b6afaae5fab458086d9a277862ff
This is a nice looking little unit and all you need to do is change the plug from the female type that comes on it to a male type .....
View attachment 198924
View attachment 198925
I didn’t scroll further enough down when he started talking about the rectifiers. That was the problem but I now see it"Reading is fundamental.".
Comment #1 talks about the rectifier and even has a link to order one. Comment #3 goes into great detail on how to wire a rectifier.
We don't hold hands here.... at least we shouldn't... all the info you need is contained in this thread. All ya gotta do is read.
Yes I can see the PDF. And I do have the mechanical regulator and it is fine. The ohms are in range for all three of the tests of the regulator. Going thru everything else nowCan you see that pdf or do you have the factory service manual? A simple test shows if the issue is in the voltage regulator. Is it still factory mechanical regulator? Have you checked ALL electrical connections including grounds?