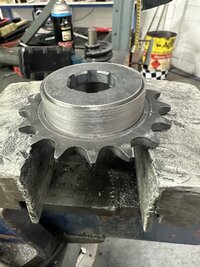
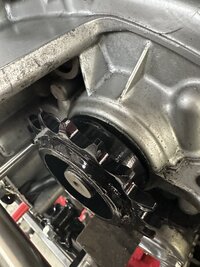
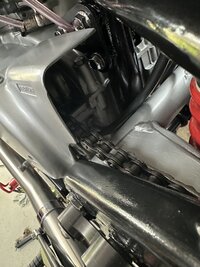
What have you done to your XS today?

To "clean" those numbers off the tops of stainless bolts, I use a medium (maroon) Roloc disc in a die grinder, makes short work of it, lol .....

BoltHeads2.jpg


BoltHeads.jpg


Then a minute or so on the buffing wheel to finish .....

BoltHeads3.jpg


I've put them all over, lol .....

LightSwitch.jpg


Tail Light Bolt.jpg


InnerFenderBolt.jpg


Plate Mount3.JPG
 
Today I put the air filter assembly back on the bike and finished off setting up the carbs with slow running mixture adjustment and ballancing. Tickover is metronomic, pick up is immediate and the exhaust note is even on both sides. I also fitted the right hand twist grip / switchgear and the new twin cables ( obviously prior to setting up the carbs. Its really so much more easy for me to do such a job when there are two tick over screws and two throttle cables. The previous set up wasnt standard for the early 650B and entailed a single tick over screw , single cable and a hard to get at balancing adjustment which wasn't quite so easy to deal with. The twinned choke mechanism on the single cable carbs was also a bit more difficult to deal with too.
 
Carried on with the roadworthiness inspection mods. Some I don't mind doing, others are hideous and are spoiling the look of the bike. I need to keep in mind that most of these mods are temporary and all of them are reversible.
- replaced the Kellermann pin lights with some larger generic LED indicators
- fabricated a mounting bracket for side reflectors
- replaced the mirrors with larger generic bar-end mirrors (the bar-end mount may still be a cert issue)
- pinched the chain guard from my 650D and installed it on the SG (requires taking the shock out of its lower mount, which revealed that there were no steel bushings in there)
- turned up and installed a set of lower shock eye bushings
- started the installation of an odd-ball (non-XS) rear fender (this bit is truly aesthetically offensive!!!)
More to follow, including pics. Still need a conventional tail light, license plate mount and lights.
Well, got the fender installed but found that the factory tail light/ license plate bracket obscured the embedded LED in the rear hoop. Need to fab a custom license plate mount to lower the plate on this fender. This will need some sheet-metal bending for which I will need a brake. Oh-oh, new rabbit hole to dive into...fabing a brake to complete the plate mount.
 
Today I put the air filter assembly back on the bike and finished off setting up the carbs with slow running mixture adjustment and ballancing. Tickover is metronomic, pick up is immediate and the exhaust note is even on both sides. I also fitted the right hand twist grip / switchgear and the new twin cables ( obviously prior to setting up the carbs. Its really so much more easy for me to do such a job when there are two tick over screws and two throttle cables. The previous set up wasnt standard for the early 650B and entailed a single tick over screw , single cable and a hard to get at balancing adjustment which wasn't quite so easy to deal with. The twinned choke mechanism on the single cable carbs was also a bit more difficult to deal with too.
I've taken the bike out for a shakedown and am very surprised how smooth it is. The bike picks up from low revs very well and cruises in top almost anywhere in the rev range. Initially I thought that it was worse than ever but I had left the choke on ! The shakedown revealed that I hadnt tightened up the speedo cable enough and the idiot lamp for the right hand indicator doesnt work.
 
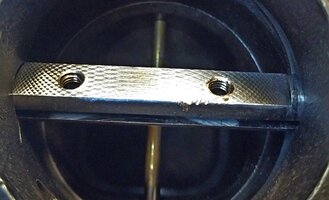
Gary, before I even attempt to remove the butterfly plate screws, I grind the peened ends off with a ball cutter in a Dremel .....

View attachment 225148

I think this really helps and I've had a 100% success rate removing the screws since I started doing this. But lately, I've switched to using the diamond grit coated ball cutter and like it even better. Seems to make a finer cut and is easier to control.
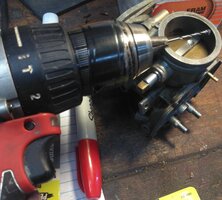
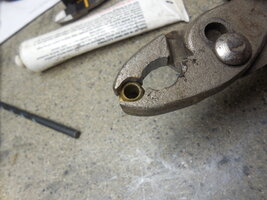
You made me do it, had ordered some Chinese diamond ball cutters a while ago. Got handed two early bodies today, one had the screw heads broken off, the other body' screw heads were intact, ball cutters made the job simple on the intact screws and helped a bunch as I drilled through the busted ones, the bit caught as it broke through and with careful bit twisting using a pliers the screw remains went out the back. Saved both, Whew.

A #2 .210 bit will remove the head out to the brass butterfly plate hole diameter, a 3/16" will core drill through the screw shank/threads if you are REALLY careful about finding and maintaining center.... I used the low speed range on the battery drill and kept the trigger down at a bottom of THAT speed range. This is not the place to use high speed. Used some mineral spirits as a light lube, coolant, drilled out both broken screws, the bit's still sharp.

KIMG4894.JPGKIMG4896.JPGKIMG4895.JPG
This was a broken off screw, the swaged thread was stuck good into the throttle shaft, had to grind a bit deeper to get it freed up. The other swage was proud of the shaft.
KIMG4889.JPG
KIMG4897.JPG
The early carbs have heavy swages, the late model BS34 swages are much lighter.
 
Trying to save a set of BS34's...they've been soaking in carb cleaner for 24 hrs+. The needle jets are stuck in place. Turned up an aluminum drift, thinking that would be sufficient to knock them out. No dice, zero movement, bent the drift! Any words of wisdom from the community on how this is best done? A little heat, maybe, from an electric heat gun or a propane torch?

Heat gun preferably and some penetrating lube (PB Blaster)...and tapping from the main jet side toward venturi

You're tapping from the bottom... the bowl side, correct?
Yes BS34 the needle jets go up towards the bore from the bottom after you remove the main jet.
You MUST undersize or notch the drift to avoid hitting the alignment pin in the carb body!
BS38 needle jets are tapped down towards the float bowl from the bore.
Getting float needle seats out of the BS34 carb body is a whole 'nother issue.
 
Last edited:
Well, I've got a "special tool" for that too, lol. Grabbing the outside of the seat with pliers or vice grips just doesn't work very well. Yes, you can often get it out like this, but not without damage. Besides the teeth marks from the plier or vice grip jaws you make, often you end up distorting the opening, squeezing it oval. So, you ruin an often still good seat. I needed a better way and here's what I came up with. This is nothing more than a 1/4" partially threaded bolt with the head cut off and a slight bevel ground on the end so it will start into the seat hole. The unthreaded shank is actually a little smaller than the threaded part, about 7/32", but that's still a hair too big to go into the seat without the slight bevel ground on the end .....

SeatRemoved.jpg


So, you tap the "tool" down into the seat then grab it with the needle nose vise grips. It wedges in there really good and the threads allow the vice grips to grab the "tool" really well. The Sharpie line represents the depth of the hole, and as you can see, it doesn't go in anywhere near that deep, maybe 1/8" or so .....

Removal.jpg


SeatRemovedClose-up.jpg


SeatRemovedClose-up2.jpg


The o-ring is often sort of "glued" in place with gas varnish. With this "tool" you can wiggle the seat all around, but more importantly, you can twist it, and break the o-ring free. Then it's a simple matter to twist and pull the seat out .....

SeatRemoved2.jpg


So far I've had a 100% success rate removing the seats, and they come out totally undamaged and can be re-used.
 
Well, got the fender installed but found that the factory tail light/ license plate bracket obscured the embedded LED in the rear hoop. Need to fab a custom license plate mount to lower the plate on this fender. This will need some sheet-metal bending for which I will need a brake. Oh-oh, new rabbit hole to dive into...fabing a brake to complete the plate mount.
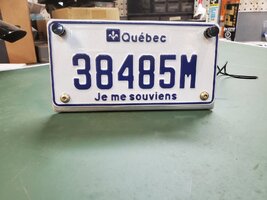
Finally got around to bending up a license plate bracket... required finishing the build of a brake first! It's no piece of art, but grateful that its done. Surprising amount of force required to bend this little bit of aluminum; its probably 12 ga. (didn't measure it) and its a hard alloy. Bare bracket:
001 (9).jpg003 (6).jpg

With mounted plate and LED plate lights:
006 (5).jpg
All lit up:
004 (6).jpg
 
Speaking of automatic license plate readers...do the highly polished SS fasteners and the bright LED bits make it difficult for SCMODS finks to read plate and send "citation"...we would not want to make the copper's job difficult, you know, they keep us so safe an' all. If fender mount vibrates, what is frequency of sweep in readergizmo? Beat beat beat... So far, this has worked , winkwink...

Bourbon, fellas...

1698627159918.png
 
Drained my oil today, finally found my large socket , so this time I got the back one drained too.
When I pulled the rear plug it had a huge lump of giro on it feels similar to the muck that you get around a countershaft sprocket.

Probably the first time that plug has been out in 20 years?


Tore my ex 500 carbs apart to start cleaning them ,
Had to order fuel T orings it was wet on both sides.

Switched to tapered head bearings ,
And put on a different set of forks that I got,
They are in much better shape than the other ones.

Actually 2days worth of work, 🙂
 
I've been pretty satisfied with the stock pipes on my '82 Special which I use to cruise the Catskill Mountains, especially because it's rather quiet; the small town locals smile and wave to me when I come through, but not so much as the raucous Harleys invade their space.

XStoday2.jpg


However, lately I've been yearning for a bit more sound and performance, so I sprung for the 1.5 headers and Commando Megaphone mufflers at XS650.com. Nice price.

The removal and fitting of the new system was straight-forward. Before installing the headers I sprayed 2000 degree ceramic coating inside, 2 coats, dried quickly with a hairdryer.

newpipes7.jpg


Once installed, I did the obligatory heat-cool-heat-cool-heat-cool cycles (to fully cure the ceramic) which took 140 minutes.
Then went out for an hour ride in the sunny, lower 60's afternoon.

newpipes4.jpg


newpipes6.jpg


I had already bumped up the mains one step when I got the bike. It ran perfectly with the new system, and now I've got a slightly louder and throaty exhaust note which I like. The performance bump is most noticeable to me in the latter half of the performance curve; it doesn't feel as "held back".

After an hour of assertive riding, the headers have turned only a faint golden color in the first 10".

newpipes3.jpg


Then it was time for what might be my last-of-the-season mint chip ice cream cone at the Byrne Dairy in Lafayette.
Yum.

newpipes5.jpg


.
 
Last edited:
I've been pretty satisfied with the stock pipes on my '82 Special which I use to cruise the Catskill Mountains, especially because it's rather quiet; the small town locals smile and wave to me when I come through, but not so much as the raucous Harleys invade their space.

View attachment 254615

However, lately I've been yearning for a bit more sound and performance, so I sprung for the 1.5 headers and Commando Megaphone mufflers at XS650.com. Nice price.

The removal and fitting of the new system was straight-forward. Before installing the headers I sprayed 2000 degree ceramic coating inside, 2 coats, dried quickly with a hairdryer.

View attachment 254616

Once installed, I did the obligatory heat-cool-heat-cool-heat-cool cycles (to fully cure the ceramic) which took 140 minutes.
Then went out for an hour ride in the sunny, lower 60's afternoon.

View attachment 254617

View attachment 254618

I had already bumped up the mains one step when I got the bike. It ran perfectly with the new system, and now I've got a slightly louder but throaty exhaust note which I like. The performance bump is most noticeable to me in the latter half of the performance curve; it doesn't feel as "held back".

After an hour of assertive riding, the headers have turned only a faint golden color in the first 10".

View attachment 254619

Then it was time for what might be my last-of-the-season mint chip ice cream cone at the Byrne Dairy in Lafayette.
Yum.

View attachment 254620
Love the new exhaust! And that mint chocolate chip looks very tempting! :D
 
Last edited by a moderator:
Back
Top