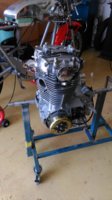
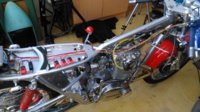
It's going to look great!
-
Enjoy XS650.com? Consider making a donation to help support the site.
XS650.com receives a small share of sales from some links on this page, but direct donations have a much greater impact on keeping this site going.
You are using an out of date browser. It may not display this or other websites correctly.
You should upgrade or use an alternative browser.
You should upgrade or use an alternative browser.
Aussie Cafe build
- Thread starter phil1rowe4
- Start date
phil1rowe4
XS650 Addict
Thanks Brassneck, a little encouragement goes a long way!
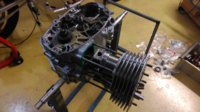
I was a bit torn up about the crank and also found the conrods were outside tolerance, so I've sent the crank off to Professional Motorcycle Tuning (Aussie XS650 specialist) to have the crank pulled down, new conrods & bearings fitted and crank pressed all back together. $$$$ Will be a new motor by the time its finished.
Meanwhile I've been playing around with other smaller jobs and getting bits for the upcoming rewiring job.
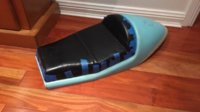
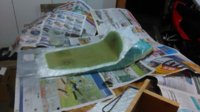
Also making up a fibreglass seat pan for the foam/vinyl to attach to and bolt to the main seat/tail piece.
Just think, you'll practically have a new engine to not worry about. 
Making an upholstery pan is smart! Easier to mount to the seat pan to the body. I just used velcro to attach the upholstery pan to the seat pan...works great.
Making an upholstery pan is smart! Easier to mount to the seat pan to the body. I just used velcro to attach the upholstery pan to the seat pan...works great.
phil1rowe4
XS650 Addict
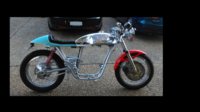
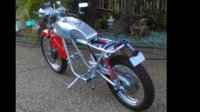
Here's some pics of the latest progress:
Seat Pan for the foam in progress. I liked the idea of using Velcro, but had the bolts already fitted, so will be bolting mine down to the seat base.
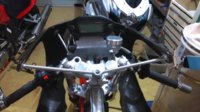
Instrument panel and controls in place. Top fairing brace painted and fitted.
This might be helpful to some other builders.
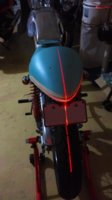
I used a carpenters laser level to get a vertical centreline to help line things up. It proved a useful reference point to help get the seat, tank, fairing and other bits centered.
Seat Pan for the foam in progress. I liked the idea of using Velcro, but had the bolts already fitted, so will be bolting mine down to the seat base.

Instrument panel and controls in place. Top fairing brace painted and fitted.

This might be helpful to some other builders.
I used a carpenters laser level to get a vertical centreline to help line things up. It proved a useful reference point to help get the seat, tank, fairing and other bits centered.

...This might be helpful to some other builders.
I used a carpenters laser level to get a vertical centreline to help line things up. It proved a useful reference point to help get the seat, tank, fairing and other bits centered...
I like that. Wonder if it would work on Royboy's bike.
http://www.xs650.com/forum/showthread.php?t=43405
phil1rowe4
XS650 Addict
phil1rowe4
XS650 Addict
phil1rowe4
XS650 Addict
Attachments
phil1rowe4
XS650 Addict
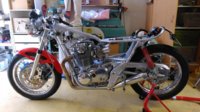
Next was fitting the engine in the frame and fitting the ancillaries.
I'll need to get the exhaust system modified to match the new rear mounting points. The back of the footpeg mounts were threaded to be exhaust mounts.
Electrical harness is to be redone and throttle cable to be shortened. I also need to finish the rear brake cable conversion. Lots to do !
Hopefully, I'll be able to start the motor sometime next weekend.


Phil1rowe4, it’s a wonderful feeling when anything you have worked on bursts into life. Your bike is looking great, the Ducati SS fairing looks good on so many bikes it’s a design classic.
I also feel compelled to tell you that a local ran his race bike with velocity stacks and when he took the motor down he said he could not believe how far the grit had got through his motor.
He now runs air filters.
Looking forward to seeing it finished.
I also feel compelled to tell you that a local ran his race bike with velocity stacks and when he took the motor down he said he could not believe how far the grit had got through his motor.
He now runs air filters.
Looking forward to seeing it finished.
phil1rowe4
XS650 Addict
Thanks Signal,
It hasn't burst to life just yet but hopefully soon and yes, it will feel like a Frankenstein moment when my creation comes to life !!
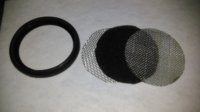
I have a plan for the velocity stacks. They came with a rubber ring that held a metal mesh screen to the end of the stack. I've cut out another mesh screen and used the two of them to sandwich some filter foam which I'll probably spray with filter oil. see pic.
I fitted the starter motor (Pain in the butt, especially with allen head screws), and oil pump filter so filled it with oil. Hopefully there wont be a puddle of oil underneath in the morning.
It hasn't burst to life just yet but hopefully soon and yes, it will feel like a Frankenstein moment when my creation comes to life !!
I have a plan for the velocity stacks. They came with a rubber ring that held a metal mesh screen to the end of the stack. I've cut out another mesh screen and used the two of them to sandwich some filter foam which I'll probably spray with filter oil. see pic.

I fitted the starter motor (Pain in the butt, especially with allen head screws), and oil pump filter so filled it with oil. Hopefully there wont be a puddle of oil underneath in the morning.
- - - I have a plan for the velocity stacks. They came with a rubber ring that held a metal mesh screen to the end of the stack. I've cut out another mesh screen and used the two of them to sandwich some filter foam which I'll probably spray with filter oil. - - -
Hi phil,
that'll work to keep the dirt out of the motor but that small of a filter area will also keep out most of the air.
The only ways I can see to keep the stacks fed with enough filtered air to run the engine is to feed them from a filtered plenum chamber or graft UNIpods on their ends.
phil1rowe4
XS650 Addict
Hi Fred,
I was a little concerned with the surface area of the filter being quite small compared to a pod or factory filter. I suppose I'll see how it runs and fall back to a uni filter if it feels starved of air.
It's planned to be a sunny Sunday ride in the hills kind of bike, not a daily commuter and the rear wheel is fully enclosed so it's not going to get a lot of muck flung at the carbs. Hopefully that one layer of filter material will be enough.
Cheers,
Phil
Radford119
XS650 Enthusiast
This looks awesome. I will definitely be following your build. A+ work.
phil1rowe4
XS650 Addict
Thanks Radford.
Been customising the throttle cable and made a custom cable adjuster to fit the new throttle grip. I also shortened one of the two cables to the carbs to take out some slack to the closer carb. Hope that makes sense!
Wiring has started with starter motor and ign circuits the priority for a weekend first start up.
phil1rowe4
XS650 Addict
Woohoo! Great job!!!
phil1rowe4
XS650 Addict
Hi,
OK, I've got a couple of issues that someone may be able to help me with.
1. The electronic tacho doesn't want to show anything. The LCDs work during the self test and I've seen one LCD flicker, so the screen appears to be ok. All other indicator lights work fine. I've connected the RPM signal lead to the negative pole of the coil and a digital multimeter shows some voltage (11V AC) on this wire which seems to indicate a pulsing 12v signal at idle. Nothing happens on the screen. Only time I've seen a single bar flicker is after coiling the signal wire around the HT lead several times. Anyone tried anything else? Filters, amplifier circuits?
2. Carbs - The bike starts first kick and idles fairly smoothly and then sometimes dies after 3-4 minutes. The idle works best when the air mix screw is 0-1/4 turn out, suggesting that the pilot jet is too small and needs to be richer. (bike dies if I screw air mix screw out past 1 turn) However, the plug and piston are wet and the inlet manifold feels and looks wet also, suggesting that the bike is running very rich. Anyone seen this before. I've ordered pilot jets either side of the 25 jets I'm using but a bit confused as to which way to try first. Both float levels appear ok, but I'll double check the measurements. Thought maybe float level might be too high.
Any ideas?
Hey, Phil.
1. Do the forum's 'google custom search' on "electronic tach resistor". The guys here have written several posts about this, and use a 1-2 megohm resistor in the trigger line.
2. Listening to your video, the engine's running on one cylinder, the other cylinder is just spitting. Have you synchronized and resolved this yet?
phil1rowe4
XS650 Addict
Hi TooMany,
Thanks for the search hint. I'll try some 1Meg Ohm resistors and see how it goes.
You're right that the left cylinder wasn't working regularly in the video. That was fixed by balancing the throttle stop screws. Placing my hand over the muffler now, I'm getting a strong and regular pulse from each cylinder. I've also since rechecked the cam chain tensioner and valve clearance and the motor has quietened down considerably.
I'll check the float levels tonight as I suspect that might be part of the cause of the wet plugs. When I first got the bike it used to leak fuel from one of the carbs when parked, so I adjusted the 'leaking side' float level to match the good side, which fixed the problem. I've now found the right measurement, so I'll check them more accurately.


