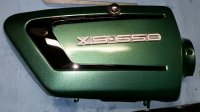
Some info on fitting the sidecover trim pieces.

http://www.xs650.com/threads/side-cover-trim-xs1-xs1b-xs2.51250/

I punched my own rubber washers from neoprene sheet.
And found bags of 4mm emblem clips at Napa.
XS1B-EmblemClips.jpg


Sorry, don't remember the part numbers.
Punch them on with a small socket that only contacts the clip's outer ring...
XS1B-RtSideCover.jpg
 
Last edited:
I can smell the first exhaust fumes from here! Excitement at a fever pitch.
What steve said. It scares the crap out of me to see layers of thick new paint under petcock and gas cap seals. You are begging for blisters in short order. Seen it way to many times, including factory paint jobs.
 
I am also a fan of rubber washers under the emblem clips. Yep you can get the clips at the auto store. I tend to open up the ID of the clip with a small Dremmel grinder so they slide on without to much force.
 
Ok, it’s now Monday morning and I have been reading , reading, reading. Steve, thanks as always for the amount of detail you provide and all of your links to read. It’s always a bit of a rabbit hole , as your links go to threads that have more links, and those links lead to more links! Haha! :D But I love it! I always read everything until I’ve exhausted all of the links and in the end I always know more than when I started.

So much to chew on.....SO, I am going to slow my roll here a little and think about some things. I will definately be doing 2M’s suggested gas cap mod, because that gas cap is definately a bitch to close, it binds like crazy and feels like you have to push on it way too hard. I fear I will damage the tank. I also already have in my possession a very large rubber fender washer that I bought with the thought of cutting into a new gas cap seal.

I will also remove the petcocks and replace those washers, I had frankly forgotten how much grief they have caused people.

Gary, I remember that you had suggested removing all paint under those petcocks. I’ll admit that the thought of that has given me pause. That paint is tough, almost plastic in its feel. I had to really work at grinding off enough clearance around the gas cap mounting points to get the gas cap to fit. I am scared I will really do damage trying to remove all the paint under those petcocks. That paint is thick too. This whole discussion has made me realize another potential problem with my paint. All that grinding on the mounting points for the gas cap and associated hardware ( right down to the metal in some places ) has left the paint open for gas intrusion. I need to take the gas cap off and seal all that back up with my brush on super glue. I know what you’re warning me about regarding the petcock, but I am unsure how to do it without marring my tank.

I’m processing all of this. I think I need more coffee. o_O
Bob
 
I am also a fan of rubber washers under the emblem clips. Yep you can get the clips at the auto store. I tend to open up the ID of the clip with a small Dremmel grinder so they slide on without to much force.

Oh, I forgot to mention. I’m going to try a suggestion you made for those rubber washers. I saved an old inner tube and I have a Harbor Freight hole punch set. I’m going to try and punch out a set of those myself!
 
Why oh why didn’t Yamaha make the screw thread in the tank a blind bobbin, hey we are left with the dribbling screws. If it were my tank I would cut around the taps with a craft knife then remove the taps and cut off the paint inside the cut line, then seal the edge with fuel resistant lacquer. The tap fitting is well engineered with the ‘O’ ring, but less so with the screw holes.
I’m not so much waiting to see the first start, which I’m sure it will, but I do hope someone gets a picture when you set off down the drive. The smile will be reward enough.
 
I didn’t get any real work done today, but I did make a run to the hardware store and picked up a small bag of goodies. All new push on speed nuts for my sidecover emblems, and the fiber washers to use on the petcocks, these are the ones that 2M provided me links to in other threads. They are 7/32” ID or approx 5.5mm ID, which makes them a nice tight fit on the screws. I might give em a little Hylomar treatment too just for insurance.
A8F7F841-12A4-461A-8B82-EDD949E6BDB9.jpeg


Then I worked on making some rubber washers to go under the speed nuts on my side covers. I had a piece of old inner tube and some Harbor Freight hole punches. What’s more fun that beating on things with a BFH?
70ACCAAF-51F6-42D5-AF79-049D452F742D.jpeg
D677BED7-5485-40E1-B089-D895D90F7AA5.jpeg


They are much thinner than any rubber washers the hardware store had. Plus they were fun to make, I think they came out pretty good. :)
 
Yeah buddy! :thumbsup:
I’ve only got the one done right now , because you know how it goes, every success is met with a new challenge. I went to install that cover and the threaded hole it screws into on the frame was stripped out! :eek:
So.....what’s one more repair in the big scheme of things.
 
Yeah buddy! :thumbsup:
I’ve only got the one done right now , because you know how it goes, every success is met with a new challenge. I went to install that cover and the threaded hole it screws into on the frame was stripped out! :eek:
So.....what’s one more repair in the big scheme of things.
:hump::laughing::hump:
I'm SURE that's the last gotcha..........
 
Back
Top