-
Enjoy XS650.com? Consider making a donation to help support the site.
XS650.com receives a small share of sales from some links on this page, but direct donations have a much greater impact on keeping this site going.
You are using an out of date browser. It may not display this or other websites correctly.
You should upgrade or use an alternative browser.
You should upgrade or use an alternative browser.
Mailman’s XS2 a full on restoration
- Thread starter Mailman
- Start date
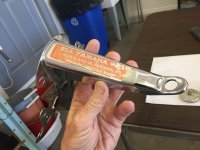
Another piece of the puzzle arrived today. I found a NOS battery band on EBay. I can’t believe that you can still find new factory parts nearly 50 years later. They are getting scarce and it’s always very satisfying when you can find one.


Don't ya wish you could go back 50 yrs. knowin' what ya know now?
Don't ya wish you could go back 50 yrs. knowin' what ya know now?
Haha! Oh man I know! I just looked up the retail price for the XS1 , it was $1245. I’ve heard 2M remark that back in the old days , working for a dealership, when bikes came in for repairs, parts were so plentiful that worn and damaged parts weren’t repaired they just swapped in new parts.
Even less than ten years ago you could still find NOS big ticket items, like painted tins and instruments around.
But that ship has sailed. All that’s left are the little odds and ends.
Jim are we still talking about Yamahas here? Or women?Don't ya wish you could go back 50 yrs. knowin' what ya know now?
It’s already hanging on my junk wall!
View attachment 131845
My new lifting straps just arrived. Not gonna use them for my motor. But these things are beefy looking, I think they’d lift my Fiat!
View attachment 131846
They came with these handy instructions!
View attachment 131847
WTF??
Bob,
No Engrish!!!
A DAY OF SUCESSES AND SETBACKS
I’ve been busy out in my little workshop, right through Christmas.
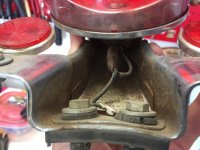
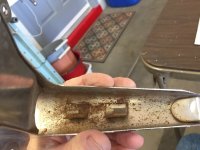
I have been working for a few days now to try and salvage my rear taillight assembly. It was not in great shape with surface rust on the chrome mount, all the rubber components were crispy, the hardware was corroded and the plastic tail light lens was rather rough, all scuffed up and scratched and dull.


I was really ready to just scrap it and order a reproduction unit. But then I figured I’ve got nothing to lose to try and save it. So I broke it down and got started.
I worked the chrome housing over with a Dremel and an assortment of wire wheels to remove all the rust.
After that I masked off all the bright chrome and sprayed clear enamel over all the undersides where I removed the bulk of the rust.
Then I turned my attention to the lens. I used a headlight restoration kit on it that I already had. Starting with 800 grit wet sandpaper and working my way up to 2000 grit, then hitting it with polish. It came out really nice.
I also polished the reflectors and they look good.
All the hardware and rubber bits went into the ultrasonic cleaner. Then I threw all the rubber bits in a ziplock bag to soak in silicone.


This is where my first setback occurred. For the first time , my rubber bits did not respond well. The large circular gasket that goes around the lens and that large oval piece, absorbed a lot of the silicone spray and grew a surprising amount. So much so, that they no longer fit. I am trying to dry them out and hopefully they will shrink back to the right size. If they don’t, I will get creative with some rubber from the hardware store.
More in the next post.......
Been having good luck with "pure" wintergreen oil on rubber parts.
This morning I got the call I’d been waiting for.....the powder coater “ Come get your frame.”
So I hot footed it right over and loaded it into the back of my Fiat.

When I got it home I gave it a good look over and couldn’t be more pleased. The finish is smooth as glass.
I spent a lot of time cleaning welding spatter off the frame and smoothing the welds, and now that it’s been coated the welds look really good.


They took great care to seal all the threaded holes and the holes in the frame that the swingarm and center stand pass through. They use silicone plugs and heat resistant tape. Here is a plug that they missed removing.


They put heat resistant tape over the frame number. It was later coated with something clear to protect the metal.


So I just had one problem and it was self inflicted. 5Twins noticed that I didn’t remove my steering lock before sending it to the powder coater. I frankly never even thought about it. I kinda figured they would mask it off.
Apparently there was some kind of soft metal inside the lock and it seems to have melted during the baking process.


I saw what looked like a paint drip hanging off of the lock cover, so I was going to trim it off. When I tried to move the cover it was stuck, so I wrapped it with a towel and put a pair of channel locks on the cover to try and open it.
No joy...then I noticed that I had scraped the paint off of what I thought was the paint drip and saw it was made of metal. The lock must’ve melted inside. It doesn’t interfere inside the steering neck and I’m inclined to leave it , at least for now. I don’t want to mar the finish.
So...I’m mostly happy with the results. I don’t like things that don’t work the way they’re supposed to, but it won’t affect the looks or performance.
This seems to be my pattern, every success is met with a pinch of pain in the ass. Most people will never see the little faults that drive me crazy. Oh well , it keeps me humble.
Till next time,
Bob
So I hot footed it right over and loaded it into the back of my Fiat.
When I got it home I gave it a good look over and couldn’t be more pleased. The finish is smooth as glass.
I spent a lot of time cleaning welding spatter off the frame and smoothing the welds, and now that it’s been coated the welds look really good.
They took great care to seal all the threaded holes and the holes in the frame that the swingarm and center stand pass through. They use silicone plugs and heat resistant tape. Here is a plug that they missed removing.
They put heat resistant tape over the frame number. It was later coated with something clear to protect the metal.
So I just had one problem and it was self inflicted. 5Twins noticed that I didn’t remove my steering lock before sending it to the powder coater. I frankly never even thought about it. I kinda figured they would mask it off.
Apparently there was some kind of soft metal inside the lock and it seems to have melted during the baking process.
I saw what looked like a paint drip hanging off of the lock cover, so I was going to trim it off. When I tried to move the cover it was stuck, so I wrapped it with a towel and put a pair of channel locks on the cover to try and open it.
No joy...then I noticed that I had scraped the paint off of what I thought was the paint drip and saw it was made of metal. The lock must’ve melted inside. It doesn’t interfere inside the steering neck and I’m inclined to leave it , at least for now. I don’t want to mar the finish.
So...I’m mostly happy with the results. I don’t like things that don’t work the way they’re supposed to, but it won’t affect the looks or performance.
This seems to be my pattern, every success is met with a pinch of pain in the ass. Most people will never see the little faults that drive me crazy. Oh well , it keeps me humble.
Till next time,
Bob
Been having good luck with "pure" wintergreen oil on rubber parts.
That’s really what I should be using. Never been a problem until now. The rubber that swelled seems like a softer, squishier kind of rubber. Must be more porous.
Yeah.... but if you had to pick the one thing on a bike to "not work," that would be it.I don’t like things that don’t work the way they’re supposed to, but it won’t affect the looks or performance.
Yeah.... but if you had to pick the one thing on a bike to "not work," that would be it.Looks great Bob.
Thanks Jim, I’m not terribly bothered by it. I’ve never used a steering lock to lock up a bike. They’re not terribly effective.
You can still get all the parts for that lock assembly except for the wave washers which can be purchased at a hardware store. The lock barrel probably melted. It a soft metal of some sort. I rekeyed mine and removed the cover before powder coating. I would be inclined to leave it. But if you decide you could probably correct the problem with a little patience and replacement parts. It will set you back about $80.00 and a few choice words. Now would be the time to do it before you get it back together. Take a look inside the neck and see if anything is running out
Frame looks great.
Frame looks great.
You can still get all the parts for that lock assembly except for the wave washers which can be purchased at a hardware store. The lock barrel probably melted. It a soft metal of some sort. I rekeyed mine and removed the cover before powder coating. I would be inclined to leave it. But if you decide you could probably correct the problem with a little patience and replacement parts. It will set you back about $80.00 and a few choice words. Now would be the time to do it before you get it back together. Take a look inside the neck and see if anything is running out
Frame looks great.
Thanks, I did look inside the neck, nothing ran into the inside, no problems there. I’m inclined to leave it alone, it’s really not something I would use, even if it worked.
It was probably a tin plating on the tumblers or drum. Tin melts at about 350°F... about the same temp as powder coating. A heat gun would melt it enough to work the lock free. Me personally, I don't think I've ever used the steering lock... ever. I'd just let it be.
Been having good luck with "pure" wintergreen oil on rubber parts.
G'day Bob,
Where did you get your headlight restoration kit/name??
Geedub
The steering lock is just like the other locks. It's a pot metal cylinder with sliding brass "wafers" in it. Maybe those wafers melted.

Knowing that a steering lock may not survive the powder coating process is useful info though.
Knowing that a steering lock may not survive the powder coating process is useful info though.
The frame looks great, Bob! That steering lock is like the appendix of the Xs. Even if it works, it never gets used. I was gonna cut it off on "The Basketcase", weld over the hole, and smooth it over when I clean up the welds, like you did. I was even thinking of taking it one step further: brazing the "pits" in the welds. Or lead-filling. The owner of the hot rod shop where I keep the bikes is a big fan of lead-filling. No plastic filler, all metal, and for the purpose of powder coating, ideal. Both methods have the ability to withstand the high temperatures of powder coating, and sand smooth. But brazing wouldn't be as soft. Either way, I was hoping to make all the factory welds smooth as glass, and not the "chewed bubblegum" they look like now... And a great job on that tail light! Wow! 

Mailman, I still have the frame from the 1972 I sent you some bits and pieces from I could check and see if the steering lock is still in it if you are interested.
