I know what you mean. How can it take so much freakin' fluid to push out that little bit of air? I flush my brake fluid every year and it's the one chore I dread.It took a lot of pumping the Mighty Vac and the brake lever to get 2 1/2 bottles of DOT3 (30 oz) through the system before I got resistance at the lever.
-
Enjoy XS650.com? Consider making a donation to help support the site.
XS650.com receives a small share of sales from some links on this page, but direct donations have a much greater impact on keeping this site going.
You are using an out of date browser. It may not display this or other websites correctly.
You should upgrade or use an alternative browser.
You should upgrade or use an alternative browser.
What have you done to your XS today?
- Thread starter I am Carbon
- Start date
-
- Tags
- maintenance
mrktm
XS650 Member
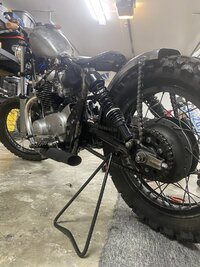
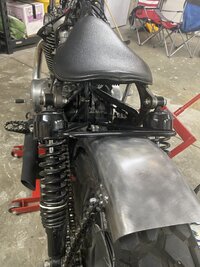
Rigged up a kickstand over the weekend. I decided to run a dirt bike style triangle stand. I can mount it to the rear fender while riding. Figured it would go with the look of the bike pretty well. Gonna wrap the triangle in leather and find a way to fasten it down a little better
Attachments
Yamaha Graveyard
XS650 Enthusiast
And probably a couple beersI took some 1000 grit wet sand paper and sanded out the scratches on my valve covers. That took few hours.
Yamaha Graveyard
XS650 Enthusiast
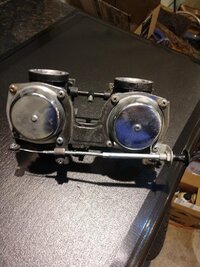
Pulled the carbs off and tore them down.Got the left one rejetted cleaned and back together, the right one is being a little bitch. just full of rust and oxidation. but I have a question about the fuel T ? No "O" rings? mine appears to be pot metal with a rubber coating, does that seem right? I couldn't tell you if it was leaking before because I didn't run it enough and it had 3 sections of ratty fuel line strung together from the petcock, they were definitely leaking. This past week I got the wiring sorted and routed, new alternator brushes, cam chain adjustment and valves lashed. Intakes were spot on exhausts were pretty tight.
Replace all you fuel line while you have it apart. I bought a "not tygon" brand line for yellow line for $1/foot from a lawnmower shop to bleed my brakes so I believe at double the cost you get off cheap.Pulled the carbs off and tore them down.Got the left one rejetted cleaned and back together, the right one is being a little bitch. just full of rust and oxidation. but I have a question about the fuel T ? No "O" rings? mine appears to be pot metal with a rubber coating, does that seem right? I couldn't tell you if it was leaking before because I didn't run it enough and it had 3 sections of ratty fuel line strung together from the petcock, they were definitely leaking. This past week I got the wiring sorted and routed, new alternator brushes, cam chain adjustment and valves lashed. Intakes were spot on exhausts were pretty tight.
No o-rings on the "T" fitting, just the thin rubber covering as you found. You must clamp the carbs together against the "T" with the mounting screws in the bottom angle bracket and top butterfly shaped bracket loose. Once the "T" is clamped tight so it won't easily rotate by hand, tighten the screws in the brackets to hold it like that .....

Yamaha Graveyard
XS650 Enthusiast
"Excellent" Thank you, do you recommend any lube on the nipples? I'm asking about the "T" I know about the other.....LOL!No o-rings on the "T" fitting, just the thin rubber covering as you found. You must clamp the carbs together against the "T" with the mounting screws in the bottom angle bracket and top butterfly shaped bracket loose. Once the "T" is clamped tight so it won't easily rotate by hand, tighten the screws in the brackets to hold it like that .....
View attachment 209533
Nipple lube? I like the strawberry flavored Booby Drops."Excellent" Thank you, do you recommend any lube on the nipples? I'm asking about the "T" I know about the other.....LOL!
Yamaha Graveyard
XS650 Enthusiast
Exactly what I had on the shelf. It's back together all dialed up runs great and ready for a test ride. I did have to drop the float bowls after they were on the bike both were overflowing IDK if the floats were spread out or the new gaskets were wider but they didn't let the floats float. I squeezed them together a little and shaved the edge of the gaskets. good to go now. I have UNI's and exhaust so I bought a jet kit from Mikes went with a 45 pilot and 145 main to start. I didn't change the needles or drill the slide. If it's like every other yammie I own it will take a couple tanks of fuel to settle in. Tomorrow I will pull the front tire and replace it then it's just endless details. https://photos.app.goo.gl/YGPzN6M5YJkwAhbC8Yes, I put some sort of rubber friendly lube on them. My "go-to" of late has been red rubber grease. I've been using it on all my rubber parts.
Attachments


Well, it appears you do have those free flowing shorty megaphones but your headpipes look stock. If they are then their I.D. is quite small and a detriment to flow. What I'm getting at is you may find 145 mains to be a bit too much. I have the UNIs and a complete freer flowing new exhaust (larger I.D. headpipes and freer flowing mufflers) on my '83 and the most I can go is a 137.5 main. I tried 140s but they caused break-up in the upper midrange under heavy throttle, an indication they were too big. So, it was back to the 137.5s and all is well again.
Yamaha Graveyard
XS650 Enthusiast
Yes Sir, You are correct and I anticipated that. Fortunately I have some experience removing float bowls while on the bike LOL! Carb's are funny creatures, not mysterious but they all have their sweet spot.Well, it appears you do have those free flowing shorty megaphones but your headpipes look stock. If they are then their I.D. is quite small and a detriment to flow. What I'm getting at is you may find 145 mains to be a bit too much. I have the UNIs and a complete freer flowing new exhaust (larger I.D. headpipes and freer flowing mufflers) on my '83 and the most I can go is a 137.5 main. I tried 140s but they caused break-up in the upper midrange under heavy throttle, an indication they were too big. So, it was back to the 137.5s and all is well again.
There's another jet on these BS34s you can toy with, the air jet in the bell-mouth .....

It feeds the idle circuit and is a way to fine tune it. It doesn't have as big an effect as changing a pilot jet size so allows you to achieve richness levels in between them. On mine, I have 45 pilots and reduced the air jets one size to make the idle circuit a tad richer. I tried 2 sizes down on the air jets but that proved to be a little too rich.
It feeds the idle circuit and is a way to fine tune it. It doesn't have as big an effect as changing a pilot jet size so allows you to achieve richness levels in between them. On mine, I have 45 pilots and reduced the air jets one size to make the idle circuit a tad richer. I tried 2 sizes down on the air jets but that proved to be a little too rich.
I recently installed a 12.77mm master cylinder off a 2014 Yamaha V Star 250 i snagged off ebay for $24 (no one else bid on it. This was after this past summer when Ii installed $20 ebay master cylinder, a banggood braided steel hose and rebuilt my OEM caliper. It worked real well but the return spring on lever was lost...
At first the V Star M/C had a firm lever crappy feel and didn't work well. Took the M/C off, cleaned the tiny hole and greased the caliper bolt in the rubber housing.
Works great. Better than ever .. the Nissin MC seems very high quality.
Listen all you guys with a bad feeling brake - clean out that little hole and grease that bolt !
Yamaha Graveyard
XS650 Enthusiast
Yes I am aware of that one. I'm not getting to excited about jetting until I can ride it couple times. I did discover another problem that slowed my thoughts on tweeking any more, It dawned on me as I was confronted with a funky stale fuel smell in the garage yesterday that the 103 octane leftover from my racebike had been sitting in the jug for 2 years. I had been burning it in the lawnmower now I'm quite sure it's past it's use by date. So I will dump it in my truck and get some fresh 87 octane. LOLThere's another jet on these BS34s you can toy with, the air jet in the bell-mouth .....
View attachment 209615
It feeds the idle circuit and is a way to fine tune it. It doesn't have as big an effect as changing a pilot jet size so allows you to achieve richness levels in between them. On mine, I have 45 pilots and reduced the air jets one size to make the idle circuit a tad richer. I tried 2 sizes down on the air jets but that proved to be a little too rich.
Lakeview's Playpen
Total Fool and MaxPete dropped by this afternoon to try to correct my attempt at points installation.
We now have spark but no action other than a couple massive back fires.
I will recharge the power pack and try tomorrow.
Three of us can't have messed up the timing, could we?
Total Fool and MaxPete dropped by this afternoon to try to correct my attempt at points installation.
We now have spark but no action other than a couple massive back fires.
I will recharge the power pack and try tomorrow.
Three of us can't have messed up the timing, could we?
Attachments
Probably not.......then again......too many cooks?Lakeview's Playpen
Total Fool and MaxPete dropped by this afternoon to try to correct my attempt at points installation.
We now have spark but no action other than a couple massive back fires.
I will recharge the power pack and try tomorrow.
Three of us can't have messed up the timing, could we?

Backfires (through the carbs) and, more usually, afterfire out the pipes is a good indication your timing is 180° out. Try swapping the coil HT leads and see if it wants to run. If it does you can then backtrack and see where it's off.Lakeview's Playpen
Total Fool and MaxPete dropped by this afternoon to try to correct my attempt at points installation.
We now have spark but no action other than a couple massive back fires.
I will recharge the power pack and try tomorrow.
Three of us can't have messed up the timing, could we?
Check your advance rod install. There's a little locating pin for the points cam on one end, another for the little disc on the advance side. They must point in the same direction .....

It's possible to install them 180° off. That throws the timing off 180°. Symptoms are as you have - spark but no start and big backfires.
It's possible to install them 180° off. That throws the timing off 180°. Symptoms are as you have - spark but no start and big backfires.
Agree that timing could be out 180. I had that problem as the p.o. had the wires reversed for the points. L-R and R -L. Swapped points wires and all was good.Lakeview's Playpen
Total Fool and MaxPete dropped by this afternoon to try to correct my attempt at points installation.
We now have spark but no action other than a couple massive back fires.
I will recharge the power pack and try tomorrow.
Three of us can't have messed up the timing, could we?
Similar threads
- Replies
- 32
- Views
- 1K