1976 XS650C Restore

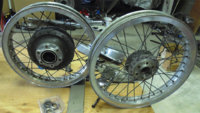
Spent about three hours cleaning wheels today.
It looks like the PO took a wire brush to the front rim. :(
I'm not going to spend much more time on these.
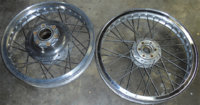
I polished the outside of the front rim.
Stripping the oil-soaked golden-hued clear from the back rim was a pita.
Took several applications of stripper and some scrubbing to get it all off.
I'll buff the outside of the rear rim but that's about it.
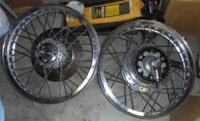
Sometime in the future I'll do stainless spokes and polish the hubs.
Anyway, time for new bearings and tires.
 

Attachments

  • xs650c_dirty_wheels_31.jpg
    xs650c_dirty_wheels_31.jpg
    266.4 KB · Views: 256
  • xs650c_clean_wheels_30.jpg
    xs650c_clean_wheels_30.jpg
    296.3 KB · Views: 257
Hi geedubya,
I'd say refit with bronze bushings rather than needle rollers.
In the specific case of low speed, high load, partial rotation bearings like on a swingarm plain bearings work better than bearings with rolling elements.

BMW built themselves into a conundrum on this point. Their rear swing arm has a small limited motion needle bearing. It's a special, costs $70 plus and it fails regularly. It's also a PITA to get in and out. Several have tried to manufacture replacements (oilite bronze) and they fail faster than the stocker. Jus sayin' I guess. I put an allballs needle set up in the super stock 79. The stock parts appeared to have been kept well greased, disassembly was easy, the bike had always been garaged and had <10K miles, the stock phenolics were worn, causing a front end shake at speed... The needle set seem great so far, though there were a couple of issues with the install and I will keep an eye on it. I have put in a bunch of the bronze bushings, they seem great as long as you get a set that is sized correctly I have one set that wasn't machined to the correct dimensions.

Nice wheels!
 
Wheels look great, what did you use other than elbow grease? My look in similar condition and want to clean them up.

Klean-Strip Strip-X and some ratty scotch brite to remove the old clear coat.
(Fresh Scotch brite would scratch the aluminum.)
Some Simple Green and scrubbing to remove the dirt and grease
Then I buffed the rim edge with a buffing wheel.
The wheels can't get much cleaner without dissassembly.
I'll rebuild the wheels sometime in the future.
 
Wheels are bearinged and back together.
You can see the inside of the front rim looks pretty funky.
Maybe someday I'll replace it.
The problem with having a tap & die set is you you look for excuses to use them!
 

Attachments

  • xs650c_clean_wheels_33.jpg
    xs650c_clean_wheels_33.jpg
    110.3 KB · Views: 231
  • xs650c_rim_corrosion_35.jpg
    xs650c_rim_corrosion_35.jpg
    237.4 KB · Views: 227
  • xs650c_chase_threads_34.jpg
    xs650c_chase_threads_34.jpg
    261.9 KB · Views: 234
I got some color back on the bike today.
Guess I'd better get the tires mounted so I can get it back up on the center stand.

So stuff like this chrome piece from the forks I coated the inside with Boeshield T-9 after soda blasting.
Anyone else use Boeshield? Wonderful stuff! Terrific for coating hidden areas against corrosion.
 

Attachments

  • xs650c_halfwaythere_37.jpg
    xs650c_halfwaythere_37.jpg
    101.6 KB · Views: 234
  • xs650c_fork_chrome_36.jpg
    xs650c_fork_chrome_36.jpg
    173.1 KB · Views: 234
You can usually bring these alloy rims back, it just takes lots of elbow grease, lol. That's why a spare set is nice. They're getting so expensive now though.
 
You can usually bring these alloy rims back, it just takes lots of elbow grease, lol. That's why a spare set is nice. They're getting so expensive now though.
Oh yeah, no doubt if I took the wheel apart it could be made to shine again but I'm just not that into it right now. :)
I'd like to be riding this thing before the summer is out.
 
Did Yamaha ever chrome plate the brake shoe plate?
Mine sure looks like it has plating over the aluminum.
The PO told me he had a bunch of parts plated back in the day but I wouldn't expect him to have done the brake plate, but who knows.
 
An upsidedownside? Sounds like the next build title.
I'd like to be riding, period. (*glug*)...

Shiny side up always!
Yeah, looked like you got dumped on hard the other night.
That storm sat right on top of you for a couple of hours.
I kept waiting for it to slew east but it just sat there.
By the time it got to me it only dropped about a half inch.
I guess it left it all in Luckenbach!
 
Wheels are bearinged and back together.
You can see the inside of the front rim looks pretty funky.
Maybe someday I'll replace it.
The problem with having a tap & die set is you you look for excuses to use them!

Cycleranger, great progress! I'm about to add new bearings as well. Curious, how did you press yours in?
 
Cycleranger, great progress! I'm about to add new bearings as well. Curious, how did you press yours in?

I have several different sized PVC fittings I use in conjunction with a hammer.
The PVC fittings are the same diameter as the outer races on the bearings.
A couple I sanded down a bit to fit better.
I use them for driving bearings, along with a drift when necessary.

The important thing is to not tap on the inner race or the bearing seals during install and drive in the bearing evenly, don't let it get cocked.
Apply a light coating of grease to the inside of the hub and the bearing. You can also freeze the bearings to shrink them a bit prior to install.

And don't forget to install the spacers correctly before you get the bearings in!
Pay special attention to the rear wheel spacers.

I'm sure there's some other threads here about installing bearings. If you've never done it before do some research. It's not difficult. :)

PVC pipe/fittings. Genius. Thank you!
 
Good grief! Why are master cylinder kits so expensive?
I have the Asco 5/8 MC and apparently I can replace the whole thing cheaper than rebuilding.

Update: Well the MC looks salvageable but I'm thinking why bother.
(Pity I can't just get new seals. The piston is still usable.)

The caliper otoh, looks like....fun. :(
So I applied a bit of air power and..

Pistons stuck tight. Cast iron, Yamaha what were you thinking...
Looks like the PO rebuilt the brakes in the early 90's.
The lines are not original and still look almost new.
Pity the pads are ~25 years old, they look almost new too.
Anyway, I'll play around with the caliper and try some things but even if I get the pistons out the bores are likely toast.
 

Attachments

  • xs650c_airpower_38.jpg
    xs650c_airpower_38.jpg
    100.5 KB · Views: 226
  • xs650c_front_brakes_39.jpg
    xs650c_front_brakes_39.jpg
    100.7 KB · Views: 226
Last edited:
Back
Top