Nice. I spent my career in line maintenance. Make the right guess, and make it fast. There are skills I lack, but not knowing my equipment was inexcusable. I’m using that same knowledge still today. An old mechanic for old airplanes, old being relative.This is why I always loved troubleshooting broken aircraft on the flight line before ordering parts and bringing them to the hangar for heavy maintenance.
If you truly understand the components and how they work together in performing their tasks with one another, troubleshooting is an exciting challenge.
Always loved getting it right the first time.
-
Enjoy XS650.com? Consider making a donation to help support the site.
XS650.com receives a small share of sales from some links on this page, but direct donations have a much greater impact on keeping this site going.
You are using an out of date browser. It may not display this or other websites correctly.
You should upgrade or use an alternative browser.
You should upgrade or use an alternative browser.
1978 XS650 Special Project
- Thread starter Melnic
- Start date
In the Air Force I was part of, and later ran the Launch/Recovery section. Fighters had a launch window in order to make their range time block. Usually that window was 5-10min. That's what time you had to fix any problems. After that it was dead in the water. Sometimes we'd do a mass launch (Elephant Walk) of up to 28 aircraft at once, and on bad days up to 8 or 10 of 'em would break and need tending to. It required speed and good systems knowledge. High stress and speed.... it was my adrenalin fix. ")
Our section patch is still proudly displayed on my "I love me" wall.
My last 6 yrs on the line was as an Outstation mechanic on B727's and DC-8's. They'd come and go with just 1 mechanic per shift. So you were it... didn't matter.. brakes, fuel pumps, engines or avionics... it was all on you. I loved it.
Er.... pardon the hijack Melnic. Back to you. 
The factory manuals do have regulator adjustment instructions. Besides that adjustment screw for the output, there are a couple gaps that need to be checked (and re-set if need be). When I adjusted the original mechanical regulator on my '78, I found both gaps were off. My charging output was a bit low, in the mid to high 13's. It always kept the battery charged but it wasn't ideal. Re-setting the gaps correctly brought the charging output back up and I didn't even need to mess with that adjusting screw .....

Although the 650 manual doesn't mention it, looking through an XS750 triple manual, I found this little tidbit of info on adjustment intervals .....

Although the 650 manual doesn't mention it, looking through an XS750 triple manual, I found this little tidbit of info on adjustment intervals .....
VR115 installed and a new rectifier.
Starts and does not exceed 14.7 volts. However at idle its not really much above 12.5V.
The issue with that is the Turn Signals are not blinking. Right one might blink a few times then stays on. Left one does not blink at all.
If I rev up to get the battery voltage up, they will both blink.
Starts and does not exceed 14.7 volts. However at idle its not really much above 12.5V.
The issue with that is the Turn Signals are not blinking. Right one might blink a few times then stays on. Left one does not blink at all.
If I rev up to get the battery voltage up, they will both blink.
I fixed that by putting LED lamps in my taillight. That freed enough amps.The issue with that is the Turn Signals are not blinking. Right one might blink a few times then stays on. Left one does not blink at all.
If I rev up to get the battery voltage up, they will both blink.
Looked back at some things.
Tested Rectifier (diode pass/block) and passed.
Measured Brown wire voltage going to Regulator, 11.3V when Battery is at 12.3V (switch on, bike off).
Even while running, there is a 1V drop between Battery and Regulator.
LED lights is an interesting suggestion. I"ll unplug the tail light and see if that helps. I also know that LED turn signal lights can be done but the flasher unit needs to be changed too I'm expecting.
Grrrr, I was expecting my shipment of the brake rebuild parts today, USPS delayed it a day in Washington DC.
Yeah, what skull said. Also, the ignition switch is a known source for voltage drop. There's a how-to in Tech on disassembly and cleaning.Maybe its time to do a full harness connections, bullet, couplings and earth connections, inspect, clean and fix/replace where needed.
Did that to my loom, (using a full continuity test), and factory bulb indercators would flash at a normal speed no matter the revs with engine running or not.
Does this thread need to be archived in the "Tech Section" under "Tending to your Electrical gremlins"?
I removed the headlight and jumped the ignition. It did save .2V and with the Headlight unplugged, the Turn Signals flashed when the bike was running but not when it was not running. Until my parts come in hopefully Sat afternoon, I'll look at this some more on Saturday.
I feel the Red and Brown power wires that run thru the bike are under sized. I ran into a lot of voltage drop on my fishing boat the way they daisy chained everything and had to run new wires and fuse it differently.
I feel the Red and Brown power wires that run thru the bike are under sized. I ran into a lot of voltage drop on my fishing boat the way they daisy chained everything and had to run new wires and fuse it differently.
They're actually about right. Keep in mind the whole bike only pulls about 10-15A with everything going... so the 14-16ga they used is more than big enough. After I cleaned all the connections on my SG, I'm getting about 0.1V drop at the regulator.... everywhere actually.I feel the Red and Brown power wires that run thru the bike are under sized.
Just a little heads up - your '78 has a gizmo called a light checker that monitors the brake and tail light. If either burns out, a red "Brake" warning light will illuminate on your dash. If you switch to a led tail light bulb, it draws so little voltage the light checker is going to think it's burned out and that dash warning light will come on all the time. I just removed the bulb, lol.
Doh! I forgot about that. Additionally, there’s only one lamp.Just a little heads up - your '78 has a gizmo called a light checker that monitors the brake and tail light. If either burns out, a red "Brake" warning light will illuminate on your dash. If you switch to a led tail light bulb, it draws so little voltage the light checker is going to think it's burned out and that dash warning light will come on all the time. I just removed the bulb, lol.
Changing my two lamp taillight to LED did the trick. My incandescent turn signals function. It’s not going to be as simple for you, plus one bulb is less draw.I also know that LED turn signal lights can be done but the flasher unit needs to be changed too I'm expecting.
I had a recent OEM flasher fail. I believe the contacts are contaminated or dirty. It appears I can disassemble and fix it. Since I had a spare, I put it aside as CDL (can do later).
Key switch was dropping .3v measured at the plug inside the headlight. Pulled key switch, cleaned contacts and wipers.
Now its just under .1v drop. Now, Idling turn signals working. Bike off with key on, it does not blink.
I also pulled the flasher relay, opened up can and cleaned. Did not make a difference with bike off, key on.
I wonder if I feed battery power to the regulator w/ a relay controlled by the brown wire if it would help boost the regulator input voltage?
This morning I finished up the De rust of the gas tank. Waiting for Petcock rebuild kits to come in today.
Rinse
Fill with 10% vinegar and nails
Soak a few days lifting tank and sliding around nails a couple times a day to scrape up rust as it dissolves.
Drain
Rinse with water
WD40 , swish around and drain
Finish with fogging spray, swish around and drain.
Fill with fresh gas, drain thru a filter then use in old Yukon
Fill with fresh gas
Last edited:
Not for the same reason, but my Regulator is fed from a relay. The reason I did it was to disable the alternator during starts.I wonder if I feed battery power to the regulator w/ a relay controlled by the brown wire if it would help boost the regulator input voltage?
https://www.xs650.com/threads/alternator-disable-mod.53271/
I wonder if I feed battery power to the regulator w/ a relay controlled by the brown wire if it would help boost the regulator input voltage?
There is no short cut to cleaning up the loom/Switchs. As I explained in my post.
Did you clean up and check and replace, (if necessary),
the bar Switch,
all bullet connectors
Dismantle and clean any couplings
Always more than one way to do things.
I did clean up the key switch and some of the bullet connectors and some other connectors in the headlight. I'll keep working on cleaning up connectors during the week as time permits. For now, turn signals flashing at idle.
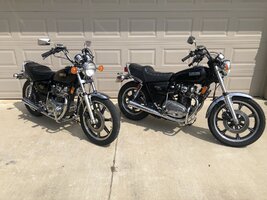
Parts came in and finished up rebuilding brake calipers/master cylinder and replaced all brake lines. Spent a little time cleaning and polishing chrome after breakfast which turned out really nice. One petcock is different design and rebuild kit won't work on it. The other seemed to work so I put the rebuild off to another day. I blocked off the left side that had the bad petcock and blocked the fuel tube on the same side. Put tank on the bike to take it for its first run. Unfortunately the other petcock was leaking too. Test rode the bike just 1 mile in the neighborhood and came home and pulled the tank again. It was fine up to 3rd gear that I got it in. Clutch Cable needs some adjustment. I like the sound of this bike but not necessarily the ergonomics of the mini apes. They are turned in/down more than the 83 xj is. Engine is running great and idling really awesome. Here is pic of the 78' XS650 sitting in front of the 83 XJ650 behind it.


I did clean up the key switch and some of the bullet connectors and some other connectors in the headlight. I'll keep working on cleaning up connectors during the week as time permits. For now, turn signals flashing at idle.
Parts came in and finished up rebuilding brake calipers/master cylinder and replaced all brake lines. Spent a little time cleaning and polishing chrome after breakfast which turned out really nice. One petcock is different design and rebuild kit won't work on it. The other seemed to work so I put the rebuild off to another day. I blocked off the left side that had the bad petcock and blocked the fuel tube on the same side. Put tank on the bike to take it for its first run. Unfortunately the other petcock was leaking too. Test rode the bike just 1 mile in the neighborhood and came home and pulled the tank again. It was fine up to 3rd gear that I got it in. Clutch Cable needs some adjustment. I like the sound of this bike but not necessarily the ergonomics of the mini apes. They are turned in/down more than the 83 xj is. Engine is running great and idling really awesome. Here is pic of the 78' XS650 sitting in front of the 83 XJ650 behind it.
Bars are very personal, good for one, bad for the other...Always more than one way to do things.
I did clean up the key switch and some of the bullet connectors and some other connectors in the headlight. I'll keep working on cleaning up connectors during the week as time permits. For now, turn signals flashing at idle.
Parts came in and finished up rebuilding brake calipers/master cylinder and replaced all brake lines. Spent a little time cleaning and polishing chrome after breakfast which turned out really nice. One petcock is different design and rebuild kit won't work on it. The other seemed to work so I put the rebuild off to another day. I blocked off the left side that had the bad petcock and blocked the fuel tube on the same side. Put tank on the bike to take it for its first run. Unfortunately the other petcock was leaking too. Test rode the bike just 1 mile in the neighborhood and came home and pulled the tank again. It was fine up to 3rd gear that I got it in. Clutch Cable needs some adjustment. I like the sound of this bike but not necessarily the ergonomics of the mini apes. They are turned in/down more than the 83 xj is. Engine is running great and idling really awesome. Here is pic of the 78' XS650 sitting in front of the 83 XJ650 behind it.View attachment 253810View attachment 253811
So, I decided to just go with the Dunlop 404 front tire for now to get this bike operationally safe(r). Was not very expensive at CycleGear near me.
Its same tires on my 1983 XJ650 and i've been good with those the way I ride the bike. I have 2 newer bikes ('22 Bonneville, '21 Scout) that I ride more and the old bikes are just projects that I will take out on short local 1 hour rides.
Now, as I'm working out the kinks of the petcock leak and cleaning up the electrical, I'm looking ahead of my end game.
Before I got this bike for essentially $0 out of pocket, I was looking for an XS650 standard. I like the looks of it better than the buckhorn bars and this seat/sissybar have got to go. Tank/side panel re paint to original Burgundy is likely in the plans as well.
That being said, finding a good condition grab rail is not looking very easy. I'm ok with the original factory Special seat/grab rail and I'd like to keep it consistent with the original. Don't really want to do any welding/fitting for a different seat.
So, what I'm thinking I'll end up with is everything original to the '78 special with factory color but just with different bars.
I think the bars are where I have some choices. I'm 5'7" and on my Bonneville, it was much better with some pull back risers. Been reading threads on bars already. I would not mind the euro bars with some pull back in them. I REALLY don't want to change out much on the bars as far as brake lines, throttle cable or clutch cable. I want the change to be simple if possible.
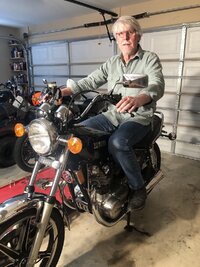
Mine has Triumph US market T120 bars from the mid 1970s. The rise is eight inches. I’m a good bit taller than 5’ 7”, but a lot of Triumphs were delivered with this bar. Photos attached.So, I decided to just go with the Dunlop 404 front tire for now to get this bike operationally safe(r). Was not very expensive at CycleGear near me.
Its same tires on my 1983 XJ650 and i've been good with those the way I ride the bike. I have 2 newer bikes ('22 Bonneville, '21 Scout) that I ride more and the old bikes are just projects that I will take out on short local 1 hour rides.
Now, as I'm working out the kinks of the petcock leak and cleaning up the electrical, I'm looking ahead of my end game.
Before I got this bike for essentially $0 out of pocket, I was looking for an XS650 standard. I like the looks of it better than the buckhorn bars and this seat/sissybar have got to go. Tank/side panel re paint to original Burgundy is likely in the plans as well.
That being said, finding a good condition grab rail is not looking very easy. I'm ok with the original factory Special seat/grab rail and I'd like to keep it consistent with the original. Don't really want to do any welding/fitting for a different seat.
So, what I'm thinking I'll end up with is everything original to the '78 special with factory color but just with different bars.
I think the bars are where I have some choices. I'm 5'7" and on my Bonneville, it was much better with some pull back risers. Been reading threads on bars already. I would not mind the euro bars with some pull back in them. I REALLY don't want to change out much on the bars as far as brake lines, throttle cable or clutch cable. I want the change to be simple if possible.