Thanks Scott; I think I have it petty well covered from the bins.
-
Enjoy XS650.com? Consider making a donation to help support the site.
XS650.com receives a small share of sales from some links on this page, but direct donations have a much greater impact on keeping this site going.
You are using an out of date browser. It may not display this or other websites correctly.
You should upgrade or use an alternative browser.
You should upgrade or use an alternative browser.
Pentagram/Star Wheels: My rebuild and How-To thread
- Thread starter scott s
- Start date
-
- Tags
- build how to restoration wheels
I had those wheels on my '76. I bought that bike used in '77 and the wheels were the coolest part of the bike. It also had a 2 into 1 pipe. It was such a cool bike. I had no idea at the time that the wheels were so rare. I've thought many times over the years about how I've never seen a set like them again. I honestly thought they were aftermarket.
Last edited:
Well they kind of are, Yamaha would work with aftermarket venders to develope complete bolt on products, then sell them in "Genuine" Yamaha accessory catalogs. Would be fun to see one of those old catalogs.
One for the 81 Maxim
http://www.ebay.com/itm/Vintage-198...ash=item488a6b43dd:g:DaoAAOSwP~tW2b9x&vxp=mtr
One for the 81 Maxim
http://www.ebay.com/itm/Vintage-198...ash=item488a6b43dd:g:DaoAAOSwP~tW2b9x&vxp=mtr
Last edited:
gggGary are you going to put them on a frame (special) with the OEM master and caliper?
And yes they are rare.
And yes they are rare.
TBD WER, wife likes them, period piece, prolly just swap swing arms and wing an MC mount.
Well. . . . .crap. I had hoped that was the plan. Let you blaze the trail to see if I wanted to hunt down a rear disc frame. Still trying to find the rountoit for a drum brake conversion.
Got started, front wheel was a used CL snag, It's a plug and play fit for the XS650, sanded and buffed (most of) the corrosion, painted it to match Period Piece. New wheel bearings and seals are in, Bearings and seals for both wheels to my door for $23.00 from ebayer CALTRIC They seem fine front bearings had seals on both sides, I popped one off each bearing they had a decent amount of grease, I added a little more, closed them up and installed. When I started looking at the wheel the spacer between the bearings was a bit loose (one bearing was frozen), I checked and the spacer length matched the flange to flange distance perfectly, 68.5mm. Put the wheel by the woodstove and bearings outside for a while and I still had to get pretty aggressive to get the spacer snug between the bearings. New tire for the front will be here tomorrow, I'll get that mounted up with a new tube. The rear wheel is new has never been on a bike but was not machined for the XS650, So will start getting the rear spacers measured, made and fitted.
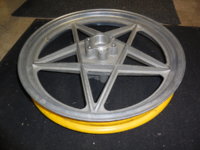
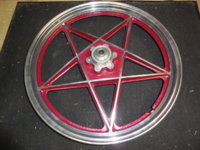
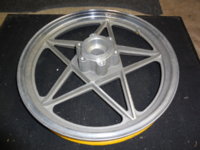
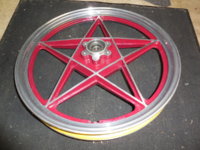


Been learning the new to me Grizzly lathe and making spacers. The star rear wheel I have was not for an XS650 so the machining is all for a narrower bike. I have the bearing spacers made and the bearings are in now. I have a chunk of aluminum for the rotor spacer and though it's going to be kinda big and deep shouldn't be a problem. My issue or area of indecision is the sprocket. the extra width I need to add is about exactly one sprocket width which leaves me with no easy path to a centering ring for the "real" sprocket. Pictures with a sprocket on it like a spacer would sit.
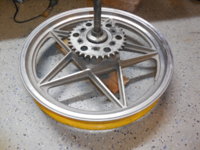
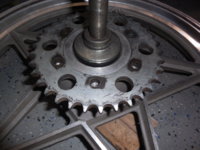
I'm about sure I won't just hang it on the bolts and call it done. I haven't tried turning/cutting a sprocket on the lathe yet so not sure how hard that will be to do. I could turn "real" sprocket larger on the ID and make a centering ring on the spacer but don't want to have to machine a custom sprocket at replacements and bolt circle is pretty close to the ID so the sprocket will quickly get thin/weak. I got one idea that is going to require a lash up bit of machining of the wheel (I don't have a lathe big enough to turn the wheel) and am kind leaning that way, but I'm looking for ideas....


I'm about sure I won't just hang it on the bolts and call it done. I haven't tried turning/cutting a sprocket on the lathe yet so not sure how hard that will be to do. I could turn "real" sprocket larger on the ID and make a centering ring on the spacer but don't want to have to machine a custom sprocket at replacements and bolt circle is pretty close to the ID so the sprocket will quickly get thin/weak. I got one idea that is going to require a lash up bit of machining of the wheel (I don't have a lathe big enough to turn the wheel) and am kind leaning that way, but I'm looking for ideas....
If I'm reading that correctly, you need a spacer to move the sprocket out towards the swingarm AND a centering ring between the hub and the sprocket ID... correct?the extra width I need to add is about exactly one sprocket width which leaves me with no easy path to a centering ring for the "real" sprocket.
If that's the case, why not turn a spacer with a lip on it... like a large hat bushing?
Right, but there's zero clearance for the lip to connect to the spacer. I'm thinking I am going to have to figure out a way to bevel the outside corner off the hub so the spacer can connect to the lip.
How about a a separate centering ring and a plate that bolts to the outside of the sprocket with a hole ID the same as the OD of the hub. The centering ring would just be captive...
In other words, 3 pieces... sprocket spacer, centering ring, and sprocket plate to hold centering ring captive.
Now that I've thought about it a little more.... you could make just two pieces. The inner sprocket spacer and an outer plate that has the centering ring machined into it... hat bushing style.
I'd cut an old sprocket to be the spacer, just as 5twins posted here:
http://www.xs650.com/threads/anybody-interested-in-star-pentagram-rims.27893/#post-504456
Then turn a piece of scrap to the same OD as the hub's boss, as an alignment jig/fixture.
Fit this jig/fixture to the (now) spacer and new sprocket, align their bolt holes.
Weld the spacer (cut-down old sprocket) to the new sprocket.
You now have a 1-piece, thick-center-section shoulder sprocket...
Last edited:
Thanks for the ideas so far! Would prefer a standard sprocket at changes instead of having to build a custom each time.... Need to look into welding "sprocket steel" Is it a special hard steel, hardened, different from every vender, could cracking be an issue? I'm guessing turning hard steel though holes or "web" will not be easy. Don't make me invest in a plasma cutter,  . So far the wheel has not been altered, it could be returned to use on whatever Yamaha it was designed for. One thought is shoulder bolts, drilling out sprocket holes and drilling a short recess into the threaded wheel holes. having the shoulders act as the locator. Local farm store does stock #50 weldable sprockets. Not sure they would be up to motorcycle chain speed/wear.
 . So far the wheel has not been altered, it could be returned to use on whatever Yamaha it was designed for. One thought is shoulder bolts, drilling out sprocket holes and drilling a short recess into the threaded wheel holes. having the shoulders act as the locator. Local farm store does stock #50 weldable sprockets. Not sure they would be up to motorcycle chain speed/wear.
I guess you could run a file across an inconspicuous area, like the corner of a lightening hole, and see if it feels like normal, machinable, weldable steel. The sprocket in 5twins post looked to be cuttable like ordinary steel, but he's the guy to ask.
Hmmm, trying to run a sprocket with position established by shoulder bolts, versus setting on a centered hub boss and clamped down by bolts? If you were to do the same thing with car wheels, full weight support provided by lug nuts/studs alone, without the hub boss, you may be able to visualize the risk.
Otherwise, I got nuttin'...
Actually many cars do just that. My Sprinter van ran happily for over 100,000 miles on wheels with plastic centering rings. which would bring me to flat head allan bolts and beveling the bolt holes in the sprocket. the wheel has a pretty thick flat flange I might just turn a separate centering ring and bolt it to that flange.car wheels, full weight support provided by lug nuts/studs alone, without the hub boss, you may be able to visualize the risk.
Asking $500 And I'm not for sure that rear is XS650......I`ve always liked those wheels. These are up for sale on VFT.

Last edited:
Went with an old sprocket as spacer ala 5twins. Going to take some getting used to the lathe, cruised through that thing like a hot knife through butter, cutting through the holes didn't bother it at all Hot blue chips were flying. then ground off some extra, made a mandrel to align them and welded it to a good sprocket. So welds and bolts will hold it. The hub had a radius on the inside corner, had to chamfer the spacer/sprocket a bit to get it to fit flush to the bolt flanges.
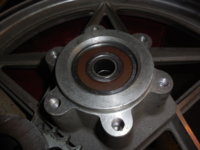
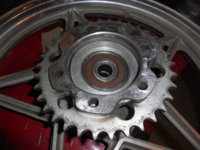
Last piece to make is the rotor spacer. Chucked a rotor in the lathe and looks like I can cut down the thickness, get some weight off it. prolly will drill it also


Last piece to make is the rotor spacer. Chucked a rotor in the lathe and looks like I can cut down the thickness, get some weight off it. prolly will drill it also
Similar threads
Sold / Found / Inactive -
Star Pentagram Wheels & Tires
- Replies
- 25
- Views
- 2K
