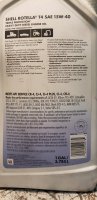
The synthetic blend is Rotella T5; it's clearly labeled as such. The fossil oil is Rotella T4. Yep, JASO ratings are in the fine print on the containers.
-
Enjoy XS650.com? Consider making a donation to help support the site.
XS650.com receives a small share of sales from some links on this page, but direct donations have a much greater impact on keeping this site going.
You are using an out of date browser. It may not display this or other websites correctly.
You should upgrade or use an alternative browser.
You should upgrade or use an alternative browser.
Yam_Tech314's official build thread
- Thread starter G_YamTech_314
- Start date
As far as circlips go... I want to invest in a circlip installer/remover tool... You know, the $130 one. I used them in school and they spoiled me, but before I do that... Are there any tools that are cheaper that work just as well? I really do not want to bend clips over and over again trying to get the technique down.
Also, I'm working on a list of parts to get, and I want to/need to replace the rubber seals that live under the washers and acorn nuts in the top of the motor. Is there anywhere I can find these other than the kit that Mike's xs sells, or Yamaha parts house? I've had a bad experience with YPH, and Idk if Mike's kit is worth the $50. Especially when I have all the hardware, I just need the rubber seals...
Another thing, while I'm here... What kind of hose do y'all prefer when running lines from the rear brake reservoir to the rear brake cyl? I am working out a design for the rear brakes and I'm trying to figure out how I wanna route my lines, and which angle fittings I wanna buy.
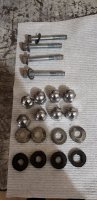
Brass washers are what I have used. A lot of guys like copper. I get my brass from Amazon. I'm sure there will be posts with links on choices.Also, I'm working on a list of parts to get, and I want to/need to replace the rubber seals that live under the washers and acorn nuts in the top of the motor.
I use brass because they look cooler. Copper works also if you like the look.

Good to know! That'll definitely give me some options for looks and functionality. I'm glad there's an alternative... Something about rubber washers didn't seem right in my mind. Would I still run the brass/copper washers under the SS washers?
I used copper washers I picked up at my local hardware store (Ace).
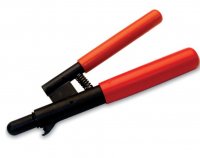
Never heard of a "circlip installer/remover tool." Got a pic?
Never heard of a "circlip installer/remover tool." Got a pic?
If you are talking about the nuts on the cylinder studs I don't think there were any SS washers on top of the sealing washers. Just the sealing washer and nut. Sealing washers only needed to be used on the 4 outside nuts, plain washers on the other 4. I used brass on all 8. Looks cooler to me.

You insert the round end into the wrist pin well, attach the little arm to the circlip, and squeeze. It compresses the clip in a way that makes the O.D smaller. You insert them the same way, attach the clip to the tool, squeeze, insert, release, and seat.
Attachments
You probably used green gaskets also.I used copper washers I picked up at my local hardware store (Ace).

Would look I guess OK on a Special.


I been waitin' ages to use this little guy....You probably used green gaskets also.
Would look I guess OK on a Special.


Love it!!!I been waitin' ages to use this little guy....

As far as circlips go... I want to invest in a circlip installer/remover tool... You know, the $130 one. I used them in school and they spoiled me, but before I do that... Are there any tools that are cheaper that work just as well? I really do not want to bend clips over and over again trying to get the technique down.
Well, we live and learn! Enjoyed watching the dude demonstrate using that tool. But I never knew there was such a thing and I've never needed it. When the circlips are the type with an eye at each end, the circlip pliers in me toolbox do the job. When they are the plainer wire type, I use a pair of needle pliers to hold one side of the circlip, offer the other side into the piston, push towards that so the clip bends slightly, the nose of the pliers passes through the notch at the edge of the hole, move that side inwards, release, job done. Ensure the circlip has seated in the groove and you're good to go.
I doubt you'll bend or destroy any circlips - they are springy - but if you do, they are also cheap.
There you are, just saved you $130 and there's no charge for that.
I doubt you'll bend or destroy any circlips - they are springy - but if you do, they are also cheap.
I bought four, thinking I'd need only enough to nail it first try.
I taught one how to fly, and taught two others how to change shape...
I did learn lastnight though, that if done gently, you can press one in by hand, turn it, then true it up with a wrist pin. It works for the inside clips but I haven't succeeded in installing one with hand tools and NOT bending them yet. I'm sure I'll get there, but the JIMS tool certainly spoiled me.
I did learn lastnight though, that if done gently, you can press one in by hand, turn it, then true it up with a wrist pin. It works for the inside clips but I haven't succeeded in installing one with hand tools and NOT bending them yet. I'm sure I'll get there, but the JIMS tool certainly spoiled me.
Gently is probably the key word. Not going to say I've never destroyed/bent a circlip, but it won't be many . . .
I liked 'taught one how to fly' - when I said they're springy, was thinking I've had a few go 'ping' and you spend the next ten minutes on knees wiv a torch looking for the blighter.
Yes, exactly. The 4 inside studs don't flow any oil so don't need a sealing washer. Some don't mind using the rubber washers but I do. It's one of the first things I replace on one of these bikes when I get it .....

Oh wow, they really ARE visible. Good thing I got shiney brass ones for .65 a pop!
Anyone think there's a problem with soaking for 24hrs, and installing to let sit in a dry motor for awhile? I wanna finish off the clutch basket build and install the long one piece pushrod and upgraded heavy-spring clutch screw kit from Heiden Tuning. I know oil doesn't "dry out" or evaporate in the same sense water would, but should I be patient and wait til the motor is gonna be filled with oil before I do the install??? I can't seem to find a reason why it would matter as long as I give the plates 24 hours to soak up the oil.
Attachments
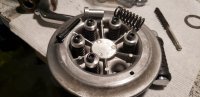
Long as they're soaked for a few hrs prior to assembly, you'll be fine. Look at it this way, my bike (and many others) sits 3-4 months over winter. Only the bottom fourth or so of the plates see any oil. Doesn't hurt them and I've never had a clutch problem after the spring wakeup.Anyone think there's a problem with soaking for 24hrs, and installing to let sit in a dry motor for awhile? I wanna finish off the clutch basket build and install the long one piece pushrod and upgraded heavy-spring clutch screw kit from Heiden Tuning. I know oil doesn't "dry out" or evaporate in the same sense water would, but should I be patient and wait til the motor is gonna be filled with oil before I do the install??? I can't seem to find a reason why it would matter as long as I give the plates 24 hours to soak up the oil.
Also, @grizld1
I read the back of my rotella T4 container, and it mentions JASO MA and MA2. then later down the list it says MB approval. I don't ever want to assume I read things correctly. In your post you mention this:
This leads me to believe I have the proper oil. Given that it's T4, and not T5. I again, just know that assuming has led to mistakes in the past so I don't do that anymore if I can help it!
I read the back of my rotella T4 container, and it mentions JASO MA and MA2. then later down the list it says MB approval. I don't ever want to assume I read things correctly. In your post you mention this:
use the original dinosaur 15W-40, not the new semi-synthetic. The dino oil has JASO MA and MB (wet clutch and centrifugal clutch) ratings. The new stuff is rated only JASO MB, meaning it's approved for use with centrifugal clutch but not wet clutch.
This leads me to believe I have the proper oil. Given that it's T4, and not T5. I again, just know that assuming has led to mistakes in the past so I don't do that anymore if I can help it!
Attachments
Similar threads
- Replies
- 214
- Views
- 26K
- Replies
- 98
- Views
- 8K