-
Enjoy XS650.com? Consider making a donation to help support the site.
XS650.com receives a small share of sales from some links on this page, but direct donations have a much greater impact on keeping this site going.
You are using an out of date browser. It may not display this or other websites correctly.
You should upgrade or use an alternative browser.
You should upgrade or use an alternative browser.
Yam_Tech314's official build thread
- Thread starter G_YamTech_314
- Start date

Got it done in one night thanks to my awesome girlfriend and helper. She helped with cam timing, camchain master link riveting, and head torquing. Wouldn't have been able to do it without her.
She even said "let me know when you're ready for lifting it into the frame" oh my. She's a keeper for sure!


She even said "let me know when you're ready for lifting it into the frame" oh my. She's a keeper for sure!
Just a few more hurdles, you'll soon be on the home straight.
Speaking of hurdles... What is the best method you guys all recommend to getting this pig in the bike?
I'm sure there's a million ways to do it, but I've got a little less experience putting things back together again than you guys! Lol
Debating lowering the bike sideways onto the motor, but we lifted the motor pretty easily off the bench, holding it still would be challenging, but I'm torn between which is most effective.
Attachments
For you, the easiest way will probably be laying the bike frame over onto the motor. For me, I have lift "handles" made up that allow me and a helper to lift the motor like a stretcher and wiggle it into or out of the frame .....


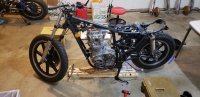
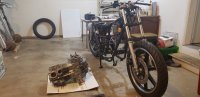
That is great teamwork. Darn thing starting to look like a motorbike, time for another of these methinks:
Isn't it weird?!? I almost don't recognize it in one piece.
Teamwork.... well done!!I got some thicker skin and just went for it. I did the heavy lifting and my girlfriend aligned the mounting hardware. We make a pretty good team!
Nice job, both of you. ")
Can anyone show me a picture of how the top motor mount/condensers are supposed to look? The exploded diagrams can get a little confusing.
These should help .....


Remember to attach the small eye of the engine ground wire to the front condenser mounting screw .....

The large eye runs over to the other side and gets trapped between the motor mount and engine .....


Remember to attach the small eye of the engine ground wire to the front condenser mounting screw .....
The large eye runs over to the other side and gets trapped between the motor mount and engine .....
Better put a ring on her finger! Nice work!She even said "let me know when you're ready for lifting it into the frame" oh my. She's a keeper for sure!
So... Now what? I have to get a few miscellaneous bolts and nuts for the motor where there weren't any from the get go... I'm missing a bolt for the starter gear cover, and somewhere down the line I either misplaced a motor mount but, or it never had one...
I also need to set my valve clearances, and put motor oil in it. I connected as many wires as I could. The rest are unconnected because I can't figure out what to do with them. The alternator is connected to the harness, so is the starter solenoid, safety relay, reg and rect. Hell even the horn is plugged in. I don't know what connectors I need to find for my condenser, nor do I have ANY of the front end wiring/switches ready to be wired up.
What I need help with:
Identifying the proper orientation of condenser connections.
Figuring out what kind/size hose I need for the rear brake reservoir to connect to the master cyl. And do I need hose clamps for it? (I'd like to get both front and rear brakes working today.)
I may be wrong (it happensFiguring out what kind/size hose I need for the rear brake reservoir to connect to the master cyl.
) but I thought I sent that hose along with the rest of the bits.I don't think so. If it's a piece I can get at the hardware store I have no problem doing so. I have been moving out piece by piece. Workbench is gone, toolbox remains and so do the three Bikes. I'm down to my last two or three boxes of XS650 parts and I don't have a single piece of hose to go along with the bike.
That doesn't mean I didn't lose it... Just wondering what I can use in place of an original piece of hose lol
It's a hose cast (molded) to shape.... and it needs to be DOT3 compatible. Lemme look and see if I have one.
Your condenser is actually a condenser "pack", two condensers mounted end to end. Of the two wires coming out, one comes from each condenser. You pair one with each set of points. The connections are shown in my 1st few pics in post #1052. There are two female double bullet connectors coming out of your harness, one on a gray wire, the other on an orange wire. The orange points wire and one condenser lead hooks to the orange double bullet. The gray points wire and the other condenser lead hooks to the gray double bullet. It doesn't matter which condenser lead connects to which double bullet. The other ends of the gray and orange wires with the double bullets run to your coils. The orange wire connects to the orange wire on the left coil. The gray wire connects to the orange wire on the right coil.


No joy on the hose. Sorry.
Similar threads
- Replies
- 214
- Views
- 26K
- Replies
- 98
- Views
- 8K