-
Enjoy XS650.com? Consider making a donation to help support the site.
XS650.com receives a small share of sales from some links on this page, but direct donations have a much greater impact on keeping this site going.
You are using an out of date browser. It may not display this or other websites correctly.
You should upgrade or use an alternative browser.
You should upgrade or use an alternative browser.
1976 xs650 by summertime?
- Thread starter VVLynden
- Start date
-
- Tags
- brakes clutch pictures restoration
VVLynden
XS650 Enthusiast
Well turns out the tank is leaking fuel. Woke up to a puddle beneath the bike. It looks like the seal between the tank and petcock is the culprit. I'm thinking about replacing the petcocks with ones that have filters. I also ordered a Clymer manual off eBay, says it covers 70-82 so that should be good for all my parts!
So for the time being my progress is on hold. Don't wanna start any fires!
So for the time being my progress is on hold. Don't wanna start any fires!
Tron
Bearded Sheep Whisperer
I'd say best bet is to get some new gaskets for your petcocks, and run an inline fuel filter..
that's just me though. the Chinese petcocks tend to be of the lesser quality
that's just me though. the Chinese petcocks tend to be of the lesser quality
VVLynden
XS650 Enthusiast
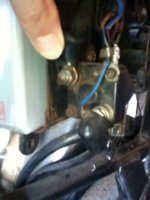
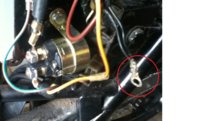
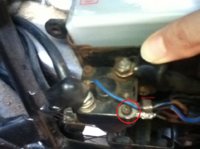
Starter solenoid. Current would only pass when the compression release lever is pulled, completing the blue wire's connection to ground. The small red wire should always have 12 volts. There should be a smaller red wire that goes to a fuse then on to the ignition switch, through the kill switch and down to the coils.
Assuming the wiring is still stock 72 here's the diagram
View attachment 22979
Assuming the wiring is still stock 72 here's the diagram
View attachment 22979
In gggGary's diagram Use your meter to trace the power. Start at the battery, There should be a large cable and a samall red wire hooked to the positive. Or the small red wire may be located on the starter solenoid where the big cable from the battery hooks.
Either way follow this wire to the fuse, check voltage at the fuse, both sides. If power at both sides move to the key switch. Should have power at the red wire. If so turn the switch on. Power should come on the red/white wire, this wire sends power to the engine stop switch, from this switch to the coils. If no power the switch may come apart to be cleaned. If not just unplug the key switch, in the harness part of the plug hook a jumper wire fromthe red to the red white wire. This will send power to the red/white wire, engine stop switch and the coils.
Use your meter to verify power at the red/white wires at the coils. If you have power there you should get spark.
The voltage at the coils should be with in about 1/4 volt of battery voltage. If not you have a dirty connection somewhere, usually the key switch or engine stop switch.
The points need to be clean and gapped right. While you are checking the points gap it would be a good time to check the points timing too. It's all in you repair manual.
You might want to check a few things before you try to start it.
Do these things in this order.
#1 set the cam chain tension.
#2 set the valve clearance.
#3 Set the points gap.
#4 set the points timing.
All these things are in the manual. If you go through these steps you should get spark. If not go through them again to see what you missed. If still no happiness then report back with what you find and we will tryto help more.
Leo
VVLynden
XS650 Enthusiast
Just a small update here, I ordered a handful of parts and was waiting for them to arrive before moving forward. I got a decompressor cable, clutch cable, throttle cable (all these were missing), 2 petcock rebuild kits, and a new starter because when I was messing around with stuff I didn't realize what I was doing and ended up breaking the casing of the old starter.. I'm new, what can I say?
Anyhow, the new starter is installed, but there is a bundle of two wires that I can't find a home for. There was a spot specifically for them on the old starter and I was making fireworks trying to figure out where it should go now
I'm waiting for my battery to charge at a local shop and I will hopefully be back at it tonight.
Attachments
Last edited:
If I'm not mistaken, that's not a starter, it's a starter solenoid or relay. Your new part looks much different than the old one. When you mix and match parts like that, I would think extra wires (or not enough) would be par for the course, lol. Good luck, I think you're gonna need it. Find out where that double black comes from and maybe you can figure out what to connect it to. Black is usually a ground but who knows on one of these bikes that's had multiple owners and changes made. I once got a bike that was completely rewired using ALL black wires, lol. That was a challenge.
VVLynden
XS650 Enthusiast
Well it fired up today!! Big blast of black gunk shot onto the garage floor, but it sounds like a beast! Can't wait to get it on the road, but gotta get brakes and new tires first. I'm just thrilled the engine runs and seems to be steady.
VVLynden
XS650 Enthusiast
Ok I'm on amazon trying to order tires, and from what i've read the stock sizes are 90-19 and 110-18 or 3.50 and 4.00. I selected http://www.amazon.com/Kenda-Challen...&newCar=1&s=automotive&vehicleType=motorcycle and Amazon says that won't fit my bike. Can anyone explain why? Or is amazon confused? When I ask for suggestions to my ride it links me to tires that are double or more the cost.. heh. Also, is it wise to get tires fitted at a shop if I have no experience with it?
You want a 100 for the front, not a 90. I see where Amazon says the 110 rear won't fit? Maybe because these originally had a 4.00 which is very hard to come by today. The 110 is the closest metric equivalent to the original 4.00 size so should fit no problem.
VVLynden
XS650 Enthusiast
Thank you for the swift reply 5twins, I wanted to get it ordered today.
To convert from the inch size to the metric, just multiply by 25.4. There are 25.4 mm to the inch.
So a 3.50 tire is 3.50 x 25.4 = 88.9 a 90/90-19 would be the correct replacement.
A 4.00 x 25.4 = 101.6 so a 100/90-18 is correct.
Most have found that going up one size on both tires improves the ride as well as handling. The bigger tires have a larger contact patch. Going two sizes or more the contact patch becomes too large. This makes turning in while cornering harder. Roling over sideways off the flatter contact patch to the more rounded sidewalls is harder.
Also tires have three sets of didits in the metric sizes. You have the first set of digits are ther tire width. This is expressed in mm, as in the 90 or 100. Or whatever the width is. Then you have the / to seperate the width from the aspect ratio. This is the ratio of the tire height from bead to tread to the width of the tire. Then the - to seperate the aspect ratio from the wheel size.
So a 110/90-18 tire is 110 mm wide, with a 90 aspect ratio, this is a percent, 90%, this makes the tire 905 tall as it is wide. 110 x 90% = 99. This tire is 99 mm tall bead to tread.
So saying 90-19 isn't a tire size. You left out part of the size.
So to get tires that fit look for a 90/90-19 or 100/90-19 for the front, a 100/90-18 or 110/90-18 for the rear. Unless your bike has a 16 inch rear trhen get a 130/90-16.
Leo
VVLynden
XS650 Enthusiast
Thank you for the explanation Leo. I went with 100/90-19 for the front and 110/90-18 for the rear. The previous tires were on the bike still and the rear was labeled as 4.00/85-18. Am I going to run into issues with the 85 vs 90 difference? I was also searching for information about inner tubes. The general consensus seems to be to match the rim size and the rest is a wash, within reason. I did find some 120/110/100-19 tubes which I imagine would be suitable for the front, but held off ordering until I got some more information. Some of the tube sizes are really wild, 450/350-18 or something along those lines. Is that just for a super fat rear tire or something?
Tubes are sized by width and wheel size. The one you found at 120-110-100 will be fine in your 100/90-19 tire. They will look smaller than your tire, this is ok, it will stretch and fit fine.
For the rear one marked 3.50-4.00 or 4.00-4.50 - 18 will work in the rear.
Remember how to convert from inch to metric. X by 25.4. as in 4.00 x 25.4 = 101.6.
Just be sure the valve stem matches what you have. Tubes come with a variety of valve stems. Rubber or steel. centered or side valve. Get the wrong one and it won't work. All the XS650 wheels use a steel centered valve stem.
Leo
I'm thinking your old tire may have been a Dunlop K-81? They came with some weird number designations on them. The 90 aspect ratio will work just fine for you as will the sizes you've chosen. Although by Leo's formulas, 90 on the front and 100 on the rear seem correct, they really are small compared to the originals.
Your assumption about tubes is correct. Since they expand so much when inflated, they are usually designated for a range of tire widths. I would stick within the tube's rating though. In other words, don't put a 3.00 tube in a 4.00 or 4.50 tire.
Your assumption about tubes is correct. Since they expand so much when inflated, they are usually designated for a range of tire widths. I would stick within the tube's rating though. In other words, don't put a 3.00 tube in a 4.00 or 4.50 tire.
felixcontour
XS650 Enthusiast
Just wondering if you sorted out the title issue yet. I used to live in Washington. There are three options: 3 year temporary registration with no title issued, 3 year with bond, or a ruling from a local court. You can read more about it here: http://apps.leg.wa.gov/wac/default.aspx?cite=308-56A-210
Basically, the idea is that they give any previous owners a chance to challenge your ownership. If you can find anyone that was previously titled on the bike though, they can fill out an affidavit of loss of title for you, and then when you go to the DOL they are pretty much issuing a brand new title in your name.
It's really not as difficult a process as you'd think. I think it helps to take some photos of the bike, including of the frame number, and print those out on printer paper and bring it in to assure the folks that it's a real bike.
Let me know if I can help in any way!
VVLynden
XS650 Enthusiast
Hey there Felix! I have not moved forward with the title yet. I was under the impression that the bike had to be road ready? Thanks for the advice though, much appreciated. Thankfully I know the family personally and the previous owner did mention she would have no problem helping me out. I know one of the first things suggested is to secure the title, but I have enough trust invested in the previous owner that it has curbed any anxiety towards the process. I will keep you guys updated pretty much every step of the way!
felixcontour
XS650 Enthusiast
It doesn't need to be running to transfer the title. You can do that, and then go back and register it to get plates when it's actually running. It really doesn't matter. You shouldn't have to take it to the State Patrol for an inspection or anything like that.
If the PO had title at one point, she should be able to just fill this out and get it notarized: http://www.dol.wa.gov/forms/420040.pdf
That will serve to transfer title and release interest. At that point, you shouldn't be required to post a bond, it'll be just like the PO transferred title as per normal to you.
Hope this is helpful. I don't think there's any reason to do it now versus later, but just wanted to get you the info. Good luck and keep us posted on the progress!
VVLynden
XS650 Enthusiast
@5twins
The front tire is a Dunlop Gold Seal F7 and the rear simply says 'Nankang' and was made in Taiwan. The new tires were shipped today, swung by a local shop and they charge 25 per wheel to put em together. They won't service old bikes, but will do the wheels if I remove them, which I was planning on doing anyhow. I can buy tubes and liners there.
This has definitely been a learning experience thus far, and an exercise in spending money wisely. Or not so wise, so far I have purchased uni filters that are way too long for my carbs and butt up against the battery (bye bye 30something bucks), 2 filters to go over the tube on the petcock that goes inside to the tank. There's no way they were going to get past the little cutout (only like 3 bucks so no biggie). Then I ordered a stock throttle cable and stock clutch cable. The clutch cable did attach and I think it will work after I lube it (duh should've done it first). The throttle cable on the other hand is WAY too long. Like I don't even know how it would have worked even if my bars weren't straight (both cables, another 30 bucks). This is all my own fault, but that's part of the process I suppose.
I have a bunch of old cat5 cable in the garage, I am thinking I can use that as a mock up for the length of the throttle cable, then have it specially made.