Just reread that Rob. Any chance you can give us some good pics of it compared to the others?but still noticeably different than the other three.
-
Enjoy XS650.com? Consider making a donation to help support the site.
XS650.com receives a small share of sales from some links on this page, but direct donations have a much greater impact on keeping this site going.
You are using an out of date browser. It may not display this or other websites correctly.
You should upgrade or use an alternative browser.
You should upgrade or use an alternative browser.
STANDARD issue…. a resurrection begins….
- Thread starter willis
- Start date
The valve in question is the right intake. It’s hart to tell in the pictures but the right intake valve sits almost flush with the collar. The other all protrude a little more.
Right intake

Right exhaust

Left intake

Left exhaust

Not sure if it’s worth mentioning but I will be running elephant foot adjuster on this motor.
Right intake
Right exhaust
Left intake
Left exhaust
Not sure if it’s worth mentioning but I will be running elephant foot adjuster on this motor.
I would recheck the half moon shaped ( is it keepers ) installation
taking care that the compressor is compressing enough so they fall in deep enough
no 2 don't look right
and upon loosening compressor slowly --- perhaps adjust keepers a little with a tool ... screwdriver
taking care that the compressor is compressing enough so they fall in deep enough
no 2 don't look right
and upon loosening compressor slowly --- perhaps adjust keepers a little with a tool ... screwdriver
I did not replace the retainers. I have to pull them all off again anyway to instal the seals, so I will have a look and compare. I do have the full set of both styles. I was aware of different valves and keepers, but not heard of different retainers.
Yeah, I honestly don't know if that's a thing or just my imagination. Be interesting to find out. It would explain why that one valve sits lower.I was aware of different valves and keepers, but not heard of different retainers.
EDIT: Didn't mean the valve sits lower... that's determined by the stem height from the seat. I meant the stem sittin' lower in the spring retainer... retainer sitting higher.
Last edited:
Yeah, I honestly don't know if that's a thing or just my imagination. Be interesting to find out. It would explain why that one valve sits lower.
Yeah, it *is* a thing, Jim.
Been so long ago, kinda fuzzy memory, but MikesXS offered a special spring retainer that set high like that right intake valve pic. Supposed to be used with certain race springs. A member in here ran into that, confused a lot of us. Those special retainers are likely floating around out there, and getting intermixed in the used parts stream.
Maybe someone remembers that thread...?
As Jan mentioned, pic #2, the right exhaust, doesn't look right. The valve is sticking up above the retainers more than all the others. Not sure if you did so, but after you install the springs, you're supposed to give the spring and valve a couple of good whacks on top with a rubber mallet. This bounces the valve in and out a little and seats the keepers. Or if they're not right, they might pop out. But, better now with this little test than later while it's running, lol.
+1 on that. That's a required test everywhere I've ever worked. A slightly different method....Not sure if you did so, but after you install the springs, you're supposed to give the spring and valve a couple of good whacks on top with a rubber mallet.
Lay a rag across the valve, Set some wood under the ends of the head to raise it so the valves don't smack your workbench, set a piece of wood on the valve stem and give the wood a good smack or two with a heavy ball peen.
As careful as you can be, I've still seen springs, keepers and spring retainers fly out... the rag stops 'em earning frequent flyer miles.
As 5twins says, if they're gonna fly out, it's best they do now so you can fix it rather than... you know...
I did give them the smack test and that’s picture was after. I’ll get a closer look when I install the guide seals, but I’ve been down sick. Maybe this weekend.
The offending valve looks to have different hardware. Are the keepers different?
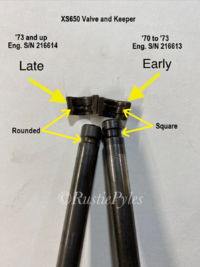
Be sure to check that right exhaust valve (pic 2). That's the only one that looks wrong to me, sticking out of the retainers more than any of the other three. Early square retainers on a late round retainer valve maybe?
5T you nailed it. Upon disassembly I discovered the right exhaust had the wrong keepers, exactly as you suggested.


Installed valve seals and threw it all back together again. You can easily spot the replaced valve just by how it sits in the retainer, but looks like it should operate fine.


Installed valve seals and threw it all back together again. You can easily spot the replaced valve just by how it sits in the retainer, but looks like it should operate fine.
5T you nailed it.
I'm sure that 5Twins has much better things to do, but it would be great to have him always looking over my shoulder when I'm working on my XS650's.
Heck, he only lives just down the street !
")
.
.
Last edited:
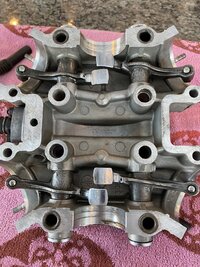
With the heads reassembled it’s time to move to the rocker box. I have a set of CB Performance Elephant foot adjusters left over from a previous build, so why not? These rocker arm pivot shafts were really in there. I made up a shade tree puller system that worked, but took some time. It is nothing more than an Allen head bolt, an old shock washer, and a series of spacers of varying thicknesses.


It’s was a bit tedious extracting, backing off to adjust different spacers, extracting, changing spacers….. but it got the job done.

After a good cleaning, I’m ready for reassembly. These are a separate set of rocker arms that I had previously modified for the elephant feet. Only three of the four are done. I need to get a new grinding stone for finish the last arm. I hope to get that one done later this week. Getting closer though


A quick question though. On the rocker shaft end plugs, are the orings just standard, or are they a special square? The old ones came out retaining a square profile. I’m just not sure if that’s from decades of sitting under pressure in that shape though.
It’s was a bit tedious extracting, backing off to adjust different spacers, extracting, changing spacers….. but it got the job done.
After a good cleaning, I’m ready for reassembly. These are a separate set of rocker arms that I had previously modified for the elephant feet. Only three of the four are done. I need to get a new grinding stone for finish the last arm. I hope to get that one done later this week. Getting closer though
A quick question though. On the rocker shaft end plugs, are the orings just standard, or are they a special square? The old ones came out retaining a square profile. I’m just not sure if that’s from decades of sitting under pressure in that shape though.
Attachments
Last edited:
Looking good! It’s funny, I found that the first time I built my XS2 motor, I was so worried about getting everything right that I found if stressful. The second time , it just flew together. Lately I find myself daydreaming about building another motor!  I even spend time , just watching other guys build motors on YouTube.
I even spend time , just watching other guys build motors on YouTube.The rocker end cap o-rings are normal round ones, at least they start out that way, lol. Here's a Vesrah gasket kit contents listing but I think they got the size wrong. An early shop manual lists it as 2.5 x 17, which makes more sense and is a listed size from o-ring suppliers .....

I have some that fit from a gasket kit but they were not labeled. Just wanted to be sure I didn’t overlook something there.
Last edited:
The slow grind continues. I still haven’t put my motor together yet as my shop is in total disarray. It’s all mocked up but waiting till I have a a clean work area to button it up. But we had 70 degree weather yesterday and in the 60s today. So after putting brakes on the wife’s car today I spent a few hours out in the shop. All winter I’ve had my mower with snowblower attachment in my shop which has made things very tight. So today it was moved out to the storage barn!! After a quick cleanup I tackled a few small jobs. I got the center stand and front motor mount painted and installed. The bike is much more secure now that it’s not on 4x4 blocks.

I also tackled cleaning the alternator engine cover. Started with paint stripper the clean off the factory clear coat. Followed with a Nyloc wheel in the drill press.


Not happy with the inconsistent finish, I hit it with 320 grit on my palm sander. Once it was uniform I washed it well and rubbed it down with very fine scotch bright pad. I’m going to use a more brushed finish as it will be easier to maintain than polished. I’m happy with the results.


Finally, I pulled the starter motor to inspect. It was pretty filthy. Doing my best to clean the inside with some mineral spirits and a toothbrush. I cleaned the end caps on a wire wheel in the drill press. Also hit the body shell with a quick coat of paint. It’s looking good and will button it back up once the paint dries this week.


It’s a slow burn but progress marches on.
I also tackled cleaning the alternator engine cover. Started with paint stripper the clean off the factory clear coat. Followed with a Nyloc wheel in the drill press.
Not happy with the inconsistent finish, I hit it with 320 grit on my palm sander. Once it was uniform I washed it well and rubbed it down with very fine scotch bright pad. I’m going to use a more brushed finish as it will be easier to maintain than polished. I’m happy with the results.
Finally, I pulled the starter motor to inspect. It was pretty filthy. Doing my best to clean the inside with some mineral spirits and a toothbrush. I cleaned the end caps on a wire wheel in the drill press. Also hit the body shell with a quick coat of paint. It’s looking good and will button it back up once the paint dries this week.
It’s a slow burn but progress marches on.
Similar threads
- Replies
- 61
- Views
- 2K